WINDSHIELD GLASS INSTALLATION
CAUTION / NOTICE / HINT
Note
When replacing the windshield glass of a vehicle equipped with a forward recognition camera, make sure to use a Toyota genuine part. If a non-Toyota genuine part is used, the forward recognition camera may not be able to be installed due to a missing bracket, or the forward recognition camera system, lane departure alert system, road sign assist system or pre-collision system may not operate properly due to a difference in the transmissivity of the windshield glass or the shape of the black ceramic border.
Tech Tips
-
Use the same procedure for RHD and LHD vehicles.
-
The procedures listed below are for LHD vehicles.
-
A bolt without a torque specification is shown in the standard bolt chart.
PROCEDURE
-
CLEAN WINDSHIELD GLASS
-
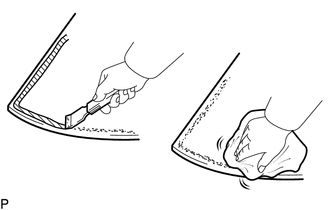
When reusing the windshield glass:
Using a scraper, remove the stoppers, adhesive dam, moulding, adhesive and double-sided tape sticking to the windshield glass.
Note
Do not damage the windshield glass.
-
Clean the outer edges of the windshield glass with non-residue solvent.
Note
Even if using a new windshield glass, clean it with non-residue solvent.
-
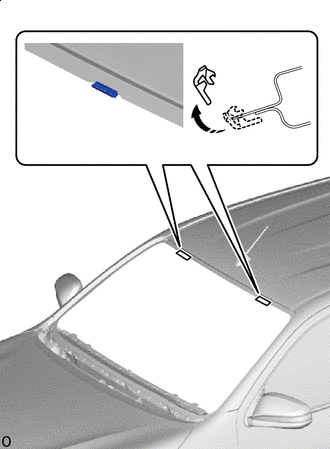

Remove in this Direction for 2-piece Type:
Remove the 2 windshield glass stoppers.
Note
Make sure to replace the installed windshield glass stoppers with new ones.
-
-
INSTALL WINDSHIELD GLASS STOPPER
-
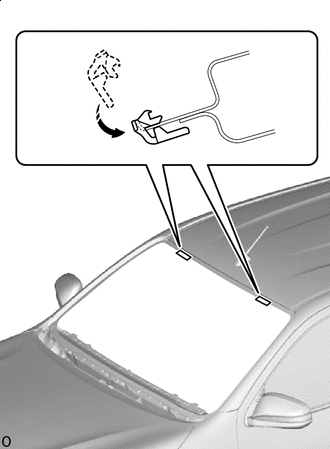
Install in this Direction Install 2 new windshield glass stoppers to the vehicle body as shown in the illustration.
Note
Only 2-piece type windshield glass stoppers are supplied. Therefore, it is necessary to use the 2-piece type windshield glass stoppers even on vehicles with 1-piece type windshield glass stoppers.
-
-
INSTALL NO. 2 WINDSHIELD GLASS STOPPER
Tech Tips
The supplied No. 2 windshield glass stoppers are the 2-piece type. Therefore, it is necessary to use the 2-piece type No. 2 windshield glass stoppers on vehicles with the 1-piece type windshield glass stoppers.
-
Apply Primer G to the No. 2 windshield glass stopper installation area on the windshield glass.
Note
Do not apply too much Primer G.
-
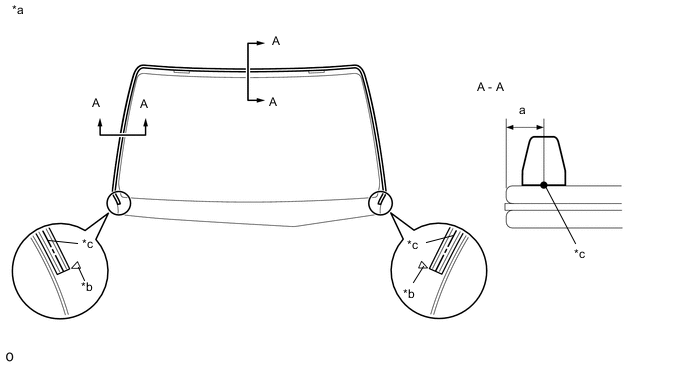
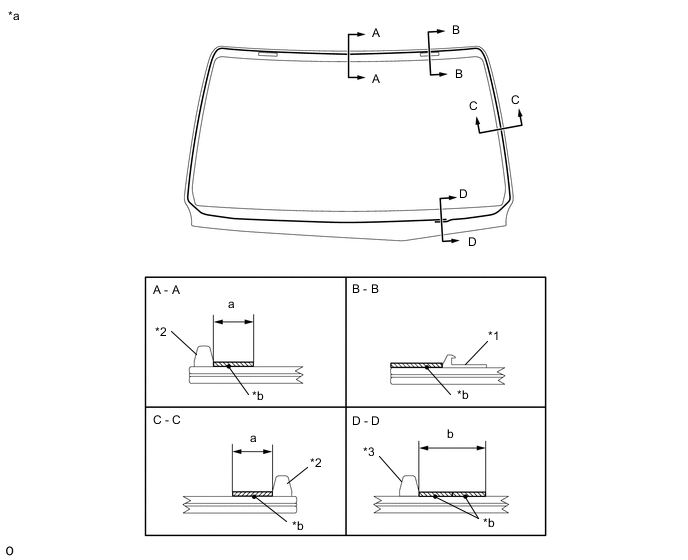
Install 2 new No. 2 windshield glass stoppers to the windshield glass in the locations shown in the illustration.
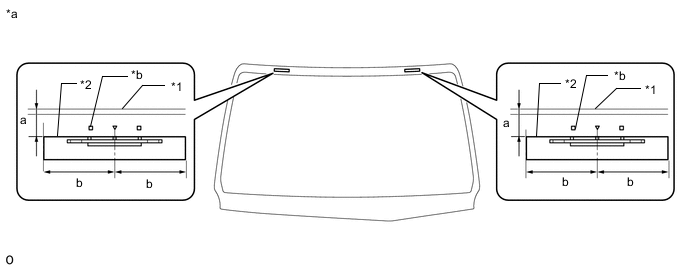
*1 Windshield Glass *2 No. 2 Windshield Glass Stopper *a Back of Windshield Glass *b Ceramic Notch Standard Area Measurement a 14.8 mm (0.583 in.) b 40.0 mm (1.57 in.) Note
-
Install the No. 2 windshield glass stopper after Primer G has been allowed to dry (approximately 3 min).
-
Make sure to install the No. 2 windshield glass stopper in the correct orientation.
-
-
-
INSTALL WINDOW GLASS ADHESIVE DAM
Tech Tips
The supplied window glass adhesive dam is a 1-piece type. Therefore, it is necessary to use the 1-piece type window glass adhesive dam on vehicles with the 3-piece type window glass adhesive dam.
-
Apply Primer G to the windshield glass adhesive dam installation area on the windshield glass.
Note
Do not apply too much Primer G.
-
When removing the peeling paper of a new windshield glass adhesive dam, make sure that it does not contact the adhesive surface.
-
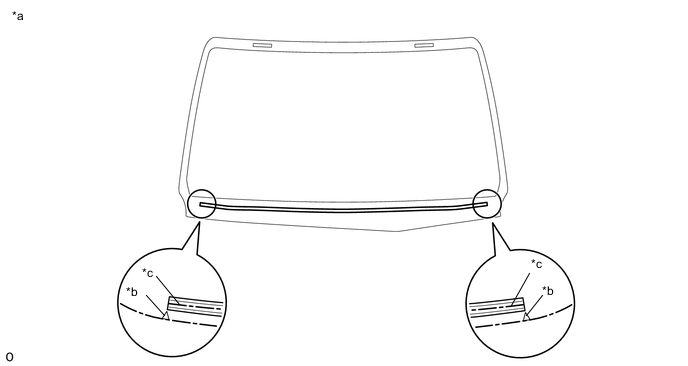
Install the windshield glass adhesive dam to the windshield glass in the location shown in the illustration.
*a Back of Windshield Glass *b Ceramic Notch *c Window Glass Adhesive Dam Center Line - - Standard Area Measurement a 4.6 mm (0.181 in.) Note
Install the upper windshield outside moulding after Primer G has been allowed to dry (approximately 3 min).
-
-
INSTALL NO. 2 WINDOW GLASS ADHESIVE DAM
-
Apply Primer G to the No. 2 window glass adhesive dam installation area on the windshield glass.
Note
Do not apply too much Primer G.
-
When removing the peeling paper of a new No. 2 window glass adhesive dam, make sure that it does not contact the adhesive surface.
Note
Install the No. 2 window glass adhesive dam after Primer G has been allowed to dry (approximately 3 min).
-
Install the No. 2 window glass adhesive dam to the windshield glass in the location shown in the illustration.
*a Back of Windshield Glass *b Ceramic Notch *c Window Glass Adhesive Dam Center Line - -
-
-
INSTALL WINDSHIELD GLASS
-
*1 Vehicle Body 
Adhesive Clean and shape the contact surface of the vehicle body.
-
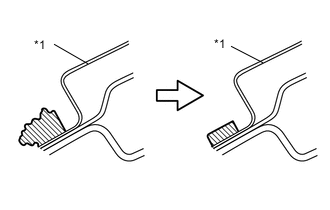
On the contact surface of the vehicle body, use a knife to cut away excess adhesive as shown in the illustration.
Tech Tips
Leave as much adhesive on the vehicle body as possible.
Note
Be careful not to damage the vehicle body.
-
Clean the contact surface of the vehicle body with cleaner.
Tech Tips
Even if all the adhesive has been removed, clean the vehicle body.
-
-
Windshield glass preliminary installation procedures.
-
Install the suction cups to the windshield glass.
-
Temporarily place the windshield glass onto the vehicle body and set it so that the gap between the body and the upper portion and sides of the windshield glass is even.
-
*a Matchmarks When using a new windshield glass:
Place adhesive tape on the windshield glass and body panel and use a pen to place matchmarks for installation.
Note
From the interior, check that the No. 2 windshield glass stopper and vehicle body are attached.
Tech Tips
When reusing a windshield glass, check the position of the matchmarks and make adjustments.
-
Remove the windshield glass.
-
-
Apply Primer M to the exposed part of the vehicle body.
Note
-
Do not apply too much Primer M.
-
Do not apply Primer M to the adhesive.
-
Be careful when applying primer to the panel joints and spot welds.
-
-
Apply primer G to the windshield glass in the locations shown in the illustration.
*1 No. 2 Windshield Glass Stopper *2 Window Glass Adhesive Dam *3 No. 2 Window Glass Adhesive Dam - - *a Back of Windshield Glass *b Adhesive Application Center Line Primer G Application Area - - Standard Area Measurement a 11.0 mm (0.433 in.) or more b 19.0 mm (0.748 in.) or more Note
Do not apply too much Primer G.
-
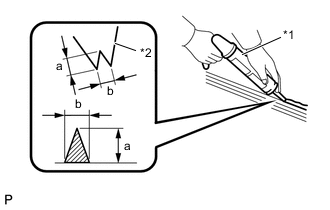
*1 Sealer Gun *2 Nozzle Cut off the tip of a cartridge nozzle as shown in the illustration.
Standard Area Measurement a 12.0 mm (0.472 in.) b 8.0 mm (0.315 in.) -
Load a sealer gun with the cartridge.
-
Apply a bead of adhesive to the location shown in the illustration.
Note
Apply the adhesive after Primer G has been allowed to dry (approximately 3 min).
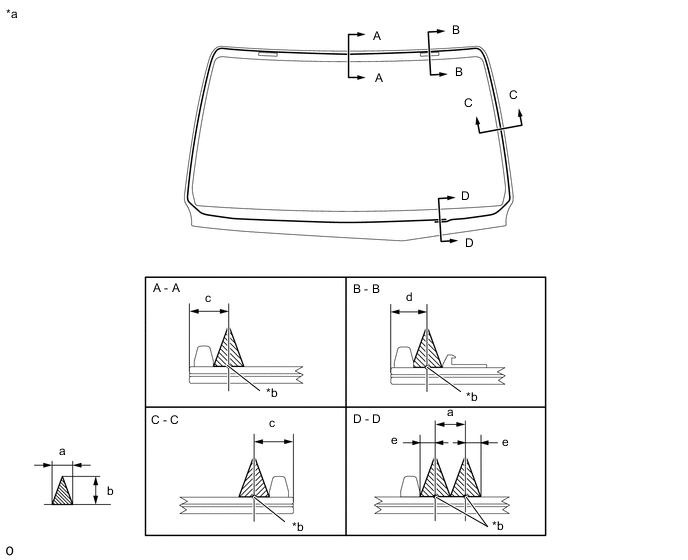
*a Back of Windshield Glass *b Adhesive Application Center Line Adhesive - - Standard Area Measurement a 8.0 mm (0.315 in.) b 12.0 mm (0.472 in.) c 11.1 mm (0.437 in.) d 10.0 mm (0.394 in.) e 4.0 mm (0.157 in.) -
Install windshield glass.
-
Using suction cups, position the windshield glass so that the matchmarks are aligned and install the windshield glass.
Note
Install the windshield glass after Primer M on the vehicle body has been allowed to dry (approximately 3 min).
-
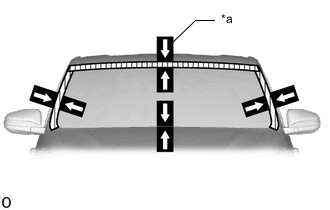
Lightly press the front surface of the windshield glass so that it is securely fit to the vehicle body.
Tech Tips
Press the glass with a force of 98 N (10 kgf, 22 lbf) or more.
-
Using a scraper, remove any excess adhesive or apply as necessary.
Note
Apply adhesive up to the edge of the windshield glass.
-
Remove any excess adhesive before it hardens.
-
Hold the windshield glass in place securely with protective tape or equivalent until the adhesive hardens.
Tech Tips
Follow the instructions for each adhesive manufacturer or the corresponding owner's manual for the minimum amount of time necessary prior to driving the vehicle.
-
-
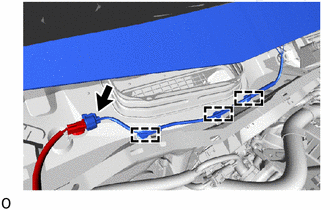
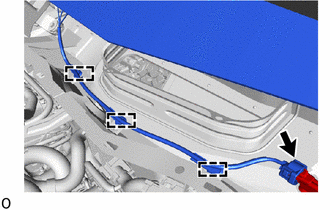
w/ Windshield Deicer System:
-
Attach the wire harness clamp and connect the connector.
-
for LHD:
-
for RHD:
-
-
-
-
CHECK FOR LEAKS AND REPAIR
-
Conduct a leak test after the adhesive has completely hardened.
-
Seal any leaks with auto glass sealer.
-
Remove any protective or adhesive tape.
-
-
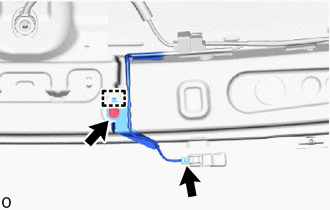
CONNECT ANTENNA CORD SUB-ASSEMBLY (w/ Digital Audio Broadcasting Antenna)
-
Attach the guide and install the bolt.
-
Connect the connector.
-
-
INSTALL ROOF HEADLINING ASSEMBLY
-
for Double Cab:
-
for Single Cab:
-
for Smart Cab:
-
-
INSTALL ASSIST GRIP SUB-ASSEMBLY
-
INSTALL VISOR ASSEMBLY LH
-
INSTALL VISOR ASSEMBLY RH
-
INSTALL VISOR BRACKET COVER LH
-
INSTALL VISOR BRACKET COVER RH
-
INSTALL NO. 1 ROOM LIGHT ASSEMBLY
-
INSTALL MAP LIGHT ASSEMBLY
-
INSTALL INNER REAR VIEW MIRROR ASSEMBLY
-
INSTALL FORWARD RECOGNITION HOOD (w/ Camera Heater)
-
INSTALL FORWARD RECOGNITION CAMERA (w/ Lane Departure Alert System)
-
INSTALL FORWARD RECOGNITION LATCH (w/ Lane Departure Alert System)
-
INSTALL NO. 1 FORWARD RECOGNITION COVER (w/ Lane Departure Alert System)
-
INSTALL FRONT PILLAR GARNISH LH
-
INSTALL FRONT PILLAR GARNISH RH
-
INSTALL ASSIST GRIP SUB-ASSEMBLY (w/ Assist Grip)
-
INSTALL COWL TOP VENTILATOR LOUVER SUB-ASSEMBLY
-
INSTALL FRONT FENDER TO COWL SIDE SEAL LH
-
INSTALL FRONT FENDER TO COWL SIDE SEAL RH
Tech Tips
Use the same procedure described for the LH side.
-
INSTALL FENDER APRON MUDGUARD SEAL SUB-ASSEMBLY LH
-
INSTALL FENDER APRON MUDGUARD SEAL SUB-ASSEMBLY RH
Tech Tips
Use the same procedure described for the LH side.
-
INSTALL FRONT WIPER ARM AND BLADE ASSEMBLY LH
-
INSTALL FRONT WIPER ARM AND BLADE ASSEMBLY RH
-
INSTALL FRONT WIPER ARM HEAD CAP
-
CONNECT CABLE TO NEGATIVE BATTERY TERMINAL
Note
When disconnecting the cable, some systems need to be initialized after the cable is reconnected.
-
ADJUST FORWARD RECOGNITION CAMERA
-
If the forward recognition camera has been replaced with a new one or the windshield glass has been removed and installed, it is necessary to perform Recognition Camera/Target Position Memory and Recognition Camera Axis Adjust.
-