FRONT SEATBACK HEATER INSTALLATION
CAUTION / NOTICE / HINT
CAUTION:
-
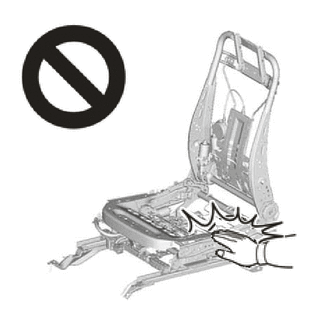
Wear protective gloves. Sharp areas on the parts may injure your hands.
-
There is risk of injury.
-
If the front seat side airbag was deployed, replace the front seat airbag assembly, separate type front seatback frame sub-assembly, separate type front seatback cover and separate type front seatback pad with the necessary parts in accordance with the extent of the collision damage.
-
Replace any other damaged parts as necessary.
Tech Tips
-
Use the same procedure for the RH and LH sides.
-
The procedure listed below is for the LH side.
PROCEDURE
-
INSTALL SEPARATE TYPE FRONT SEATBACK COVER
-
for Basic Style:
-
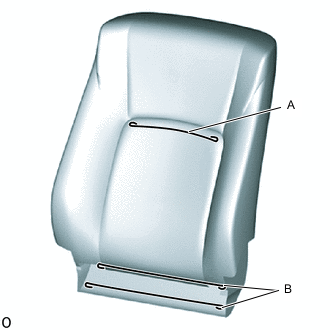
Install the seat cover wire.
Tech Tips
-
There are service parts available for wires of 1000 mm or longer and formed wires.
-
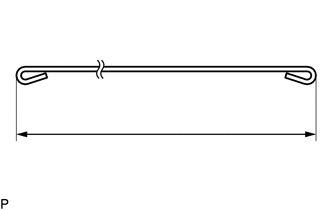
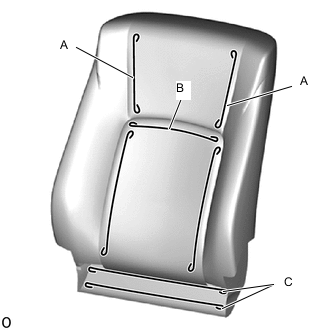
When a wire that is less than 1000 mm (3.28 ft.) in length is needed, cut and shape a 1000 mm supplied wire into the dimensions shown in the illustration.
-
Refer to the precautions when creating a wire.
Length A 290 mm (11.42 in.) B 420 mm (1.38 ft.) Tech Tips
The dimensions shown in the illustration are the length.
-
-
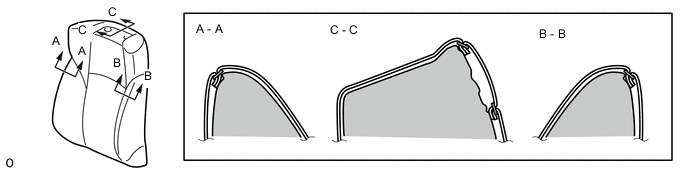
Install the separate type front seatback cover.
Tech Tips
-
Refer to the precautions on wrinkles to avoid creating any on the separate type front seatback cover when installing the seat cover.
-
As shown in the illustration, fix all of the cover seam allowances in the same direction.
-
-
Set the separate type front seatback cover.
-
Using hog ring pliers, install the separate type front seatback cover with 6 new hog rings in the order shown in the illustration.
Tech Tips
-
Do not dirty or damage the separate type front seatback cover.
-
Securely tighten the hog rings as shown in the illustration while making sure wrinkles do not form in the center of the fabric and separate type front seatback pad.
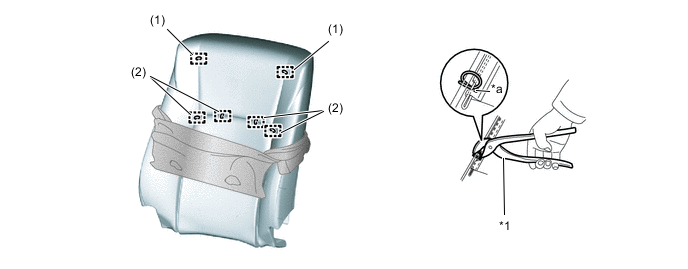
*1 Hog Ring Pliers - - *a Cutout - - -
-
-
for High Style:
-
Install the seat cover wire.
Tech Tips
-
There are service parts available for wires of 1000 mm or longer and formed wires.
-
When a wire that is less than 1000 mm (3.28 ft.) in length is needed, cut and shape a 1000 mm supplied wire into the dimensions shown in the illustration.
-
Refer to the precautions when creating a wire.
Length A 170 mm (6.70 in.) B 290 mm (11.42 in.) C 420 mm (1.38 ft.) Tech Tips
The dimensions shown in the illustration are the length.
-
-
Install the separate type front seatback cover.
Tech Tips
-
Refer to the precautions on wrinkles to avoid creating any on the separate type front seatback cover when installing the seat cover.
-
As shown in the illustration, fix all of the cover seam allowances in the same direction.
-
-
Set the separate type front seatback cover.
-
Using hog ring pliers, install the separate type front seatback cover with 12 new hog rings in the order shown in the illustration.
Tech Tips
-
Do not dirty or damage the separate type front seatback cover.
-
Securely tighten the hog rings as shown in the illustration while making sure wrinkles do not form in the center of the fabric and separate type front seatback pad.
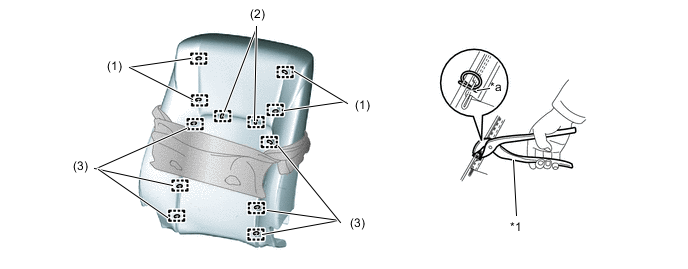
*1 Hog Ring Pliers - - *a Cutout - - -
-
-
-
INSTALL SEATBACK COVER WITH PAD
for Manual Seat:
for Power Seat:
-
INSTALL FRONT SEAT HEADREST SUPPORT
for Manual Seat:
for Power Seat:
-
INSTALL FRONT NO. 1 SEATBACK HOOK (w/ Front No. 1 Seatback Hook)
for Manual Seat:
for Power Seat:
-
INSTALL FRONT SEATBACK FRAME SUB-ASSEMBLY LH
for Manual Seat:
for Power Seat:
-
INSTALL FRONT SEAT INNER BELT ASSEMBLY LH
for Manual Seat:
for Power Seat:
-
INSTALL FRONT SEAT INNER CUSHION SHIELD LH
for Manual Seat:
for Power Seat:
-
INSTALL FRONT SEAT CUSHION SHIELD LH
for Manual Seat:
for Power Seat:
-
INSTALL FRONT SEAT INNER NO. 1 CUSHION SHIELD LH (for Power Seat)
-
INSTALL POWER SEAT SWITCH KNOB LH (for Reclining, for Power Seat)
-
INSTALL POWER SEAT SWITCH KNOB LH (for Slide and Vertical, Lifter, for Power Seat)
-
INSTALL VERTICAL ADJUSTING HANDLE LH (for Manual Seat)
-
INSTALL RECLINING ADJUSTER RELEASE HANDLE LH (for Manual Seat)
-
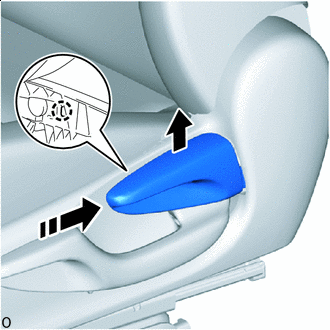

Install in this Direction With the reclining adjuster release handle LH pulled up.
-
Push in the installation direction shown in the illustration and attach the claw to install the reclining adjuster release handle LH.
-
-
INSTALL FRONT SEAT HEADREST ASSEMBLY
for Manual Seat:
for Power Seat:
-
INSTALL FRONT SEAT ASSEMBLY LH
for Manual Seat:
for Power Seat: