CAUTION / NOTICE / HINT
-
Wear protective gloves. Sharp areas on the parts may injure your hands.
-
There is risk of injury.
-
If the front seat side airbag was deployed, replace the front seat airbag assembly, separate type front seatback frame sub-assembly, separate type front seatback cover and separate type front seatback pad with the necessary parts in accordance with the extent of the collision damage.
-
Replace any other damaged parts as necessary.
-
Use the same procedure for RHD and LHD vehicles.
-
The procedures listed below are for LHD vehicles.
-
Use the same procedure for the RH and LH sides.
-
The procedure listed below is for the LH side.
PROCEDURE
- Click here
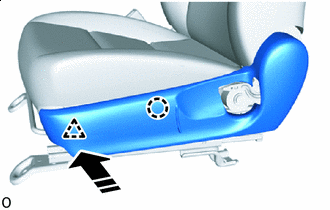
INSTALL SEAT TRACK HANDLE SUB-ASSEMBLY LH
-
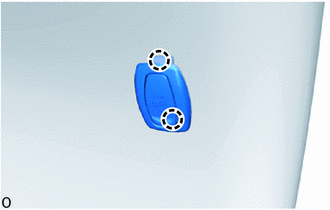
Attach the claw and install the seat track handle sub-assembly LH.
-
- Click here
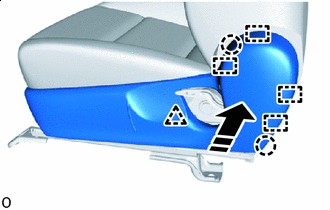
INSTALL FRONT SEAT CUSHION SPRING SUB-ASSEMBLY LH
-
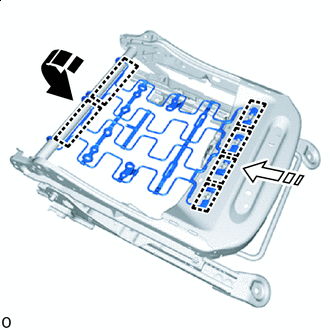

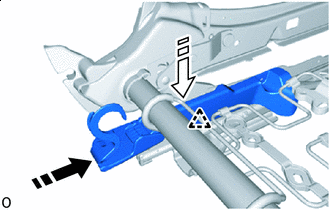
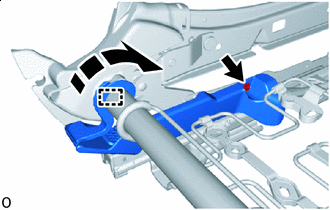
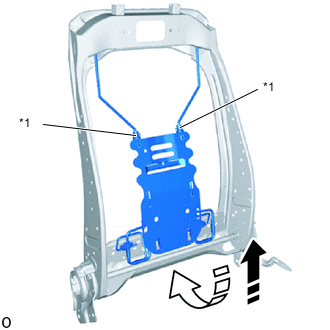
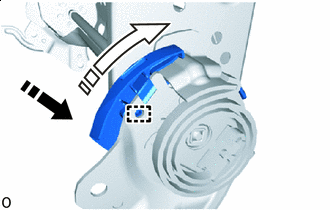
Install in this Direction (1) 
Install in this Direction (2) While rotating the part in install direction (1) shown in the illustration, attach the hook.
-
Push in Install direction (2) shown in the illustration to attach the hook and install the front seat cushion spring sub-assembly LH.
-
- Click here
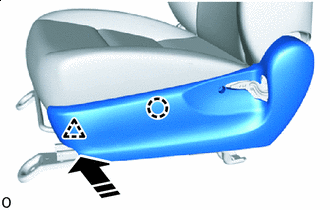
INSTALL FRONT SEAT CUSHION EDGE PROTECTOR LH
-
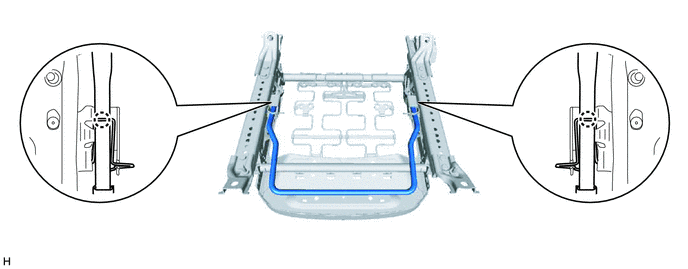
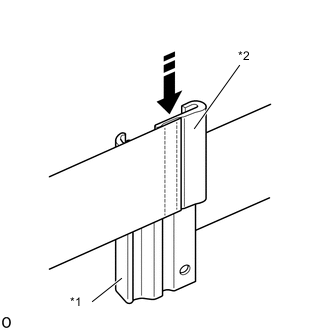
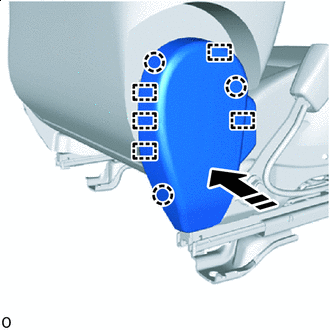
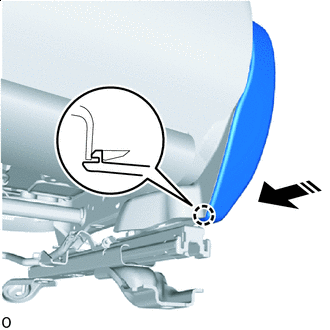
Install in this Direction (1) Install in this Direction (2) Push in installation direction (1) shown in the illustration to attach the guide.
-
While expanding the part in installation direction (2) shown in the illustration, attach the claw.
-
Install the front seat cushion edge protector LH with the screw.
-
- Click here
INSTALL FRONT SEAT CUSHION EDGE PROTECTOR RH
Tip:Use the same procedure as for the LH side.
- Click here
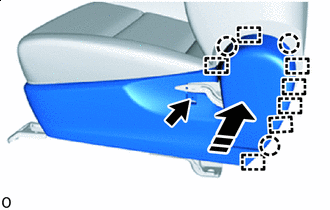
INSTALL FRONT SEAT LOWER CUSHION SHIELD LH (w/ Vertical Adjusting Handle LH)
-
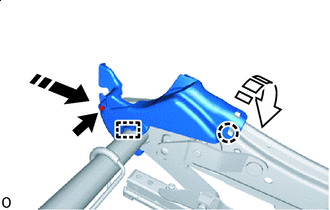
Install in this Direction (1) Install in this Direction (2) Push in the installation direction (1) shown in the illustration.
-
Push in the installation direction (2) shown in the illustration to attach the clip.
-
Install in this Direction Push the guide in the installation direction shown in the illustration.
-
Install the front seat lower cushion shield LH with the screw.
-
- Click here
INSTALL FRONT SEAT LOWER CUSHION SHIELD RH (w/ Vertical Adjusting Handle LH)
Tip:Use the same procedure as for the LH side.
- Click here
INSTALL SEAT COVER WIRE
-
Install the seat cover wire.
Tip:
-
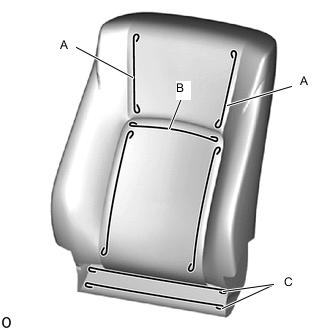
There are service parts available for wires of 1000 mm or longer and formed wires.
-
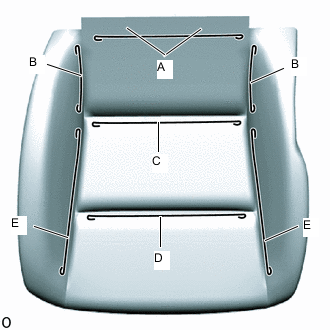
When a wire that is less than 1000 mm (3.28 ft.) in length is needed, cut and shape a 1000 mm supplied wire into the dimensions shown in the illustration.
-
Refer to the precautions when creating a wire.
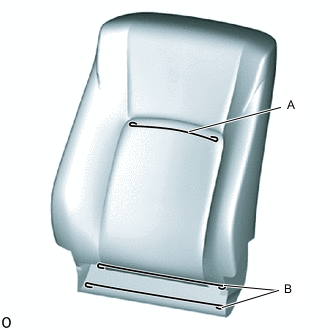
Length A 170 mm (6.70 in.) B 150 mm (5.91 in.) C 230 mm (9.06 in.) D 270 mm (10.63 in.) E 290 mm (11.42 in.) Tip: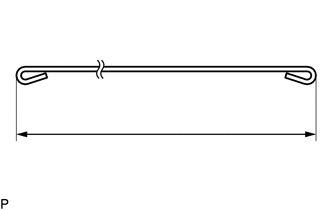
The dimensions shown in the illustration are the length.
-
-
- Click here
INSTALL SEPARATE TYPE FRONT SEAT CUSHION COVER
Tip:
-
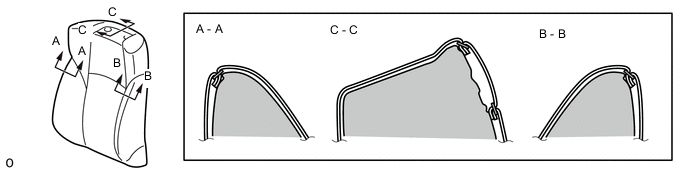
Refer to the precautions on wrinkles to avoid creating any on the separate type front seat cushion cover when installing the seat cover.
-
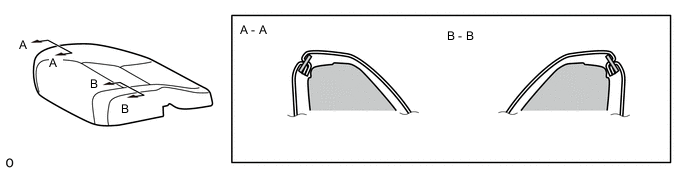
As shown in the illustration, fix all of the cover seam allowances in the same direction.
-
Temporarily install the separate type front seat cushion cover to the separate type front seat cushion pad.
-
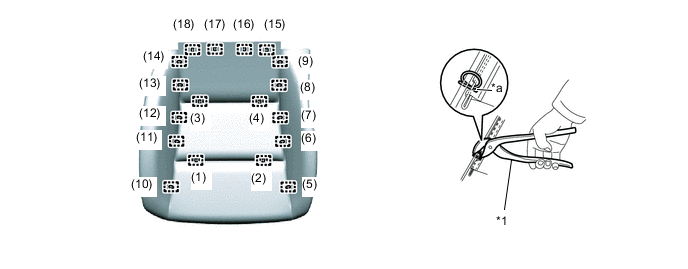
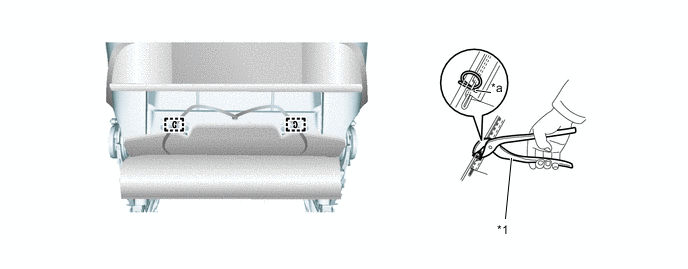
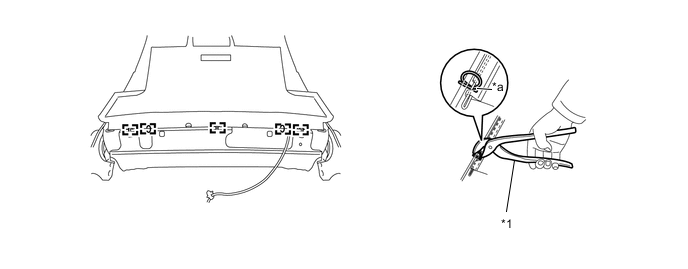
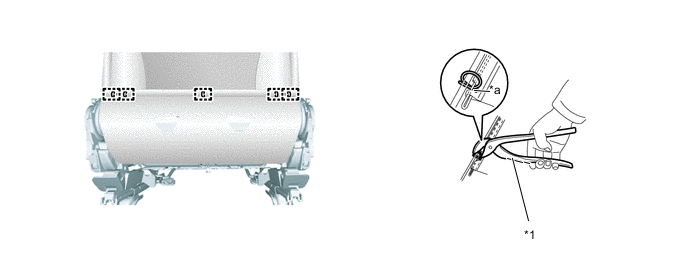
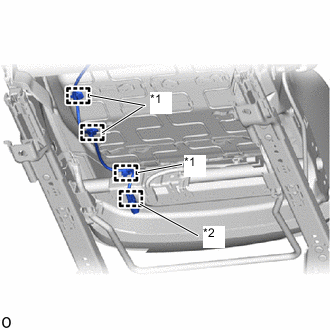
*1 Hog Ring Pliers - - *a Cutout - - Using hog ring pliers, install the separate type front seat cushion cover to the separate type front seat cushion pad with 18 new hog rings in the order shown in the illustration.
-
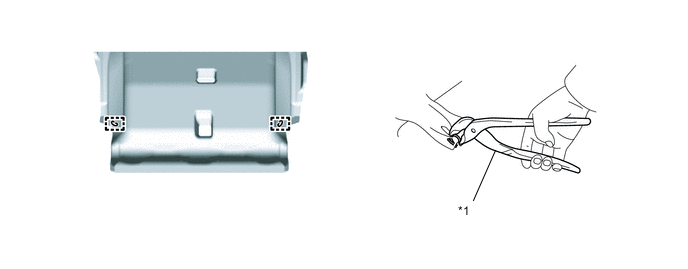
*1 Hog Ring Pliers - - Using hog ring pliers, connect the 2 straps of the separate type front seat cushion cover to the separate type front seat cushion pad with 2 new hog rings.
Tip:
-
Do not dirty or damage the separate type front seatback cover.
-
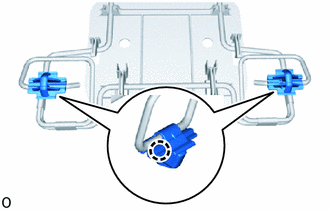
Securely tighten the hog rings as shown in the illustration while making sure wrinkles do not form in the center of the fabric and separate type front seatback pad.
-
-
- Click here
INSTALL SEAT CUSHION COVER WITH PAD
-

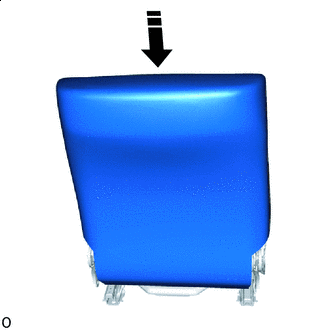
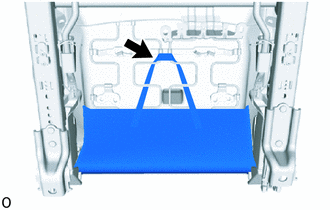
While sliding the part in the direction indicated by the arrow shown in the illustration, align the J hook to install the seat cushion cover with pad.
-
- Click here
INSTALL FRONT SEATBACK EDGE PROTECTOR (for Lo-back Seat Type)
-
Attach the claw to Install the 2 front seatback edge protectors.
-
- Click here
INSTALL FRONT SEATBACK SPRING SUB-ASSEMBLY LH (for Lo-back Seat Type)
-
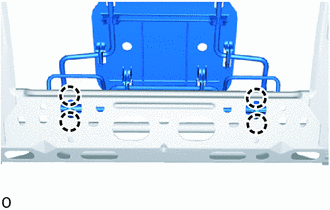
*1 Front No. 2 Seatback Hook Install in this Direction (1) Install in this Direction (2) Temporarily install the 2 front No. 2 seatback hooks to the front seatback spring sub-assembly LH.
-
Push in installation direction (1) shown in the illustration to install the front seatback spring sub-assembly LH.
-
Push in installation direction (2) shown in the illustration to temporarily the front seatback spring sub-assembly LH.
-
Attach the claw and install the 2 front seatback edge protectors.
-
- Click here
INSTALL FRONT NO. 2 SEATBACK HOOK (for Lo-back Seat Type)
-
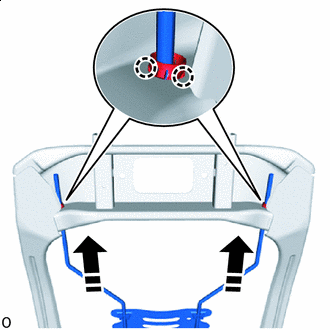
Install in this Direction Push up installation direction shown in the illustration to attach the claw to install the 2 front No. 2 seatback hooks.
-
- Click here
INSTALL FRONT SEAT AIRBAG ASSEMBLY LH (w/ Side Airbag System)
- Click here
INSTALL SEAT COVER WIRE
-
Install the seat cover wire.
Tip:
-
There are service parts available for wires of 1000 mm or longer and formed wires.
-
When a wire that is less than 1000 mm (3.28 ft.) in length is needed, cut and shape a 1000 mm supplied wire into the dimensions shown in the illustration.
-
Refer to the precautions when creating a wire.
-

for Hi-back Seat Type:
Length A 150 mm (5.91 in.) B 290 mm (11.42 in.) C 420 mm (1.38 ft.) Tip:
The dimensions shown in the illustration are the length.
-
for Lo-back Seat Type, for Basic Style:
Length A 290 mm (11.42 in.) B 420 mm (1.38 ft.) Tip:
The dimensions shown in the illustration are the length.
-
for Lo-back Seat Type, for High Style:
Length A 170 mm (6.70 in.) B 200 mm (7.87 in.) C 420 mm (1.38 ft.) Tip:
The dimensions shown in the illustration are the length.
-
-
- Click here
INSTALL SEPARATE TYPE FRONT SEATBACK COVER
Tip:
-
Refer to the precautions on wrinkles to avoid creating any on the separate type front seatback cover when installing the seat cover.
-
As shown in the illustration, fix all of the cover seam allowances in the same direction.
-
Set the separate type front seatback cover.
-
for Hi-back Seat Type:
-
Using hog ring pliers, install the separate type front seatback cover with 8 new hog rings in the order shown in the illustration.
Tip: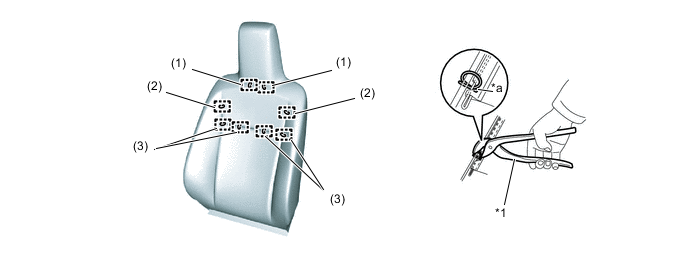
*1 Hog Ring Pliers - - *a Cutout - -
-
Do not dirty or damage the separate type front seatback cover.
-
Securely tighten the hog rings as shown in the illustration while making sure wrinkles do not form in the center of the fabric and separate type front seatback pad.
-
-
-
for Lo-back Seat Type, Basic Style:
-
Using hog ring pliers, install the separate type front seatback cover with 6 new hog rings in the order shown in the illustration.
Tip: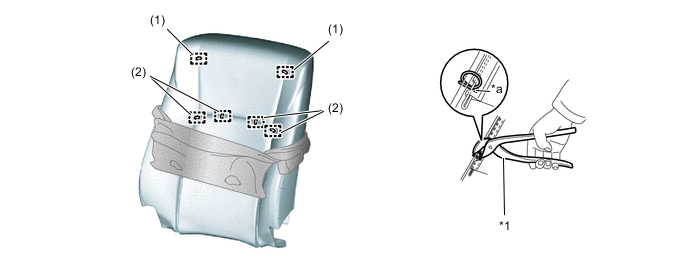
*1 Hog Ring Pliers - - *a Cutout - -
-
Do not dirty or damage the separate type front seatback cover.
-
Securely tighten the hog rings as shown in the illustration while making sure wrinkles do not form in the center of the fabric and separate type front seatback pad.
-
-
-
for Lo-back Seat Type, High Style:
-
Using hog ring pliers, install the separate type front seatback cover with 12 new hog rings in the order shown in the illustration.
Tip: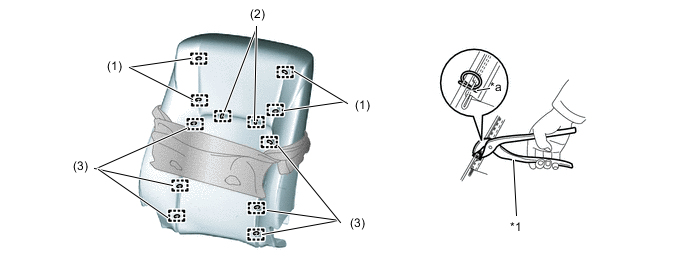
*1 Hog Ring Pliers - - *a Cutout - -
-
Do not dirty or damage the separate type front seatback cover.
-
Securely tighten the hog rings as shown in the illustration while making sure wrinkles do not form in the center of the fabric and separate type front seatback pad.
-
-
-
- Click here
INSTALL SEATBACK COVER WITH PAD
-
for Hi-back Seat Type:
-
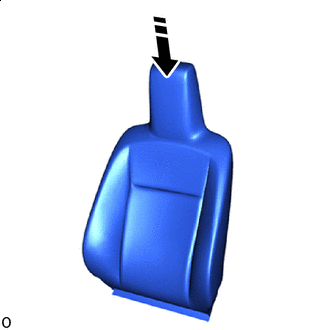
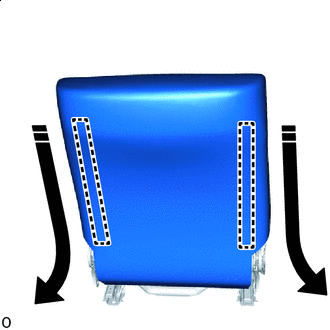
Install in this Direction Push in installation direction shown in the illustration to temporarily install the seatback cover with pad.
-
-
for Lo-back Seat Type:
-
Install in this Direction Push in installation direction shown in the illustration to temporarily install the seatback cover with pad.
-
-
w/ Side Airbag System:
-
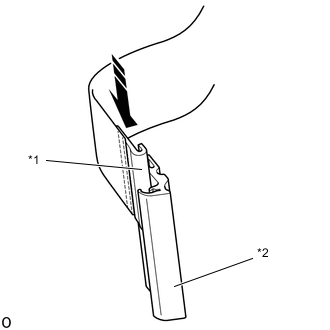
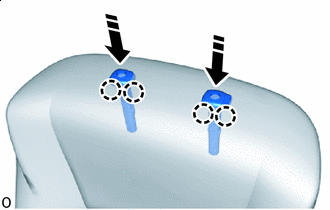
*1 J Hook A *2 J Hook B Install in this Direction Push in the installation direction shown in the illustration to attach the J hook A and J hook B.
Tip:For RH seats, push up from below.
-
*1 J Hook B (J Hook A and J Hook B) *2 J Hook C Install in this Direction Push in the installation direction shown in the illustration to attach the J hook B (J hook A and J hook B) and J hook C.
Tip:For RH seats, push up from below.
-
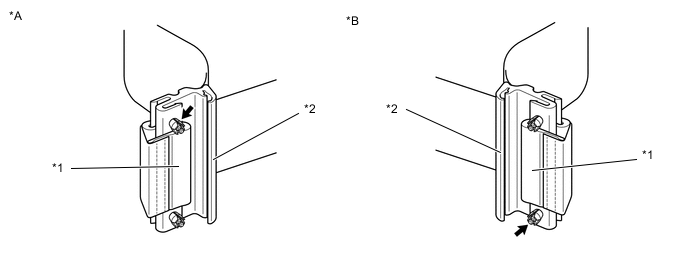
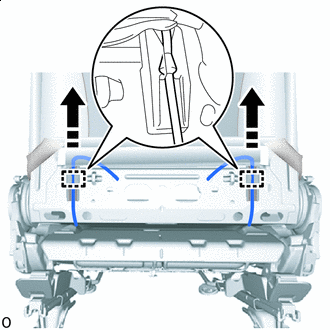
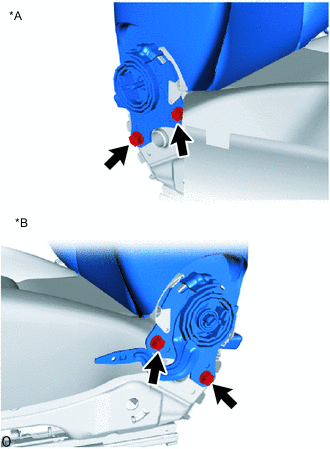
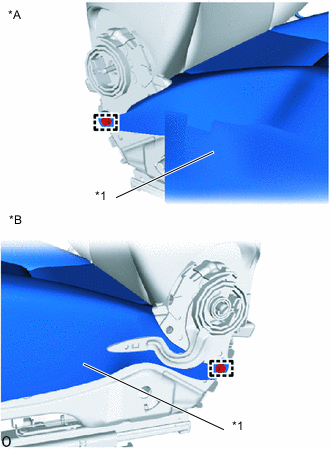
*A for LH seat *B for RH seat *1 J Hook A *2 J Hook B Install the new rivet to J hook B.
Tip:
-
For LH seats, install the top rivet.
-
For RH seats, install the bottom rivet.
-
-
*1 J Hook A *2 J Hook B *3 J Hook C - - 
Place Hand Here Install in this Direction Place your hand at the position shown in the illustration and push in the install direction to attach the J hook B.
-
-
for Hi-back Seat Type:
-
*1 Hog Ring Pliers - - *a Cutout - - Using hog ring pliers, install the 2 new hog rings.
-
*1 Hog Ring Pliers - - *a Cutout - - Using hog ring pliers, install the 5 new hog rings.
-
-
- Click here
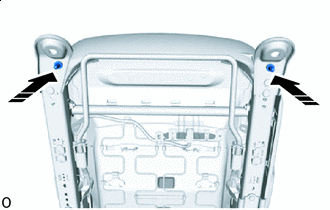
INSTALL FRONT SEAT HEADREST SUPPORT (for Lo-back Seat Type)
-
Install in this Direction Push in the installation direction shown in the illustration to attach the claw and install the 2 front seat headrest supports.
-
Install in this Direction for Basic Style:
-
Pull up the installation direction shown in the illustration to attach the guide to the 2 straps.
-
-
Install in this Direction Close the fasteners as shown in the illustration.
-
*1 Hog Ring Pliers - - *a Cutout - - Using hog ring pliers, install 5 new hog rings.
-
- Click here
INSTALL FRONT NO. 1 SEATBACK HOOK (for Lo-back Seat Type)
-
Install the claw and front No. 1 seatback hook.
-
- Click here
INSTALL RECLINING ADJUSTER INSIDE COVER LH
-
Install in this Direction (1) Install in this Direction (2) Push in the guide installation direction (1) shown in the illustration.
-
Rotate the part in installation direction (2) shown in the illustration and align the guide to install the reclining adjuster inside cover LH.
-
- Click here
INSTALL RECLINING ADJUSTER INSIDE COVER RH
Tip:Use the same procedure as for the LH side.
- Click here
INSTALL FRONT SEATBACK FRAME SUB-ASSEMBLY LH
-
*A RH Side *B LH Side Install the 4 bolts and front seatback frame sub-assembly LH.
42 N*m 428 kgf*cm 31 ft.*lbf -
*A RH Side *B LH Side *1 Separate Type Front Seat Cushion Cover Attach the hook.
-
w/ Side Airbag System, w/ Seat Heater System:
-
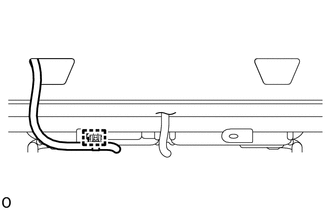
Attach the wire harness clamp and wire harness connector.
-
-
w/ Side Airbag System, w/o Seat Heater System:
-
Attach the wire harness clamp.
-
-
w/o Side Airbag System, w/ Seat Heater System:
-
Attach the wire harness clamp and wire harness connector.
-
-
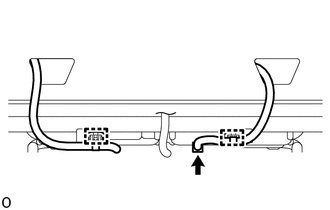
*1 Wire Harness Clamp *2 Connector Clamp w/ Side Airbag System:
-
Attach the wire harness clamp and connector clamp.
-
-

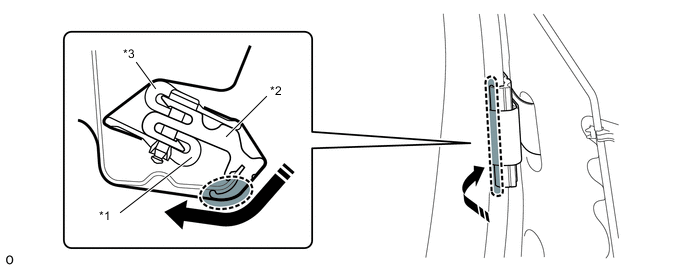
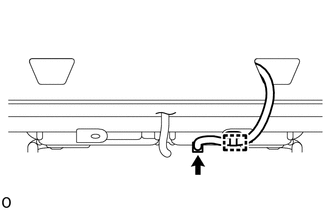
*A w/o Side Airbag System *B w/ Side Airbag System *1 Wire Harness Clamp *2 Guide *3 Connector Clamp w/ Seat Heater System:
-
Attach the wire harness clamp, connector clamp and guide.
-
-
Install the band in the position shown in the illustration.
-
- Click here
INSTALL FRONT SEAT INNER BELT ASSEMBLY LH
- Click here
INSTALL FRONT SEAT INNER CUSHION SHIELD LH
-
Install in this Direction Push in the installation direction shown in the illustration to attach the claw and guide.
-
Install in this Direction Push in the installation direction shown in the illustration and attach the claw to install the front seat inner cushion shield LH.
-
- Click here
INSTALL FRONT SEAT CUSHION SHIELD LH
-
Install in this Direction w/ Vertical Adjusting Handle LH:
-
Push in the installation direction shown in the illustration and attach the claw and clip.
-
Install in this Direction Push in the installation direction shown in the illustration and attach the clip, claw and guide to install the front seat cushion shield LH.
-
-
Install in this Direction w/o Vertical Adjusting Handle LH:
-
Push in the installation direction shown in the illustration and attach the claw and clip.
-
Install in this Direction Push in the installation direction shown in the illustration and attach the claw and guide.
-
Install the screw.
-
-
Install in this Direction Push in the installation direction shown in the illustration and attach the claw to install the front seat cushion shield LH.
-
- Click here
INSTALL VERTICAL ADJUSTING HANDLE LH (w/ Vertical Adjusting Handle LH)
-
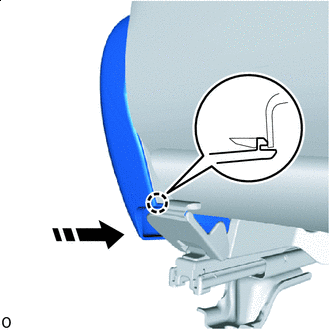
Install in this Direction Attach the guide, and then push in the install direction shown in the illustration to install the vertical adjusting handle LH.
-
Install the screw.
-
- Click here
INSTALL RECLINING ADJUSTER RELEASE HANDLE LH
-
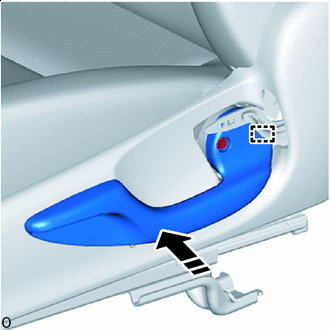
Install in this Direction w/ Vertical adjusting Handle LH:
-
With the reclining adjuster release handle LH pulled up.
-
Push in the installation direction shown in the illustration and attach the claw to install the reclining adjuster release handle LH.
-
-
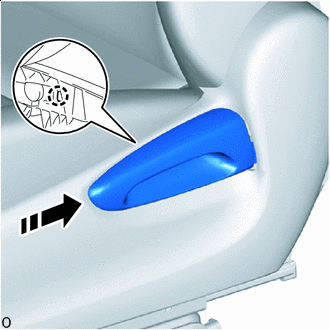
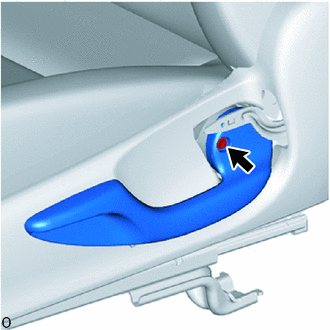
Install in this Direction w/o Vertical adjusting Handle LH:
-
Push in the installation direction shown in the illustration and attach the claw to install the reclining adjuster release handle LH.
-
-
- Click here
INSTALL SEAT ADJUSTER COVER CAP LH
-
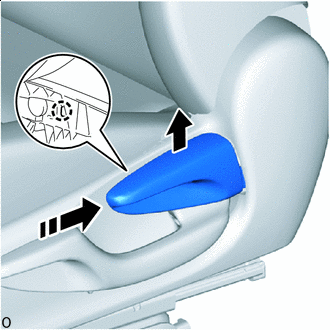
Install in this Direction Push in the installation direction shown in the illustration to install the 2 seat adjuster cover caps LH.
-
- Click here
INSTALL FRONT SEAT HEADREST ASSEMBLY (for Lo-back Seat Type)
-
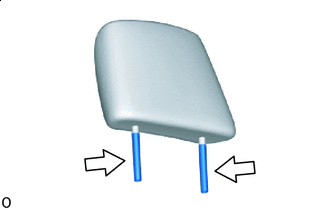

Apply Silicon Apply silicon lubricant in this range.
-
Install the front seat headrest assembly.
-