GENERATOR(for 100A Type) INSTALLATION

PROCEDURE
-
INSTALL GENERATOR ASSEMBLY
-
Install the generator assembly with the 2 bolts.
- Torque:
- 43 N*m { 438 kgf*cm, 32 ft.*lbf }
-
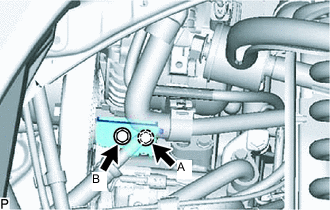
Install the generator bracket with the 2 bolts.
- Torque:
- for bolt A
- 24.5 N*m { 250 kgf*cm, 18 ft.*lbf }
- for bolt B
- 13.5 N*m { 138 kgf*cm, 10 ft.*lbf }
Tech Tips
The bolts are stopper bolts, therefore, make sure to install the bolts so that they are level and there is no clearance between the bolts and surface.
-
Install the differential breather bracket with the bolt.
- Torque:
- 5.4 N*m { 55 kgf*cm, 48 in.*lbf }
-
Attach the clamp and connect the wire harness.
-
Attach the clamp and connect the differential hose.
-
Connect the charcoal canister hose and attach the clamp.
-
Connect the wire harness together with the 2 wire harness brackets with the 2 bolts.
- Torque:
- 13 N*m { 133 kgf*cm, 10 ft.*lbf }
-
Connect the generator connector to the generator assembly.
-
Connect the wire harness to terminal B with the nut.
- Torque:
- 9.8 N*m { 100 kgf*cm, 87 in.*lbf }
-
Install the terminal cap.
-
-
INSTALL FRONT UPPER FENDER APRON SEAL LH
-
INSTALL OIL BAFFLE PLATE
-
Install the oil baffle plate with the bolt.
- Torque:
- 9.0 N*m { 92 kgf*cm, 80 in.*lbf }
-
-
INSTALL FAN AND GENERATOR V BELT
-
INSTALL BATTERY TRAY
-
INSTALL BATTERY
-
INSTALL BATTERY INSULATOR
-
INSTALL BATTERY CLAMP SUB-ASSEMBLY
-
Install the battery clamp sub-assembly with the 2 nuts and 2 battery clamp bolts.
- Torque:
- 5.4 N*m { 55 kgf*cm, 48 in.*lbf }
-
-
CONNECT CABLE TO NEGATIVE BATTERY TERMINAL
Note
When disconnecting the cable, some systems need to be initialized after the cable is reconnected.