PROCEDURE
- Click here
INSTALL LOWER STEERING WHEEL BOSS COVER (w/o Steering Heater)
-
Attach the 2 guide pins and 4 claws to install the lower steering wheel boss cover.
-
- Click here
ADJUST SPIRAL CABLE
- Click here
INSTALL CRUISE CONTROL MAIN SWITCH (w/ Cruise Control System)
- Click here
INSTALL NO. 1 STEERING WHEEL ORNAMENT (w/o Steering Pad Switch)
-
Attach the 6 guide pins and 2 claws to install the No. 1 steering wheel ornament.
-
Install the 2 screws.
-
- Click here
INSTALL STEERING PAD SWITCH ASSEMBLY (w/ Steering Pad Switch)
- Click here
INSTALL STEERING WHEEL ASSEMBLY
-
Align the matchmarks on the steering wheel assembly and steering main shaft.
-
Install the steering wheel set nut.
50 N*m 510 kgf*cm 37 ft.*lbf -
w/ Steering Heater System:
-
Connect the connector to the steering wheel heater connector.
-
-
Connect each connector to the spiral cable with sensor sub-assembly.
-
- Click here
INSTALL HORN BUTTON ASSEMBLY (w/o Airbag System)
-
Connect the horn wire.
-
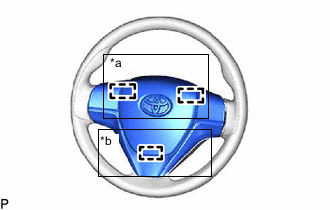
*a Upper Pin *b Lower Pin Press the horn button assembly with both hands to attach the upper pin to the spring.
-
Press the horn button assembly with both hands to attach the lower pin to the spring.
Note:After installation, try to pull the horn button assembly and check that the horn button assembly is securely installed.
-
- Click here
INSTALL LOWER NO. 2 STEERING WHEEL COVER (w/o Airbag System)
-
Attach the guide and claw to install the lower No. 2 steering wheel cover.
-
- Click here
INSTALL STEERING WHEEL PAD ASSEMBLY (w/ Airbag System)
- Click here
INSPECT STEERING WHEEL CENTER POINT
- Click here
CONNECT CABLE TO NEGATIVE BATTERY TERMINAL
Note:When disconnecting the cable, some systems need to be initialized after the cable is reconnected.
- Click here
INSPECT HORN BUTTON ASSEMBLY
-
With the horn button assembly installed to the vehicle, perform a visual check. If any of the defects mentioned below are found, replace the horn button assembly with a new one:
Cuts, minute cracks or marked discoloration on the horn button assembly top surface or in the grooved portion.
-
Make sure that the horn sounds.
-
- Click here
CHECK SRS WARNING LIGHT
for Type A:Click here
for Type B:Click here
for Type C:Click here