PARKING BRAKE CABLE(for 2WD) REMOVAL
PROCEDURE
-
REMOVE REAR WHEEL
-
REMOVE REAR BRAKE DRUM SUB-ASSEMBLY
-
REMOVE PARKING BRAKE LEVER SUB-ASSEMBLY
-
REMOVE NO. 2 INDOOR ELECTRICAL KEY ANTENNA ASSEMBLY (w/ Smart Entry and Start System)
-
REMOVE FRONT SEAT ASSEMBLY (for Manual Seat)
-
for Single Cab:
-
-
REMOVE FRONT SEAT ASSEMBLY (for Bench Seat Type)
-
for Single Cab:
-
-
REMOVE REAR SEAT ASSEMBLY
-
for Smart Cab (w/ Rear Seat Assembly):
-
for Double Cab:
-
for Seat Cushion 60/40 Split Type:
-
for Seat Cushion Bench Type:
-
-
-
REMOVE BACK PANEL TRIM (for Smart Cab)
-
REMOVE FRONT DOOR SCUFF PLATE LH
-
for Single Cab:
-
for Smart Cab:
-
-
REMOVE FRONT DOOR SCUFF PLATE RH
-
for Single Cab:
-
for Smart Cab:
-
-
REMOVE REAR DOOR SCUFF PLATE LH (for Double Cab)
-
REMOVE REAR DOOR SCUFF PLATE RH (for Double Cab)
-
DISCONNECT REAR NO. 1 SEAT OUTER BELT ASSEMBLY LH
-
for Smart Cab:
-
for Double Cab:
-
-
DISCONNECT REAR NO. 1 SEAT OUTER BELT ASSEMBLY RH
-
for Smart Cab:
Tech Tips
Use the same procedure described for the LH side.
-
for Double Cab:
Tech Tips
Use the same procedure described for the LH side.
-
-
REMOVE LOWER QUARTER TRIM PANEL LH
-
for Single Cab:
-
for Smart Cab:
-
for Double Cab:
-
-
REMOVE LOWER QUARTER TRIM PANEL RH
-
for Single Cab:
-
for Smart Cab:
-
for Double Cab:
-
-
REMOVE LUGGAGE COMPARTMENT SIDE COVER LH (for Smart Cab)
-
REMOVE LUGGAGE COMPARTMENT SIDE COVER RH (for Smart Cab)
-
REMOVE INTERMEDIATE LEVER PROTECTOR
-
Partially remove the floor carpet.
Tech Tips
It is not necessary to fully remove the floor carpet. Partially remove it so that the intermediate lever protector can be removed in a later step.
-
Remove the 3 bolts and intermediate lever protector with No. 2 console box mounting bracket.
*A for Single Cab *B except Single Cab
-
-
REMOVE NO. 2 CONSOLE BOX MOUNTING BRACKET
-
Remove the 2 bolts and No. 2 console box mounting bracket from the intermediate lever protector.
*A for Single Cab *B except Single Cab
-
-
REMOVE PARKING BRAKE CABLE HEAT INSULATOR
-

Remove the 2 bolts and parking brake cable heat insulator.
-
-
REMOVE PROPELLER SHAFT ASSEMBLY
-
for TSAM Made:
-
for TMT Made:
-
-
REMOVE FUEL TANK
-
1GR-FE:
-
2KD-FTV:
-
for Short Wheelbase:
-
for Long Wheelbase:
-
-
1GD-FTV:
-
2GD-FTV:
-
for Short Wheelbase:
-
for Long Wheelbase:
-
-
1TR-FE:
-
for Short Wheelbase:
-
for Long Wheelbase:
-
-
2TR-FE:
-
for Short Wheelbase:
-
for Long Wheelbase:
-
-
-
REMOVE NO. 1 PARKING BRAKE CABLE ASSEMBLY
-
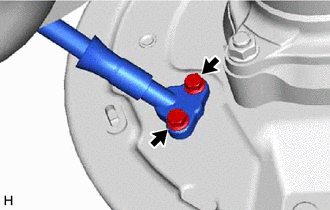
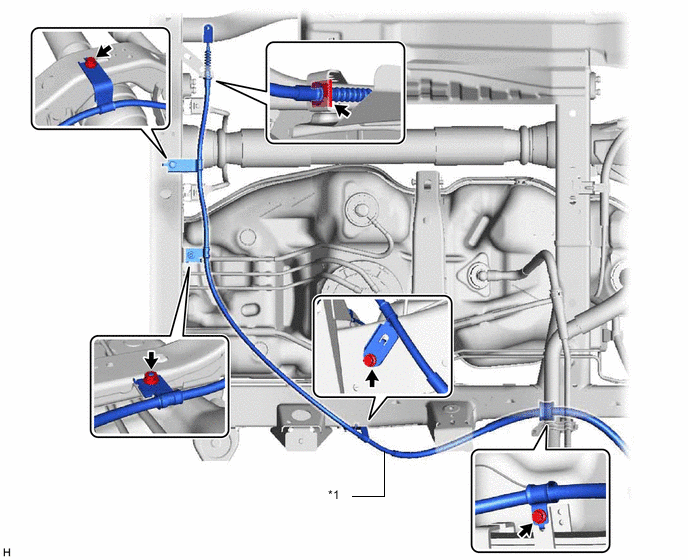
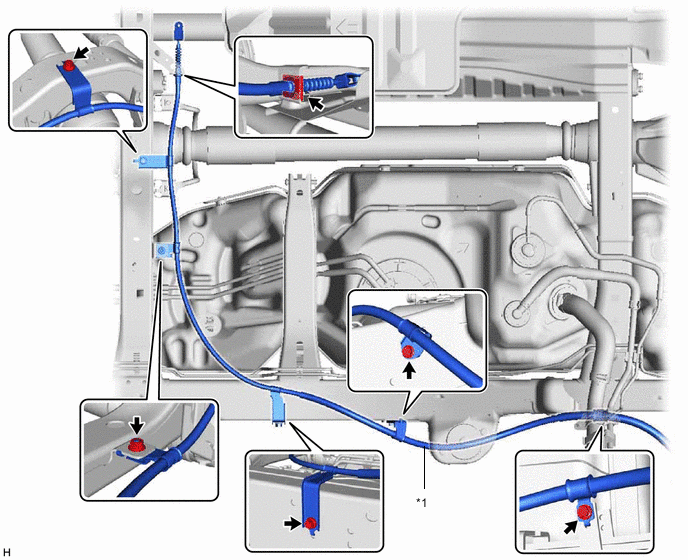
Remove the 2 bolts (labeled A).

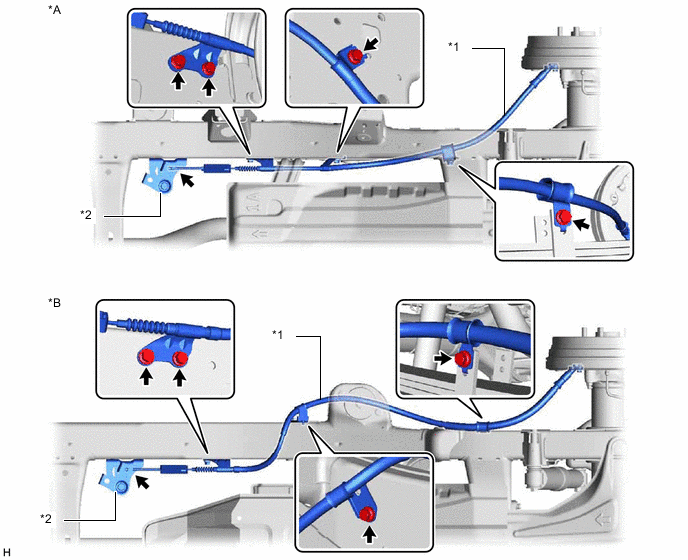
*A for Short Body *B for Long Body *1 No. 1 Parking Brake Cable Assembly *2 No. 2 Parking Brake Cable Assembly *3 No. 3 Parking Brake Cable Assembly *4 Parking Brake Equalizer Sub-assembly *5 Cable Support Bracket - - -
Remove the clip and pin from the No. 3 parking brake cable assembly.
-
Disconnect the No. 1 parking brake cable assembly from the No. 3 parking brake cable assembly.
-
Disconnect the No. 1 parking brake cable assembly from the parking brake equalizer sub-assembly.
-
Disconnect the No. 1 parking brake cable assembly from the cable support bracket.
-
Remove the No. 1 parking brake cable assembly from inside the vehicle.
-
Remove the bolt (labeled B) and cable support bracket.
-
-
REMOVE NO. 2 PARKING BRAKE CABLE ASSEMBLY
-
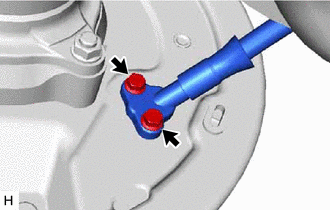
Disconnect the No. 2 parking brake cable assembly from the parking brake shoe lever.
-
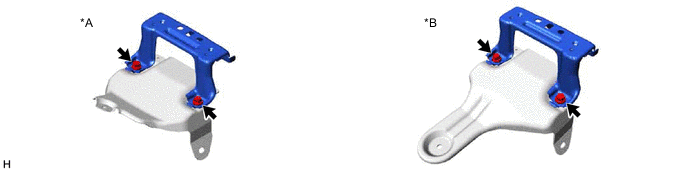
Remove the 2 bolts and disconnect the No. 2 parking brake cable assembly from the backing plate.
-
Disconnect the No. 2 parking brake cable assembly from the parking brake equalizer sub-assembly.
*A for Short Body *B for Long Body *1 No. 2 Parking Brake Cable Assembly *2 Parking Brake Equalizer Sub-assembly -
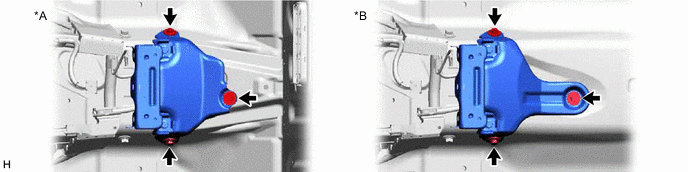
Remove the 4 bolts and No. 2 parking brake cable assembly.
-
-
REMOVE PARKING BRAKE EQUALIZER SUB-ASSEMBLY
-
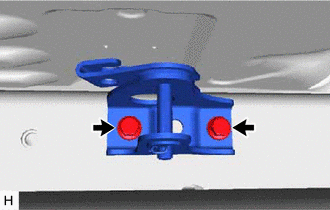
Remove the 2 bolts and parking brake equalizer sub-assembly.
-
-
REMOVE NO. 3 PARKING BRAKE CABLE ASSEMBLY
-
Disconnect the No. 3 parking brake cable assembly from the parking brake shoe lever.
-
Remove the 2 bolts and disconnect the No. 3 parking brake cable assembly from the backing plate.
-
for Short Body:
*1 No. 3 Parking Brake Cable Assembly - -
-
Remove the clip.
-
Remove the 3 bolts, nut and No. 3 parking brake cable assembly.
-
-
for Long Body:
*1 No. 3 Parking Brake Cable Assembly - -
-
Remove the clip.
-
Remove the 4 bolts, nut and No. 3 parking brake cable assembly.
-
-