FRONT DISC BRAKE PAD(for 4WD and Pre-Runner) REPLACEMENT

CAUTION / NOTICE / HINT
Tech Tips
-
Use the same procedure for the RH and LH sides.
-
The procedure listed below is for the LH side.
Note
After replacing the disc brake pads, the clearance between the disc brake pads and front discs becomes larger and the brake pedal feel becomes softer. Therefore, after replacing the disc brake pads, depress the brake pedal several times and check the clearance and brake pedal feel.
PROCEDURE
-
REMOVE FRONT WHEEL
-
DRAIN BRAKE FLUID
Note
Wash off brake fluid immediately if it comes in contact with any painted surface.
-
REMOVE FRONT DISC BRAKE ANTI-RATTLE SPRING
-
for 15 inch Front Disc Brake (Type A):
-
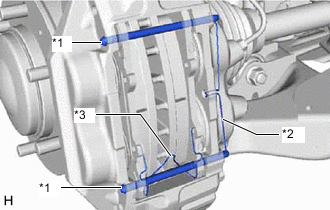
*1 Disc Brake Pad Guide Pin *2 Pin Hold Clip *3 Front Disc Brake Anti-rattle Spring Remove the pin hold clip and 2 disc brake pad guide pins.
-
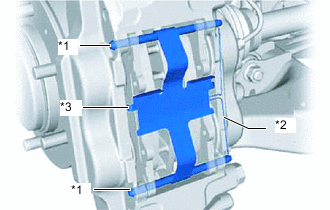
Remove the front disc brake anti-rattle spring.
Note
The front disc brake anti-rattle spring can be reused if it has sufficient rebound; no deformation, cracks or wear; and has all rust, dirt and foreign matter cleaned off.
-
-
for 15 inch Front Disc Brake (Type B):
-
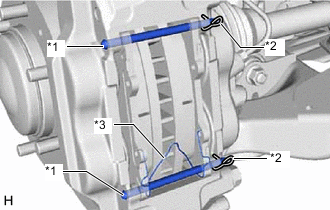
*1 Disc Brake Pad Guide Pin *2 Pin Hold Clip *3 Front Disc Brake Anti-rattle Spring Remove the pin hold clip.
-
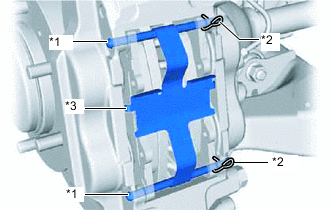
Hold down the anti-rattle spring and remove the 2 disc brake pad guide pins.
-
Remove the anti-rattle spring.
CAUTION:
Do not remove the 2 disc brake pad guide pins without holding down the anti-rattle spring. The anti-rattle spring will eject with a force capable of causing injury.
-
-
for 16 inch Front Disc Brake (Type A):
-
*1 Disc Brake Pad Guide Pin *2 Pin Hold Clip *3 Front Disc Brake Anti-rattle Spring Remove the 2 pin hold clips and 2 disc brake pad guide pins.
-
Remove the front disc brake anti-rattle spring.
Note
The front disc brake anti-rattle spring can be reused if it has sufficient rebound; no deformation, cracks or wear; and has all rust, dirt and foreign matter cleaned off.
-
-
for 16 inch Front Disc Brake (Type B):
-
*1 Disc Brake Pad Guide Pin *2 Pin Hold Clip *3 Front Disc Brake Anti-rattle Spring Remove the 2 pin hold clips.
-
Hold down the anti-rattle spring and remove the 2 disc brake pad guide pins.
-
Remove the anti-rattle spring.
CAUTION:
Do not remove the 2 disc brake pad guide pins without holding down the anti-rattle spring. The anti-rattle spring will eject with a force capable of causing injury.
-
-
-
REMOVE FRONT DISC BRAKE PAD
-
Remove the 2 front disc brake pads from the disc brake cylinder assembly LH.
-
-
REMOVE FRONT ANTI-SQUEAL SHIM KIT
-
Remove the 2 No. 1 anti-squeal shims and 2 No. 2 anti-squeal shims from each pad.
-
-
INSTALL FRONT ANTI-SQUEAL SHIM KIT
-

*1 Front Disc Brake Pad *2 No. 1 Anti-squeal Shim *3 No. 2 Anti-squeal Shim 
Disc Brake Grease except 16 inch Front Disc Brake (Type B):
-
Apply disc brake grease to both sides of each No. 1 anti-squeal shim.
Note
For 16 inch Front Disc Brake (Type B), do not apply disc brake grease.
-
-
Install the No. 1 anti-squeal shims and No. 2 anti-squeal shims to each pad.
Note
-
When replacing worn front disc brake pads, the anti-squeal shims must be replaced together with the front disc brake pads.
-
Install the anti-squeal shims in the correct positions and directions as shown in the illustration.
-
-
-
INSTALL FRONT DISC BRAKE PAD
-
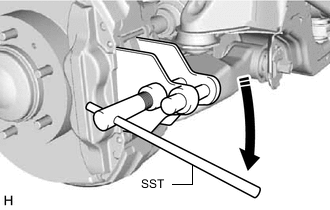

Expand Using SST, push back the front disc brake piston.
Note
Do not forcibly install the piston into the disc brake cylinder assembly LH.
- SST
- 09719-77020
-
Install the 2 front disc brake pads to the disc brake cylinder assembly LH.
Note
Make sure there is no oil or grease on the friction surface of the front disc brake pads and front disc.
-
-
INSTALL FRONT DISC BRAKE ANTI-RATTLE SPRING
-
for 15 inch Front Disc Brake(Type A):
-
Install the 2 disc brake pad guide pins and front disc brake anti-rattle spring.
Tech Tips
Install the front disc brake anti-rattle spring together with the disc brake pad guide pin on the bottom side.
-
Install the pin hold clip.
-
-
for 15 inch Front Disc Brake (Type B):
-
Install the front disc brake anti-rattle spring.
-
Hold down the front disc brake anti-rattle spring and insert the 2 disc brake pad guide pins.
-
Install the pin hold clip.
-
-
for 16 inch Front Disc Brake (Type A):
-
Install the 2 disc brake pad guide pins and front disc brake anti-rattle spring.
Tech Tips
Install the front disc brake anti-rattle spring together with the disc brake pad guide pin on the bottom side.
-
Install the 2 pin hold clips.
Note
When installing the pin hold clip, be sure to install the pin hold clip with the handle facing the center of the vehicle.
-
-
for 16 inch Front Disc Brake (Type B):
-
Install the front disc brake anti-rattle spring.
-
Hold down the front disc brake anti-rattle spring and insert the 2 disc brake pad guide pins.
-
Install the 2 clips.
Note
When installing the pin hold clip, be sure to install the pin hold clip with the handle facing the center of the vehicle.
-
-
Depress the brake pedal several times.
-
-
ADD BRAKE FLUID
-
w/ VSC:
-
w/o VSC:
-
-
INSTALL FRONT WHEEL