SHIFT LEVER INSTALLATION
CAUTION / NOTICE / HINT
Tech Tips
-
Use the same procedure for RHD and LHD vehicles.
-
The procedure listed below is for LHD vehicles.
PROCEDURE
-
INSTALL TRANSMISSION FLOOR SHIFT ASSEMBLY
Note
Check that the park/neutral position switch assembly and the shift lever are in N.
-
Install the transmission floor shift assembly to the vehicle body with the 4 bolts.
- Torque:
- 14 N*m { 143 kgf*cm, 10 ft.*lbf }
-
Attach the 3 wire harness clamps and connect the wire harness to the transmission floor shift assembly.
-
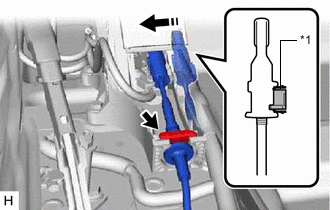
Connect the 2 connectors to the transmission floor shift assembly.
-
-
CONNECT TRANSMISSION CONTROL CABLE ASSEMBLY
-
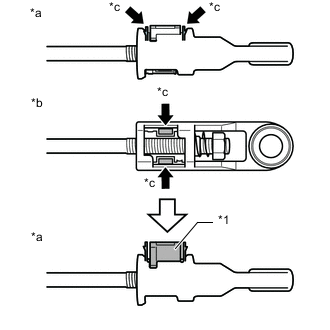
*1 Lock Piece *a Side View *b Bottom View *c Push Push the 2 claws together at the top of the transmission control cable lock piece. While holding the 2 claws together, push the 2 lugs on the bottom of the lock piece toward each other and upward to pull out the lock piece.
-
*1 Lock Piece 
Connect in this Direction Connect the transmission control cable assembly to the transmission floor shift assembly, and install a new clip.
-
Connect the end of the transmission control cable assembly to the transmission floor shift assembly.
Note
-
Make sure that the lock piece is pulled up.
-
Push on the end of the cable all the way to the base of the transmission floor shift assembly pin.
-
-
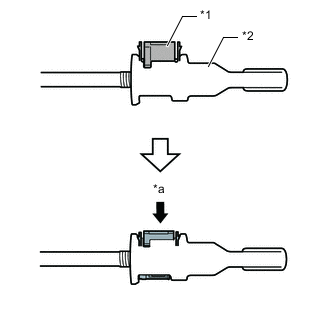
*1 Lock Piece *2 Adjuster Case *a Push Push the lock piece into the adjuster case.
Note
Securely push in the lock piece until it locks.
-
-
INSPECT SHIFT LEVER POSITION
-
INSTALL NO. 1 CONSOLE BOX DUCT (w/ Rear Air Duct)
-
Install the No. 1 console box duct with the 2 clips.
-
-
INSTALL CONSOLE BOX ASSEMBLY