FUEL INJECTOR REMOVAL

CAUTION / NOTICE / HINT
The necessary procedures (adjustment, calibration, initialization, or registration) that must be performed after parts are removed, installed, or replaced during the fuel injector assembly removal/installation are shown below.
| Replacement Part or Procedure | Necessary Procedures | Effects/Inoperative when not Performed | Link |
|---|---|---|---|
| Replacement of fuel injector assembly | Inspection after repair | Poor idle, engine start function, etc. |
PROCEDURE
-
DISCHARGE FUEL SYSTEM PRESSURE
-
PRECAUTION
Note
After turning the ignition switch off, waiting time may be required before disconnecting the cable from the battery terminal. Therefore, make sure to read the disconnecting the cable from the battery terminal notice before proceeding with work.
-
DISCONNECT CABLE FROM NEGATIVE BATTERY TERMINAL
Note
When disconnecting the cable, some systems need to be initialized after the cable is reconnected.
-
REMOVE INTAKE AIR SURGE TANK
-
DISCONNECT NO. 1 FUEL PIPE SUB-ASSEMBLY
-
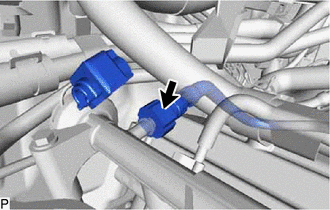
Remove the No. 2 fuel pipe clamp and disconnect the No. 1 fuel pipe sub-assembly from the fuel delivery pipe sub-assembly.
-
-
DISCONNECT NO. 2 FUEL PIPE SUB-ASSEMBLY
-
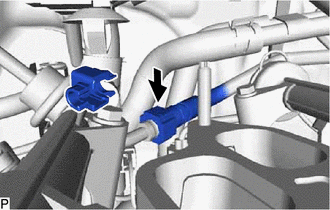
Remove the No. 2 fuel pipe clamp and disconnect the No. 2 fuel pipe sub-assembly from the fuel pressure regulator assembly.
-
-
REMOVE FUEL DELIVERY PIPE SUB-ASSEMBLY
-
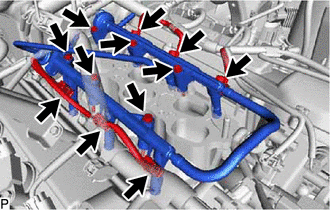
Disconnect the 6 fuel injector assembly connectors from the 6 fuel injector assemblies.
-
Remove the 6 bolts and fuel delivery pipe sub-assembly together with the 6 fuel injector assemblies.
Note
Be careful not to drop the fuel injector assembly when removing the fuel delivery pipe sub-assembly.
-
-
REMOVE FUEL INJECTOR ASSEMBLY
-

*1 Fuel Delivery Pipe Sub-assembly *2 Fuel Injector Assembly *3 Fuel Vibration Insulator *4 O-RING Remove the 6 fuel injector assemblies from the fuel delivery pipe sub-assembly.
-
Remove the O-ring and fuel vibration insulator from each fuel injector assembly.
-