FUEL LID LOCK CONTROL CABLE ASSEMBLY(for RHD) REMOVAL
PROCEDURE
-
REMOVE FRONT SEAT ASSEMBLY RH
-
for Manual Seat:
-
for Power Seat:
-
-
REMOVE FRONT SEAT ASSEMBLY LH
-
for Manual Seat:
Tech Tips
The procedure described below is for the RH side.
-
for Power Seat:
Tech Tips
The procedure described below is for the RH side.
-
-
REMOVE REAR NO. 2 SEAT ASSEMBLY RH
-
REMOVE REAR NO. 2 SEAT ASSEMBLY LH
Tech Tips
The procedure described below is for the RH side.
-
REMOVE COWL SIDE TRIM BOARD RH
-
REMOVE FRONT DOOR SCUFF PLATE LH
-
REMOVE FRONT DOOR SCUFF PLATE RH
-
REMOVE REAR DOOR SCUFF PLATE LH
-
REMOVE OUTER LAP BELT ANCHOR COVER
-
REMOVE LOWER CENTER PILLAR GARNISH LH
-
REMOVE BACK DOOR SCUFF PLATE
-
REMOVE REAR NO. 1 SEAT OUTER LAP BELT ANCHOR COVER
-
REMOVE REAR NO. 2 SEAT OUTER LAP BELT ANCHOR COVER
-
REMOVE QUARTER INSIDE TRIM BOARD LH
-
REMOVE FRONT FLOOR CARPET ASSEMBLY
-
Partially remove the floor carpet.
Tech Tips
It is not necessary to fully remove the floor carpet. Partially remove it so that the fuel lid lock control cable sub-assembly can be removed in a later step.
-
-
REMOVE FUEL LID LOCK OPEN LEVER SUB-ASSEMBLY
-
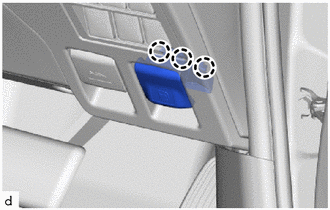
Detach the claw and remove the fuel lid lock open lever sub-assembly.
-
-
REMOVE FUEL LID LOCK CONTROL CABLE SUB-ASSEMBLY
-
Detach each clamp as shown in the illustration.
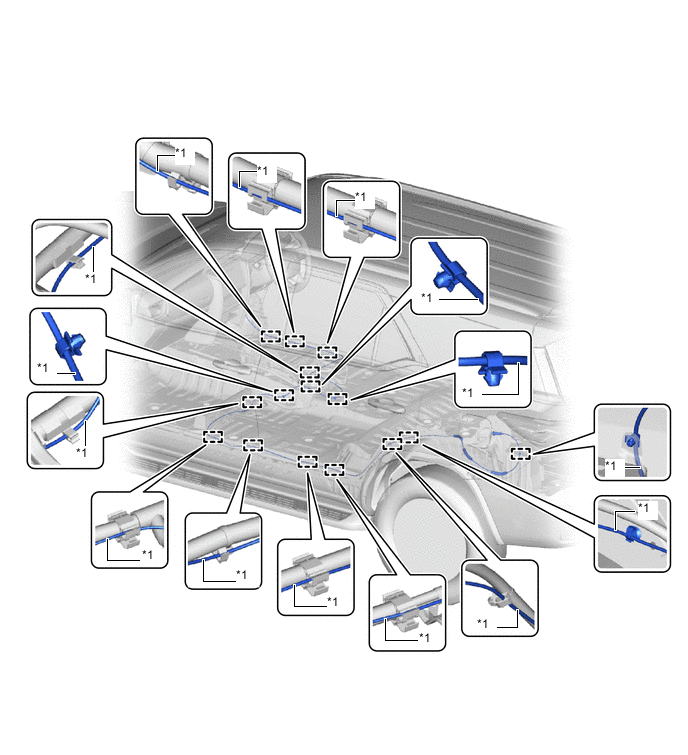
*1 Fuel Lid Lock Control Cable Sub-assembly - - -
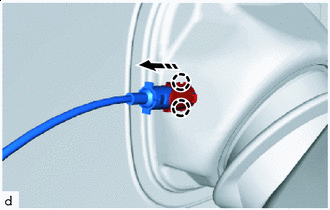

Remove in this Direction Detach the claw and remove the fuel lid lock control cable sub-assembly from the fuel filler opening lid lock retainer as shown in the illustration.
-
-
REMOVE FUEL FILLER OPENING LID LOCK RETAINER
-
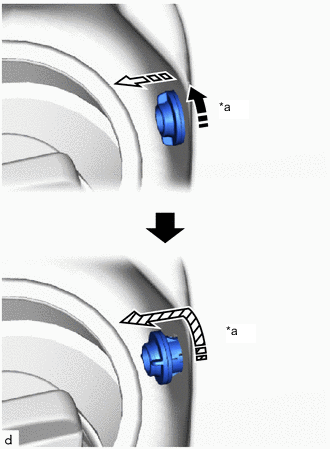
*a 90° Remove in this Direction (1) 
Remove in this Direction (2) 
Remove in this Direction (3) Remove the fuel filler opening lid lock retainer as shown in the illustration.
-