BACK DOOR REASSEMBLY
CAUTION / NOTICE / HINT
PROCEDURE
-
INSTALL POWER BACK DOOR UNIT SET ASSEMBLY LH (w/ Power Back Door)
Note
Do not apply any horizontal load to the power back door unit set assembly in order to prevent the piston rod from deforming.
-
Clean the bolt hole on the vehicle body and back door panel.
-
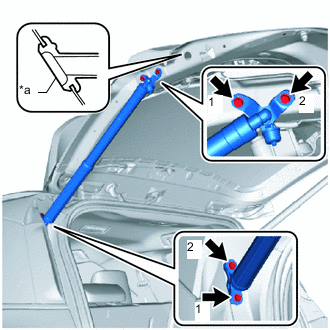
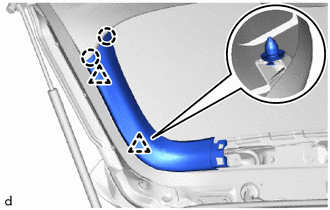
*a Grommet Temporarily install the power back door unit set assembly.
-
Tighten 4 new bolts to install the power back door unit set assembly.
Note
Install the power back door unit set assembly while supporting the back door by hand.
Tech Tips
Tighten the 4 bolts in the order shown in the illustration.
- Torque:
- 7.5 N*m { 76 kgf*cm, 66 in.*lbf }
-
Attach the grommet.
-
Connect the connector.
-
-
INSTALL POWER BACK DOOR UNIT SET ASSEMBLY RH (w/ Power Back Door)
Tech Tips
Use the same procedure as for the LH side.
-
INSTALL BACK DOOR STAY ASSEMBLY LH (w/o Power Back Door)
-
INSTALL BACK DOOR STAY ASSEMBLY RH (w/o Power Back Door)
Tech Tips
Use the same procedure as for the LH side.
-
INSTALL DOOR DUST PROOF SEAL
-
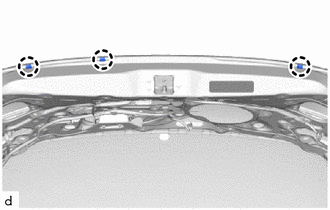
Attach the claw and install 3 new door dust proof seals.
-
-
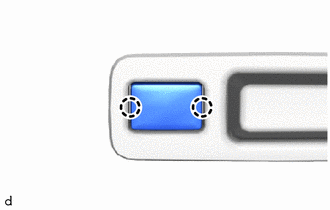
INSTALL BACK DOOR STOPPER CUSHION
-
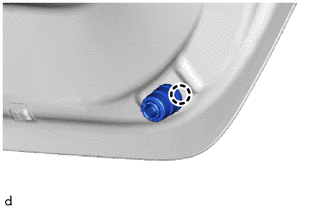
Attach the claw to install a new back door stopper cushion.
Tech Tips
Use the same procedure as for the RH side.
-
-
INSTALL LOWER BACK DOOR STOPPER
-

Attach the guide to install the lower back door stopper with the bolt.
Tech Tips
Use the same procedure as for the RH side.
-
-
INSTALL REAR WIPER MOTOR ASSEMBLY
-
INSTALL BACK DOOR LOCK ASSEMBLY (w/ Easy Closer)
-
INSTALL BACK DOOR LOCK ASSEMBLY (w/o Easy Closer)
-
INSTALL POWER BACK DOOR WARNING BUZZER (w/ Power Back Door)
-
INSTALL MULTIPLEX NETWORK DOOR ECU (w/ Power Back Door)
-
INSTALL MULTIPLEX NETWORK DOOR ECU (w/ Easy Closer)
-
INSTALL REAR TELEVISION CAMERA ASSEMBLY (w/ Parking Assist Monitor System)
-
INSTALL LICENSE PLATE LIGHT ASSEMBLY LH
-
INSTALL LICENSE PLATE LIGHT ASSEMBLY RH
-
INSTALL BACK DOOR OPENER SWITCH ASSEMBLY
-
INSTALL BACK DOOR OUTSIDE GARNISH SUB-ASSEMBLY
-
INSTALL REAR LIGHT ASSEMBLY LH
-
INSTALL REAR LIGHT ASSEMBLY RH
Tech Tips
Use the same procedure as for the LH side.
-
INSTALL NO. 2 INDOOR ELECTRICAL KEY ANTENNA ASSEMBLY (w/ Smart Entry and Start System)
-
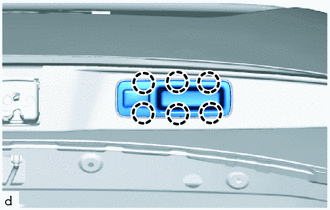
INSTALL BACK DOOR DAMPER ASSEMBLY
-
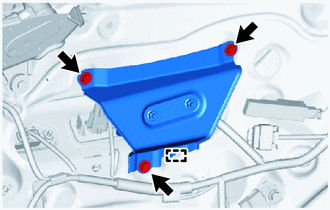
Attach the guide.
-
Install the back door damper assembly with the 3 bolts.
-
-
INSTALL REAR WASHER NOZZLE
-
INSTALL REAR SPOILER ASSEMBLY
-
INSTALL BACK DOOR GLASS CHANNEL LH
-
INSTALL BACK DOOR GLASS CHANNEL RH
Tech Tips
Use the same procedure as for the LH side.
-
INSTALL POWER BACK DOOR SENSOR ASSEMBLY LH (w/ Power Back Door)
-
INSTALL POWER BACK DOOR SENSOR ASSEMBLY RH (w/ Power Back Door)
Tech Tips
Use the same procedure as for the LH side.
-
INSTALL BACK DOOR SERVICE HOLE COVER (w/ Cover)
-
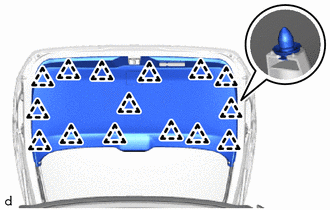
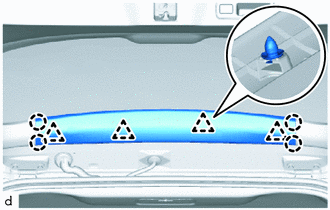
Apply new butyl tape to the back door panel.
-
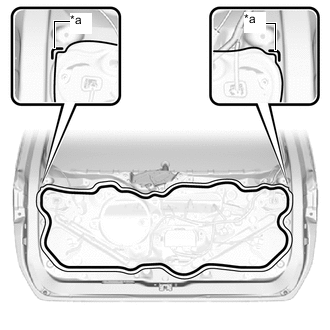
*a Reference Point 
Butyl Tape Install a new back door service hole cover, and then attach the back door service hole cover using the reference points on the back door panel.
Tech Tips
-
Securely install the back door service hole cover to prevent wrinkles and air bubbles.
-
There should be no wrinkles or folds after installing the back door service hole cover.
-
After installing the back door service hole cover, check the seal quality.
-
-
-
INSTALL BACK DOOR TRIM BOARD ASSEMBLY
-
Attach the clip to install the back door trim board assembly.
-
-
INSTALL BACK DOOR CONTROL SWITCH (w/ Power Back Door)
-
INSTALL SPARE SWITCH HOLE COVER (w/o Power Back Door)
-
Attach the claw to install the spare switch hole cover.
-
-
INSTALL DOOR PULL HANDLE
-
w/ Power Back Door:
Connect the connector.
-
Attach the claw to install the door pull handle.
-
-
INSTALL BACK DOOR SIDE GARNISH LH
-
Attach the claw and clip to install the back door side garnish LH.
-
-
INSTALL BACK DOOR SIDE GARNISH RH
Tech Tips
Use the same procedure as for the LH side.
-
INSTALL CENTER BACK DOOR GARNISH
-
Attach the claw and clip to install the center back door garnish.
-
-
INSTALL REAR WIPER MOTOR GROMMET
-
INSTALL REAR WIPER ARM AND BLADE ASSEMBLY
-
INSTALL REAR WIPER ARM HEAD CAP
-
INSPECT POWER BACK DOOR SYSTEM (w/ Power Back Door)
-
INSPECT BACK DOOR CLOSER SYSTEM (w/ Easy Closer)