TRANSFER ASSEMBLY DISASSEMBLY

PROCEDURE
-
REMOVE ACTUATOR BREATHER HOSE
-
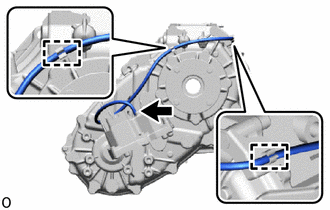
Disconnect the connection to the transfer shift actuator assembly, detach the 2 clamps, and then remove the actuator breather hose.
-
-
REMOVE TRANSFER CASE COVER SUB-ASSEMBLY
-
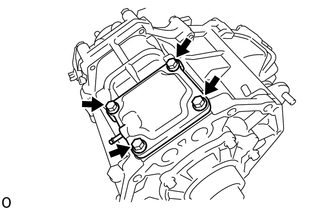
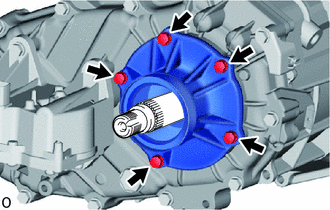
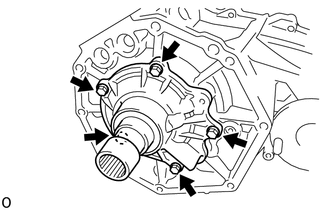
Remove the 4 bolts and transfer case cover sub-assembly.
-
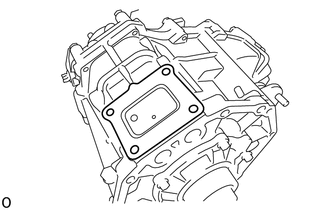
Remove the breather oil deflector.
-
-
REMOVE OUTPUT SHAFT COMPANION FLANGE SUB-ASSEMBLY (for Front Side)
-
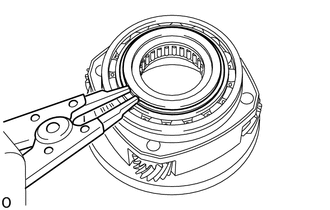
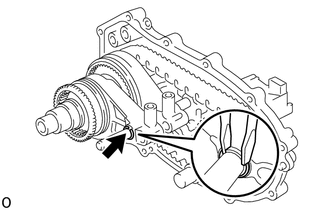
Using a chisel and hammer, loosen the staked part of the transfer output shaft companion flange nut.
Note
-
Completely loosen the staked part of the lock nut when removing it.
-
Do not damage the threads of the driven sprocket.
-
-
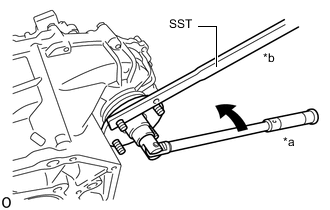
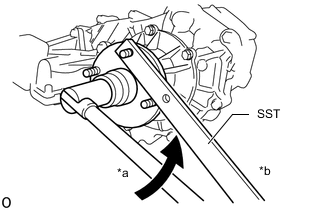
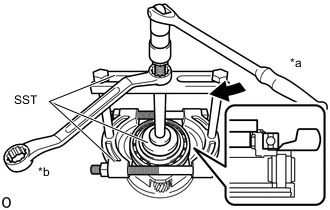
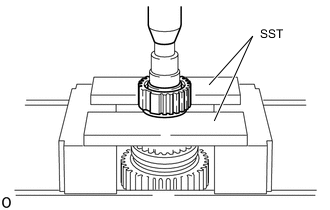
*a Turn *b Hold Using SST to hold the output shaft companion flange sub-assembly, remove the transfer output shaft companion flange nut.
- SST
- 09330-00021
-
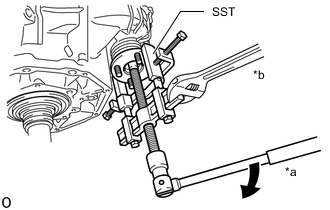
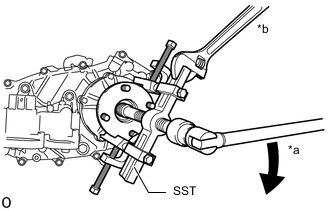
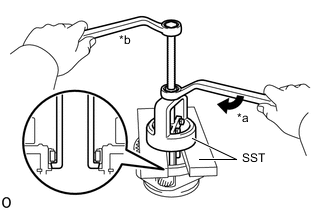
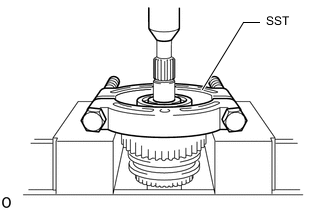
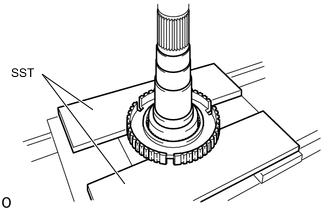
*a Turn *b Hold Using SST, remove the output shaft companion flange sub-assembly.
- SST
- 09950-40011 ( 09951-04020, 09952-04010, 09953-04030, 09954-04010, 09955-04031, 09957-04010, 09958-04011 )
Note
Apply a lubricant to the threads and end of SST.
-
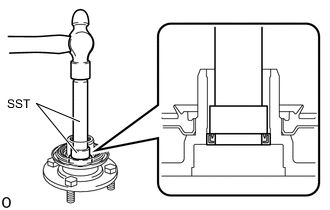
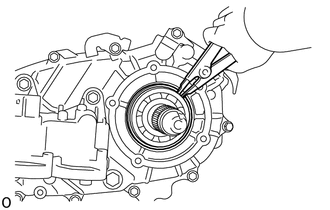
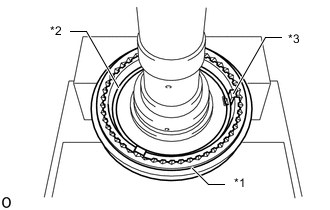
Using SST and hammer, remove the transfer output shaft companion flange oil seal.
- SST
- 09950-60010 ( 09951-00220, 09951-00290, 09952-06010 )
- 09950-70010 ( 09951-07100 )
Note
Be careful not to damage the transfer output shaft companion flange oil seal and output shaft companion flange sub-assembly contact surfaces.
-
-
REMOVE TRANSFER CASE OIL SEAL
-
REMOVE OUTPUT SHAFT COMPANION FLANGE SUB-ASSEMBLY (for Rear Side)
-
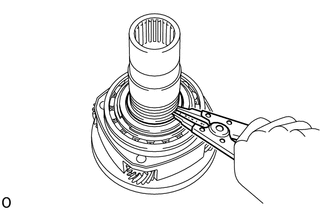
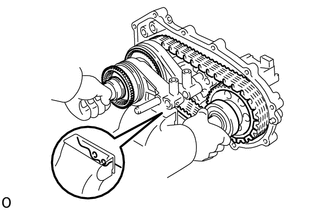
Using a chisel and hammer, loosen the staked part of the transfer output shaft companion flange nut.
Note
-
Completely loosen the staked part of the transfer output shaft companion flange nut when removing it.
-
Do not damage the threads of the rear transfer output shaft.
-
-
*a Turn *b Hold Using SST to hold the output shaft companion flange sub-assembly, remove the transfer output shaft companion flange nut and transfer output shaft O-ring.
- SST
- 09330-00021
-
*a Turn *b Hold Using SST, remove the output shaft companion flange sub-assembly.
- SST
- 09950-40011 ( 09951-04020, 09952-04010, 09953-04030, 09954-04010, 09955-04031, 09957-04010, 09958-04011 )
Note
Apply a lubricant to the threads and end of SST.
-
-
REMOVE TRANSFER EXTENSION HOUSING TYPE T OIL SEAL
-
REMOVE TRANSFER EXTENSION HOUSING
-
Remove the 5 bolts and transfer extension housing.
Tech Tips
If necessary, tap the transfer extension housing with a plastic-faced hammer to remove it.
-
-
REMOVE TRANSFER OUTPUT SHAFT WASHER
-
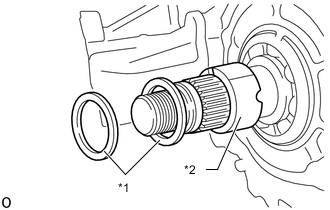
*1 Transfer Output Shaft Washer *2 No. 2 Transfer Output Shaft Spacer Remove the 2 transfer output shaft washers.
-
Remove the No. 2 transfer output shaft spacer.
-
-
REMOVE NO. 1 TRANSFER CASE PLUG
-
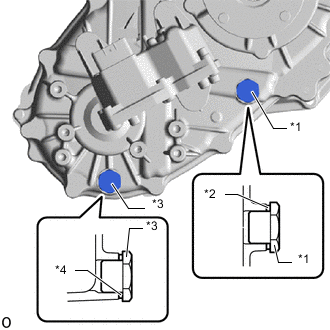
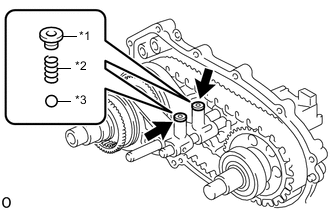
*1 No. 1 Transfer Case Plug (Filler Plug) *2 No. 1 Transfer Case Gasket *3 Transfer Drain Plug *4 Transfer Drain Plug Gasket Remove the No. 1 transfer case plug (filler plug) and No. 1 transfer case gasket.
-
Remove the transfer drain plug and transfer drain plug gasket.
-
-
REMOVE REAR TRANSFER CASE
-
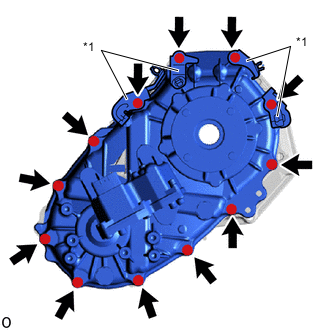
*1 Bracket Remove the 12 bolts and 4 brackets.
-
Remove the rear transfer case.
Tech Tips
If necessary, tap the rear transfer case with a plastic-faced hammer to remove it.
-
-
REMOVE TRANSFER OIL SEPARATOR SUB-ASSEMBLY
-
Remove the 3 bolts and transfer oil separator sub-assembly.
-
Remove the transfer case magnet.
-
-
REMOVE TRANSFER OIL PUMP BODY SUB-ASSEMBLY
-
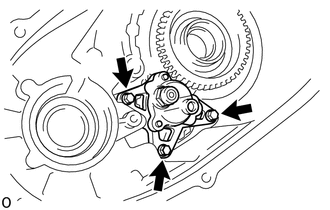
Remove the 3 bolts and transfer oil pump body sub-assembly.
-
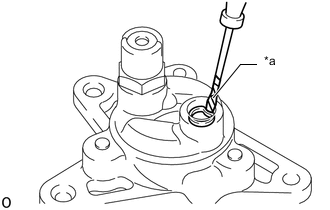
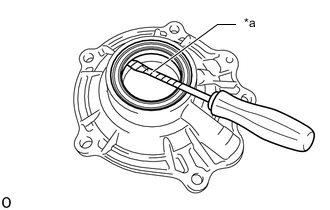
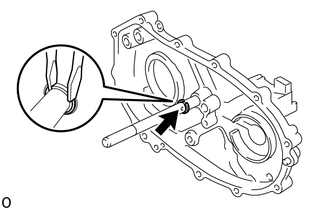
*a Protective Tape Using a screwdriver, remove the transfer oil pump body O-ring.
Note
Be careful not to damage the transfer oil pump body sub-assembly.
Tech Tips
Tape the screwdriver tip before use.
-
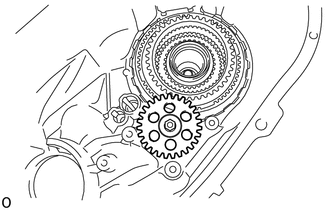
Remove the transfer oil pump gear.
-
-
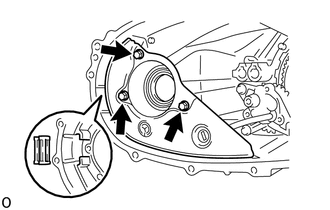
REMOVE TRANSFER FRONT BEARING RETAINER SUB-ASSEMBLY
-
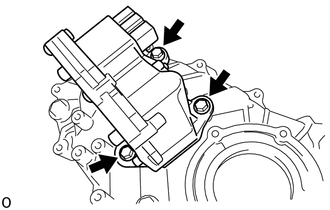
Remove the 5 bolts and transfer front bearing retainer sub-assembly.
Tech Tips
If necessary, tap the transfer front bearing retainer sub-assembly with a plastic-faced hammer to remove it.
-
for RC60F / RC61F:
Remove the O-ring.
-
-
REMOVE TRANSFER FRONT BEARING TYPE T OIL SEAL
-
*a Protective Tape for AC60F, R151F:
Using a screwdriver and hammer, remove the transfer front bearing type T oil seal.
Note
Be careful not to damage the transfer front bearing type T oil seal and transfer front bearing retainer sub-assembly contact surfaces.
Tech Tips
Tape the screwdriver tip before use.
-
for RC60F / RC61F:
Using a screwdriver and hammer, remove the 2 transfer front bearing type T oil seals.
Note
Be careful not to damage the transfer front bearing type T oil seal and transfer front bearing retainer sub-assembly contact surfaces.
Tech Tips
Tape the screwdriver tip before use.
-
-
REMOVE TRANSFER LOW PLANETARY GEAR ASSEMBLY
-
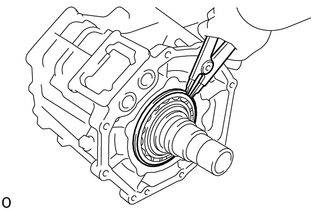
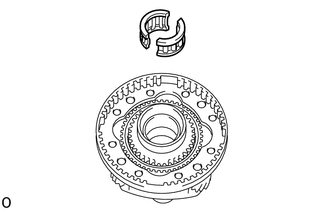
Using a snap ring expander, remove the transfer low planetary gear bearing shaft snap ring.
-
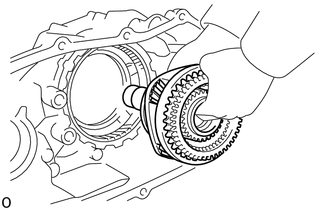
Remove the transfer low planetary gear assembly with the transfer input shaft.
-
-
REMOVE TRANSFER CASE PLUG
-
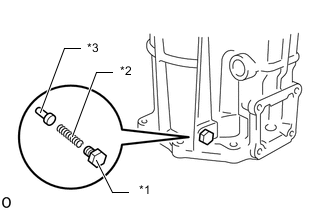
*1 Transfer Case Plug *2 Transfer Case Compression Spring *3 Pin Remove the transfer case plug, transfer case compression spring and pin.
-
-
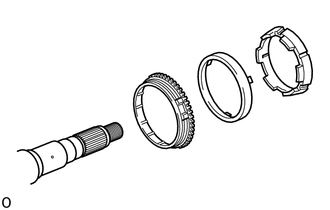
REMOVE TRANSFER LOW PLANETARY RING GEAR
-
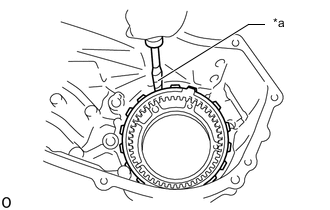
*a Protective Tape Using a screwdriver, remove the transfer low planetary ring gear hole snap ring.
Note
Be careful not to damage the front transfer case.
Tech Tips
Tape the screwdriver tip before use.
-
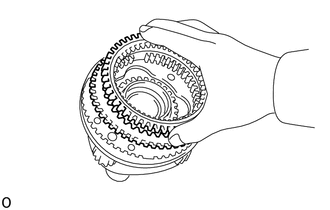
Remove the transfer low planetary ring gear.
-
-
REMOVE TRANSFER LOW PLANETARY GEAR SPLINE PIECE
-

*a Protective Tape Using a screwdriver, remove the transfer low planetary gear shaft snap ring.
Note
Be careful not to damage the transfer low planetary gear assembly.
Tech Tips
Tape the screwdriver tip before use.
-
Remove the transfer low planetary gear spline piece.
-
Remove the transfer output shaft front needle roller bearing.
-
-
REMOVE TRANSFER INPUT SHAFT
-
Using a snap ring expander, remove the transfer input gear stopper shaft snap ring.
-
*1 Transfer Input Gear Stopper *2 Transfer Input Gear Stopper Ball *3 Manual Transfer Planetary Carrier Washer Remove the transfer input gear stopper and transfer input gear stopper ball.
-
Remove the manual transfer planetary carrier washer.
-
*1 Transfer Input Shaft *2 Transfer Low Planetary Gear Bearing *3 No. 1 Transfer Thrust Bearing Race Remove the transfer input shaft, transfer low planetary gear bearing and No. 1 transfer thrust bearing race.
-
-
REMOVE NO. 1 TRANSFER INPUT SHAFT SEAL RING
-
Remove the 2 No. 1 transfer input shaft seal rings.
-
-
REMOVE TRANSFER INPUT SHAFT BEARING
-
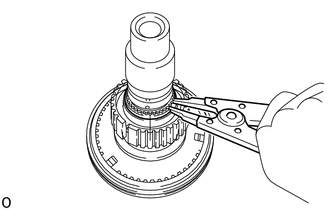
Using a snap ring expander, remove the transfer input bearing shaft snap ring.
-
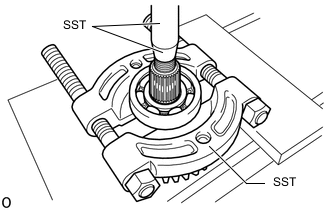
*a Turn *b Hold Using SST, remove the transfer input shaft bearing.
- SST
- 09555-55010
- 09950-00030
- 09950-60020 ( 09951-00630 )
Note
-
Be careful not to damage the transfer low planetary gear assembly.
-
Apply a lubricant to the threads and end of SST.
-
-
REMOVE TRANSFER LOW PLANETARY GEAR BEARING
-
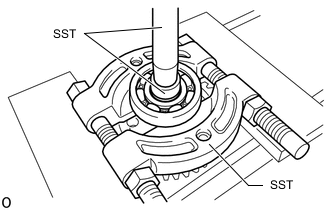
*a Turn *b Hold Using SST, remove the transfer low planetary gear bearing.
- SST
- 09527-10011
- 09612-65014 ( 09612-01050, 09612-01060 )
Note
Hook SST securely between the bearing and transfer low planetary gear.
-
-
REMOVE TRANSFER FRONT DRIVE SHIFT FORK SHAFT
Note
-
When using a vise, place aluminum plates between the part and vise.
-
When using a vise, do not overtighten it.
-
*1 Shift Detent Ball Spring Plug *2 Shift Detent Ball Compression Spring *3 Shift Detent Ball Using a 6 mm hexagon wrench, remove the 2 shift detent ball spring plugs.
-
Using a magnet hand, remove the 2 shift detent ball compression springs and 2 shift detent balls.
-
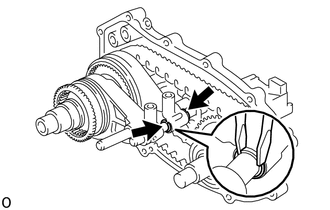
Using 2 screwdrivers and a hammer, remove the 2 transfer gear shift fork shaft snap rings.
Tech Tips
Use a piece of cloth to prevent the transfer gear shift fork shaft snap rings from flying off.
-
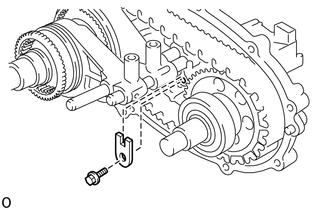
Remove the bolt and transfer shift shaft stopper.
-
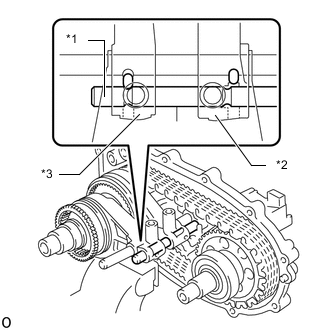
*1 Transfer Front Drive Shift Fork Shaft *2 No. 1 Transfer Gear Shift Fork *3 No. 2 Transfer Gear Shift Fork To remove the transfer front drive shift fork shaft, shift the No. 1 transfer gear shift fork and No. 2 transfer gear shift fork to the positions shown in the illustration.
-
Remove the transfer front drive shift fork shaft.
-
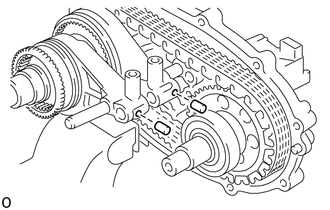
Using a magnet hand, remove the 2 shift interlock pin or rollers.
-
-
REMOVE REAR TRANSFER OUTPUT SHAFT, TRANSFER FRONT DRIVE CHAIN, TRANSFER DRIVEN SPROCKET
Note
-
When using a vise, place aluminum plates between the part and vise.
-
When using a vise, do not overtighten it.
-
Using 2 screwdrivers and a hammer, remove the transfer gear shift fork shaft snap ring.
Tech Tips
-
Use a piece of cloth to prevent the transfer gear shift fork shaft snap ring from flying off.
-
Remove only the transfer gear shift fork shaft snap ring on the front side of the transfer shift actuator shaft.
-
-
Using a snap ring expander, remove the transfer output shaft shaft snap ring.
-
Using a plastic-faced hammer, carefully tap the rear transfer case, and remove the transfer output shaft rear, transfer driven sprocket and transfer front drive chain with the No. 1 transfer gear shift fork and No. 2 transfer gear shift fork.
-
-
REMOVE TRANSFER SHIFT ACTUATOR ASSEMBLY
-
Using 2 screwdrivers and a hammer, remove the transfer gear shift fork shaft snap ring.
Tech Tips
Use a piece of cloth to prevent the transfer gear shift fork shaft snap ring from flying off.
-
Remove the 3 bolts and transfer shift actuator assembly.
-
-
REMOVE TRANSFER DRIVEN SPROCKET BEARING
-
for Front Side:
Using SST and a press, remove the transfer driven sprocket bearing.
- SST
- 09555-55010
- 09950-60010 ( 09951-00210 )
- 09950-70010 ( 09951-07100 )
Note
Be careful not to drop or damage the driven sprocket.
-
for Rear Side:
Using SST and a press, remove the transfer driven sprocket bearing.
- SST
- 09555-55010
- 09950-60010 ( 09951-00270 )
- 09950-70010 ( 09951-07100 )
Note
Be careful not to drop or damage the driven sprocket.
-
-
REMOVE TRANSFER CLUTCH HUB
-
Remove the transfer high and low clutch sleeve.
-
Using a snap ring expander, remove the transfer clutch hub shaft snap ring.
-
Using SST and a press, remove the transfer clutch hub.
- SST
- 09527-10011
Note
Be careful not to drop or damage the rear transfer output shaft.
-
-
REMOVE TRANSFER DRIVE SPROCKET SUB-ASSEMBLY
-
Using SST and a press, remove the rear transfer output shaft radial ball bearing.
- SST
- 09555-55010
Note
Be careful not to drop or damage the rear transfer output shaft.
-
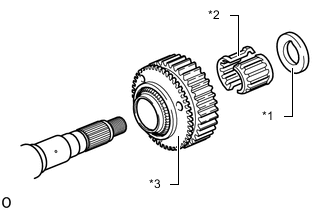
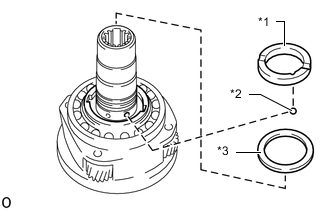
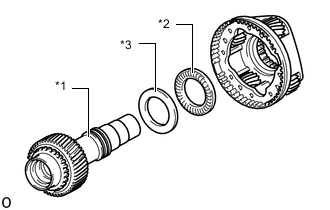
*1 No. 1 Transfer Output Shaft Spacer *2 Needle Roller Bearing *3 Transfer Drive Sprocket Sub-assembly Remove the No. 1 transfer output shaft spacer.
-
Remove the needle roller bearing.
-
Remove the transfer drive sprocket sub-assembly.
-
-
REMOVE TRANSFER SYNCHRONIZER RING SET
-
Remove the transfer synchronizer ring set.
-
-
REMOVE FRONT DRIVE CLUTCH SLEEVE
-
*1 Front Drive Clutch Sleeve *2 Transfer Synchromesh Shifting Key Spring *3 No. 1 Synchromesh Shifting Key Remove the front drive clutch sleeve.
Note
Be careful not to drop the 3 No. 1 synchromesh shifting keys.
-
Remove the 2 transfer synchromesh shifting key springs and 3 No. 1 synchromesh shifting keys.
-
-
REMOVE TRANSFER DRIVE CLUTCH HUB
-
Using SST and a press, remove the transfer drive clutch hub.
- SST
- 09527-10011
Note
Be careful not to drop or damage the rear transfer output shaft.
-