CLUTCH MASTER CYLINDER(w/o Turn Over) INSTALLATION
CAUTION / NOTICE / HINT
Tech Tips
-
Use the same procedure for RHD and LHD vehicles.
-
The procedure listed below is for LHD vehicles.
PROCEDURE
-
INSTALL CLUTCH MASTER CYLINDER PUSH ROD CLEVIS
-
Install the lock nut and master cylinder push rod clevis to the push rod.
Tech Tips
Tighten the lock nut to the specified torque when adjusting the clutch pedal.
-
-
INSTALL CLUTCH MASTER CYLINDER ASSEMBLY
-
Install a new gasket and the clutch master cylinder assembly with the 2 nuts.
- Torque:
- 18.4 N*m { 188 kgf*cm, 14 ft.*lbf }
-
-
CONNECT CLUTCH MASTER CYLINDER PUSH ROD CLEVIS
-
CONNECT CLUTCH MASTER CYLINDER TO FLEXIBLE HOSE TUBE
-
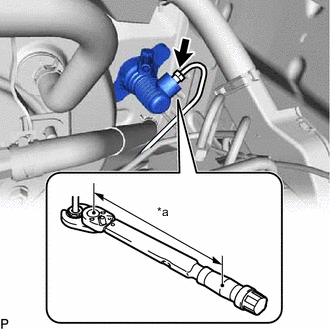
*a Torque Wrench Fulcrum Length Using a union nut wrench, connect the clutch master cylinder to flexible hose tube.
- Torque:
- Specified tightening torque
- 15.2 N*m { 155 kgf*cm, 11 ft.*lbf }
Tech Tips
-
Calculate the torque wrench reading when changing the fulcrum length of the torque wrench.
-
When using a union nut wrench (fulcrum length of 22 mm (0.8661 in.)) + torque wrench (fulcrum length of 162 mm (6.3779 in.)): 13.4 N*m (137 kgf*cm, 10 ft.*lbf)
-
-
CONNECT CLUTCH RESERVOIR TUBE
-
Connect the clutch reservoir tube to the clutch master cylinder assembly, and slide the clip to secure it.
Note
Connect the clutch reservoir hose so that it is not twisted.
-
-
BLEED AIR FROM CLUTCH PIPE LINE
-
CHECK FOR CLUTCH FLUID LEAKAGE
Tech Tips
Check for leaks in the clutch system.
-
INSPECT AND ADJUST CLUTCH PEDAL SUB-ASSEMBLY
-
CHECK FLUID LEVEL IN RESERVOIR