REAR SHOCK ABSORBER INSTALLATION
CAUTION / NOTICE / HINT
Tech Tips
-
Use the same procedure for the RH and LH sides.
-
The procedure listed below is for the LH side.
PROCEDURE
-
INSTALL REAR SHOCK ABSORBER ASSEMBLY LH
-
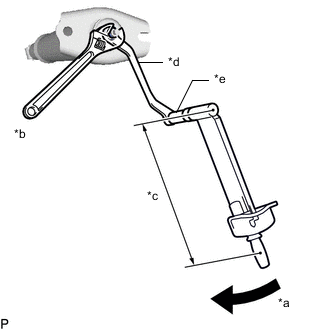
*a Turn *b Hold *c Torque Wrench Fulcrum Length *d 12 x 14 mm Long Offset Wrench *e 12 mm Socket Hexagon Wrench Using a 12 mm socket hexagon wrench and 12 x 14 mm long offset wrench, install the 3 rear shock absorber cushion retainers, rear No. 1 shock absorber cushion, rear upper shock absorber bracket LH, rear No. 2 shock absorber cushion and a new lock nut to the rear shock absorber assembly LH.
- Torque:
- Specified tightening torque
- 20 N*m { 204 kgf*cm, 15 ft.*lbf }
Tech Tips
-
Calculate the torque wrench reading when changing the fulcrum length of the torque wrench.
-
When using a long offset wrench (fulcrum length of 206.25 mm (8.1201 in.)) + torque wrench (fulcrum length of 300 mm (11.8110 in.)): 11.9 N*m (121 kgf*cm, 9 ft.*lbf)
-
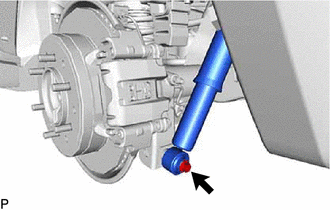
Temporarily install the rear shock absorber assembly LH to the axle housing with the bolt.
-
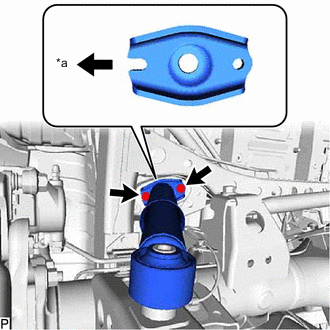
*a Vehicle Exterior Install the rear shock absorber assembly LH to the frame with the 2 bolts.
- Torque:
- 25 N*m { 255 kgf*cm, 18 ft.*lbf }
Tech Tips
Make sure that the cutout of the rear upper shock absorber bracket LH faces the vehicle exterior.
-
-
INSTALL REAR WHEEL
-
STABILIZE SUSPENSION
-
Lower the vehicle.
-
Press down on the vehicle several time to stabilize the suspension.
-
-
TIGHTEN REAR SHOCK ABSORBER ASSEMBLY LH
-
Tighten the bolt.
- Torque:
- 98 N*m { 999 kgf*cm, 72 ft.*lbf }
-
-
PERFORM INITIALIZATION (w/ Automatic Headlight Beam Level Control System)
-
INSPECT AUTOMATIC LIGHT CONTROL SYSTEM (w/ Automatic Headlight Beam Level Control System)
-
INSPECT HEADLIGHT AIMING (w/ Automatic Headlight Beam Level Control System)