FRONT SHOCK ABSORBER REMOVAL

CAUTION / NOTICE / HINT
The necessary procedures (adjustment, calibration, initialization, or registration) that must be performed after parts are removed, installed, or replaced during the front shock absorber removal/installation are shown below.
| Necessary Procedure After Parts Removed/Installed/Replaced | ||||||||||||
|---|---|---|---|---|---|---|---|---|---|---|---|---|
|
Tech Tips
-
Use the same procedure for the RH and LH sides.
-
The procedure listed below is for the LH side.
PROCEDURE
-
REMOVE FRONT WHEEL
-
REMOVE FRONT LOWER ARM SHAFT BOOT PROTECTOR LH (w/ Drive Shaft Boot Protector)
-
REMOVE FRONT STABILIZER BAR
-
REMOVE FRONT LOWER SUSPENSION ARM
-
REMOVE FRONT SHOCK ABSORBER WITH COIL SPRING
-
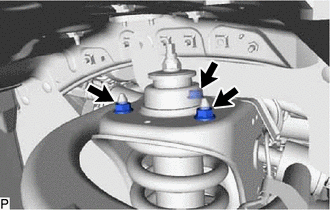
Remove the 3 nuts and shock absorber with coil spring.
-
-
REMOVE FRONT SUPPORT TO FRONT SHOCK ABSORBER NUT
-
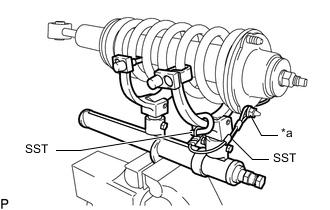
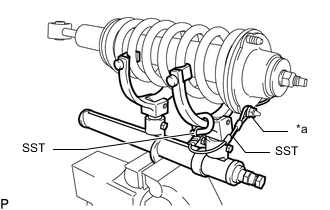
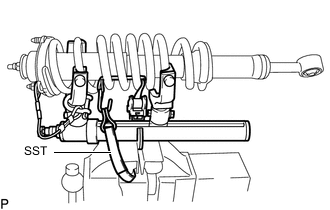
For SST with stopper pins:
-
Secure SST in a vise.
- SST
- 09727-00061
- 09727-30022 ( 09727-00010, 09727-00031 )
-
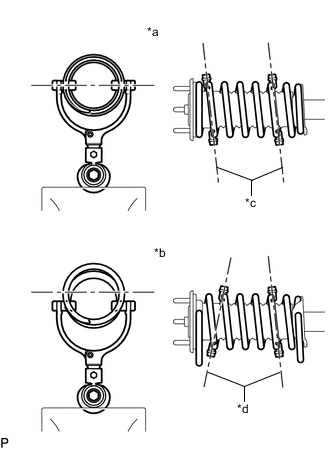
*a Correct *b Incorrect *c Parallel *d Not Parallel Attach the hooks of each SST arm across the diameter of the coil spring.
CAUTION:
-
Make sure that the hooks of the upper and lower arms are attached to the coil spring so that the distance between the hooks is as large as possible.
-
Make sure that the arms of SST are parallel and attached to the coil spring, and the number of coil springs between the hooks on each side is the same.
-
Check that the claws of the hooks are securely attached to the coil spring.
-
-
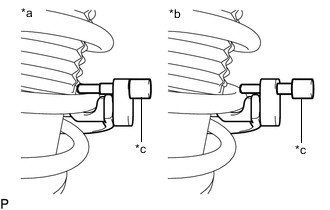
*a Correct *b Incorrect *c Stopper Pin Install the stopper pins to the hooks of SST.
CAUTION:
Make sure that the stopper pins are installed securely.
-
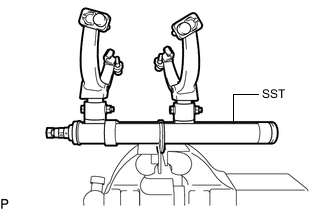
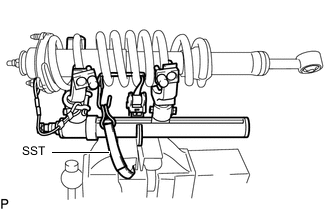
*a Vehicle Nut Install SST and 2 vehicle nuts to the upper support as shown in the illustration.
- SST
- 09727-30022 ( 09727-00090, 09727-00100 )
-
Using SST, compress the coil spring.
CAUTION:
-
If the coil spring bends while using SST, stop immediately and reattach SST correctly.
-
Do not compress the coil spring to the point where the coils touch each other.
-
Do not use an impact wrench.
-
If a stopper pin touches the coil spring while using SST, remove the stopper pin and continue with the procedure. In this case, installing the coil spring stopper belt as shown in the illustration is recommended.
- SST
- 09727-00110
-
-
-
For SST without stopper pins:
-
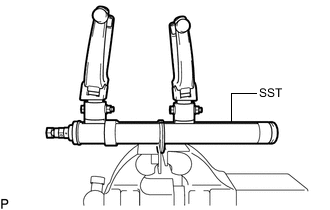
Secure SST in a vise.
- SST
- 09727-00060
- 09727-30021 ( 09727-00010, 09727-00031 )
-
*a Correct *b Incorrect *c Parallel *d Not Parallel Attach the hooks of each SST arm across the diameter of the coil spring.
CAUTION:
-
Make sure that the hooks of the upper and lower arms are attached to the coil spring so that the distance between the hooks is as large as possible.
-
Make sure that the arms of SST are parallel and attached to the coil spring, and the number of coil springs between the hooks on each side is the same.
-
Check that the claws of the hooks are securely attached to the coil spring.
-
-
*a Vehicle Nut Install SST and 2 vehicle nuts to the upper support as shown in the illustration.
- SST
- 09727-30022 ( 09727-00090, 09727-00100 )
-
Using SST, compress the coil spring.
CAUTION:
-
If the coil spring bends while using SST, stop immediately and reattach SST correctly.
-
Do not compress the coil spring to the point where the coils touch each other.
-
Do not use an impact wrench.
Tech Tips
Installing SST as shown in the illustration is recommended.
- SST
- 09727-00110
-
-
-
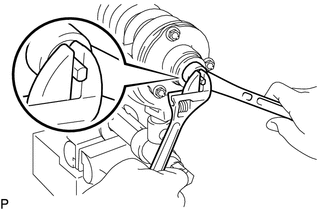
Hold the shock absorber rod and remove the nut.
CAUTION:
Do not remove the front support to front shock absorber nut when the coil spring is not free.
-
-
REMOVE FRONT SHOCK ABSORBER CUSHION RETAINER
-
Remove the front shock absorber cushion retainer from the front shock absorber assembly LH.
-
-
REMOVE FRONT NO. 1 SHOCK ABSORBER CUSHION
-
Remove the front No. 1 shock absorber cushion from the front shock absorber assembly LH.
-
-
REMOVE FRONT SUSPENSION SUPPORT SUB-ASSEMBLY LH
-
Remove the front suspension support sub-assembly LH from the coil spring.
-
Remove the front shock absorber cushion retainer from the front shock absorber assembly LH.
-
-
REMOVE FRONT COIL SPRING LH
-
Remove the front coil spring LH from the front shock absorber assembly LH.
-