EMISSION CONTROL SYSTEM ON-VEHICLE INSPECTION
CAUTION / NOTICE / HINT
CAUTION:
To prevent injury due to contact with an operating fan and generator V belt or cooling fan, keep your hands and clothing away from the fan and generator V belt and cooling fans when working in the engine compartment with the engine running.
Tech Tips
When there is a malfunction which causes the EGR system to remain on, black or white smoke may be emitted from the exhaust pipe.
PROCEDURE
-
CHECK SEATING OF EGR VALVE
-
Check that the engine starts and idles.
-
Stop the engine.
-
-
CHECK ELECTRIC EGR CONTROL VALVE ASSEMBLY OPERATION
-
Connect the GTS to the DLC3.
-
Turn the ignition switch to ON and turn the GTS on.
-
Enter the following menus: Powertrain / Engine and ECT / Active Test / Control the EGR Step Position.
-
Check the Data List.
Enter the following menus: Powertrain / Engine and ECT / Data List / Target EGR Valve Pos and Actual EGR Valve Pos
Powertrain > Engine and ECT > Active TestActive Test Display Control the EGR Step Position Data List Display Target EGR Valve Pos Actual EGR Valve Pos OK Control Range Condition Specified Condition Active Test performed (Set EGR position to 0% → 30% → 60% → 90% → 60% → 30% → 0%) Actual EGR valve opening percentage changes according to Active Test operation If the result is not as specified, refer to DTC P042E.
-
-
INSPECT NO. 2 EGR VALVE ASSEMBLY
-
VISUALLY INSPECT HOSES, CONNECTIONS AND GASKETS
-
Visually check that the hoses, connections and gaskets have no cracks, leaks or damage.
Note
-
Detachment or other problems with the engine oil level dipstick, oil filler cap sub-assembly, PCV hose or other components may cause the engine to run improperly.
-
Air suction caused by disconnections, looseness or cracks in the parts of the air induction system between the diesel throttle body assembly and cylinder head sub-assembly will cause engine failure or engine malfunctions.
If the result is not as specified, replace parts as necessary.
-
-
-
CHECK VACUUM PUMP ASSEMBLY
-
PERFORM DPF FORCIBLE REGENERATION PROCEDURE
Tech Tips
-
If the value recorded by the ECM for the PM volume stored is not initialized when the MIL illuminates during excessive PM buildup (P2458 or P2463), PM forcible regeneration cannot be performed using the GTS.
The value recorded by the ECM for the PM volume stored cannot be initialized using the GTS.
-
PM volume stored initialization:
Remove the EFI-B fuse or disconnect the cable from the battery terminal for 60 seconds or more, and then reinstall the EFI-B fuse or reconnect the cable to the battery terminal.
-
Connect the GTS to the DLC3.
-
Start the engine and warm up it.
Tech Tips
-
Make sure the engine coolant temperature sensor reaches 70°C (158°F) or higher.
-
Make sure the No. 3 exhaust gas temperature sensor reaches 115°C (239°F) or higher.
-
-
for Manual Transmission:
Move the shift lever to N and set the parking brake.
-
for Automatic Transmission:
Move the shift lever to P and set the parking brake.
-
Maintain the maximum possible engine speed under no load for 10 seconds to blow out all soot from inside the exhaust pipe.
Tech Tips
-
If only a low engine speed is continuously maintained, soot may accumulate at the end of the catalyst.
-
When soot accumulates at the end of the catalyst, it may not be possible to perform PM forced regeneration control normally.
-
-
Turn the GTS on.
-
Enter the following menus: Powertrain / Engine and ECT / Active Test / Activate the DPF Rejuvenate (PM).
Powertrain > Engine > Active TestTester Display Activate the DPF Rejuvenate (PM) 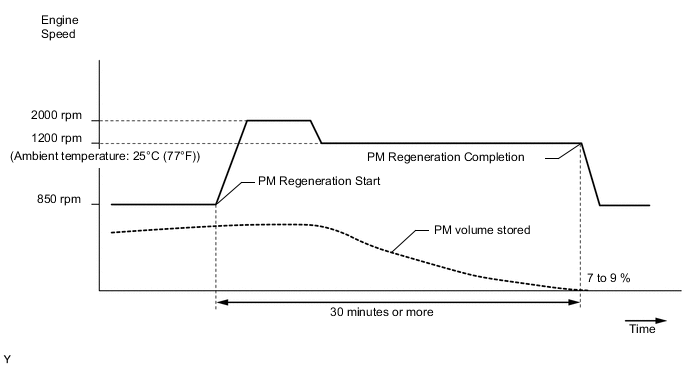
CAUTION:
Before performing the Active Test, make sure that there are no combustible materials around the DPF and tailpipe.
Tech Tips
-
When PM Accumulation Ratio is too low, Activate the DPF Rejuvenate (PM) cannot be performed. Therefore, rev the engine with no load at 3400 rpm for 5 to 10 minutes to increase PM Accumulation Ratio to 12% or more.
-
The engine speed differs depending on the ambient temperature.
-
The engine speed increases during the Active Test and the engine speed returns to idle when the Active Test is completed.
-
The time it takes to complete the Active Test varies depending on the PM volume stored. However, it usually takes approximately 30 minutes or more to complete the Active Test.
-
Do not cancel the Active Test unless absolutely necessary.
-
If the Active Test needs to be canceled, depress the accelerator pedal and race the engine or depress the clutch pedal to cancel the process.
-
If the differential pressure value increases too much during the Active Test, the fail-safe function activates and the Active Test is stopped.
-
Depending on various conditions, the Active Test may not be completed within 30 minutes. If 60 minutes elapse, the system stops the Active Test and illuminates the MIL. If this happens, an exhaust manifold converter (DPF) or exhaust fuel addition injector malfunction (low fuel addition volume) has occurred.
-
-