FUEL FILTER(for Cylinder Block Side) REPLACEMENT
CAUTION / NOTICE / HINT
Note
Clean the diesel fuel filter assembly and remove dirt completely.
PROCEDURE
-
REMOVE STARTER ASSEMBLY
-
for 2.0 kW Type:
-
for 2.2 kW Type:
-
-
REMOVE FUEL FILTER CAP WITH ELEMENT
-

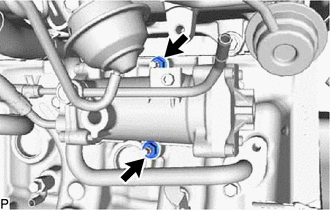
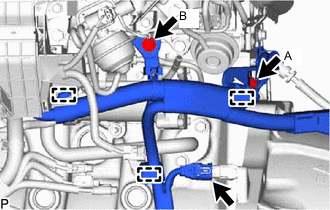
Disconnect the crankshaft position sensor connector and remove the 2 bolts.
-
Detach the 3 clamps and disconnect the engine wire.
-
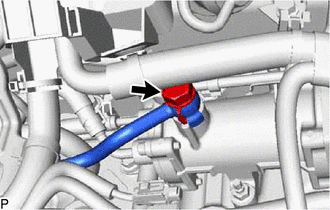
Remove the union bolt and gasket, disconnect the No. 4 fuel pipe sub-assembly from the fuel filter assembly.
-

Remove the 2 fuel pipe clamps from the No. 3 fuel pipe and fuel filter assembly.
Note
Do not scratch or dent the installation surface of the No. 4 fuel pipe sub-assembly.
-
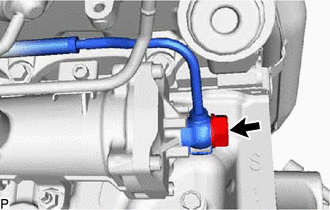
Remove the union bolt and gasket, disconnect the No. 3 fuel pipe from the fuel filter assembly.
-
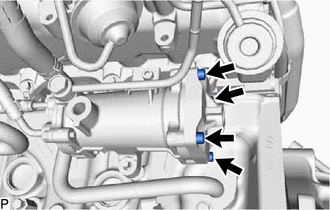
Loosen the 4 screws.
-
Remove the 2 nuts and disconnect the fuel filter assembly from the cylinder block sub-assembly.
-
Remove the 4 screws and fuel filter element from the fuel filter assembly.
Tech Tips
Use a container to catch the draining fuel.
-

Remove the O-ring from the fuel filter assembly.
-
-
INSTALL FUEL FILTER CAP WITH ELEMENT
-
Apply a light coat of diesel fuel to a new O-ring.
-
Install the O-ring to the fuel filter assembly.
-
Temporarily install a new fuel filter element with cap to the fuel filter assembly with the 4 screws.
-
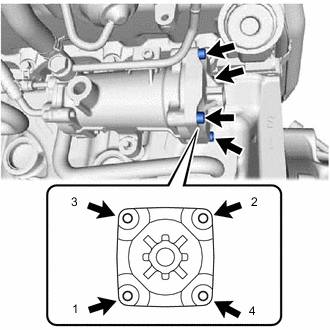
Tighten the 4 screws in the order shown in the illustration.
- Torque:
- 10 N*m { 102 kgf*cm, 7 ft.*lbf }
Note
Check the torque of screw 1 after tightening screw 4.
-
Connect the fuel filter assembly to the cylinder block sub-assembly with the 2 nuts.
- Torque:
- 21 N*m { 214 kgf*cm, 15 ft.*lbf }
-
Install the No. 3 fuel pipe and a new gasket to the fuel filter assembly with the union bolt.
- Torque:
- 42 N*m { 428 kgf*cm, 31 ft.*lbf }
-
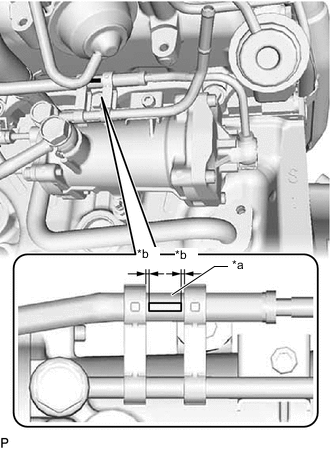
*a Paint Mark *b 0 to 2 mm (0 to 0.0787 in.) Install the 2 fuel pipe clamps to the fuel filter assembly and No. 3 fuel pipe.
Note
Be careful that the fuel pipe clamp and No. 4 fuel pipe sub-assembly do not interfere with each other.
Tech Tips
Make sure the fuel pipe clamp is oriented as shown in the illustration.
-
Install the No. 4 fuel pipe sub-assembly and a new gasket with the union bolt to the fuel filter assembly.
- Torque:
- 42 N*m { 428 kgf*cm, 31 ft.*lbf }
-
Connect the crankshaft position sensor connector.
-
Attach the 3 clamps and connect the engine wire with the 2 bolts.
- Torque:
- for bolt A
- 12.5 N*m { 127 kgf*cm, 9 ft.*lbf }
- for bolt B
- 18.5 N*m { 189 kgf*cm, 14 ft.*lbf }
-
-
INSTALL STARTER ASSEMBLY
-
for 2.0 kW Type:
-
for 2.2 kW Type:
-
-
BLEED AIR FROM FUEL SYSTEM
-
INSPECT FOR FUEL LEAK