ENGINE UNIT DISASSEMBLY

PROCEDURE
-
REMOVE CAMSHAFT TIMING PULLEY
-
REMOVE NO. 2 TIMING BELT COVER
-
REMOVE OIL FILLER CAP SUB-ASSEMBLY
-
REMOVE CYLINDER HEAD COVER SUB-ASSEMBLY
-
Remove the 9 bolts, nut, cylinder head cover sub-assembly and gasket.
-
-
REMOVE CAMSHAFT OIL SEAL RETAINER
-
REMOVE CAMSHAFT OIL SEAL
-
REMOVE CAMSHAFT
-
REMOVE CYLINDER HEAD SUB-ASSEMBLY
-
REMOVE CYLINDER HEAD GASKET
-
REMOVE NO. 2 TIMING BELT IDLER SUB-ASSEMBLY
-
Remove the bolt, No. 2 timing belt idler sub-assembly and spacer.
-
-
REMOVE ENGINE WATER PUMP ASSEMBLY
-
REMOVE NO. 1 TIMING BELT IDLER SUB-ASSEMBLY
-
REMOVE OIL PAN SUB-ASSEMBLY
-
REMOVE OIL STRAINER SUB-ASSEMBLY
-
REMOVE TIMING BELT CASE SUB-ASSEMBLY
-
REMOVE FRONT CRANKSHAFT OIL SEAL
-
REMOVE REAR CRANKSHAFT OIL SEAL RETAINER
-
Remove the 4 bolts, oil seal retainer and gasket.
-
-
REMOVE REAR CRANKSHAFT OIL SEAL
-
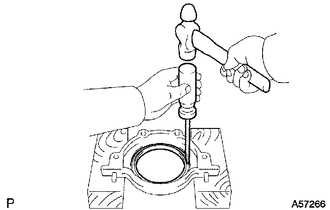
Using a screwdriver and hammer, tap out the rear crankshaft oil seal.
Tech Tips
Tape the screwdriver tip before use.
-