TIMING BELT REMOVAL

CAUTION / NOTICE / HINT
The necessary procedures (adjustment, calibration, initialization or registration) that must be performed after parts are removed, installed or replaced during the timing belt removal/installation are shown below.
| Replacement Part or Procedure | Necessary Procedures | Effects/Inoperative when not Performed | Link |
|---|---|---|---|
| Replacement of timing belt | Mode reset operation |
|
CAUTION:
To prevent burns, do not touch the engine, exhaust manifold or other high temperature components while the engine is hot.
PROCEDURE
-
REMOVE NO. 1 ENGINE UNDER COVER ASSEMBLY
-
REMOVE COMPRESSOR ASSEMBLY WITH MAGNET CLUTCH
-
DRAIN ENGINE COOLANT
-
REMOVE VANE PUMP V BELT
-
REMOVE COOLER COMPRESSOR V BELT
-
REMOVE FAN AND GENERATOR V BELT
-
REMOVE NO. 1 RADIATOR HOSE
-
DISCONNECT VANE PUMP OIL RESERVOIR ASSEMBLY
-
REMOVE OIL RESERVOIR BRACKET
-
REMOVE RADIATOR RESERVOIR
-
REMOVE FAN SHROUD
-
REMOVE VANE PUMP DRIVE PULLEY
-
Remove the 4 bolts, vane pump drive pulley and cooler compressor drive pulley.
-
-
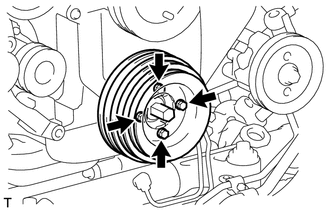
REMOVE CRANKSHAFT PULLEY
-
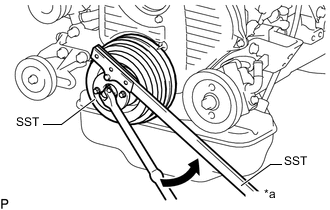
*a Hold 
Turn Using SST, hold the crankshaft pulley and loosen the crankshaft pulley bolt.
- SST
- 09213-54015 ( 91651-60855 )
- 09330-00021
Tech Tips
Make sure to leave the pulley bolt screwed into the crankshaft by 2 or 3 threads.
-
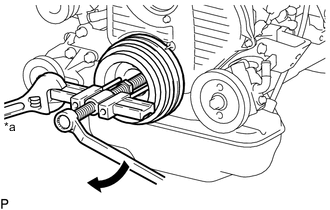
*a Hold Turn Using SST, remove the crankshaft pulley.
- SST
- 09950-50013 ( 09951-05010, 09952-05010, 09953-05020, 09954-05021 )
-
-
REMOVE NO. 1 COMPRESSOR MOUNTING BRACKET
-
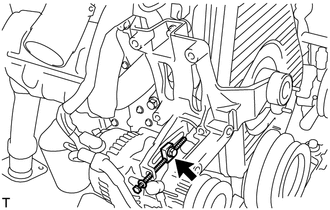
Remove the bolt and disconnect the generator with vacuum pump assembly.
-
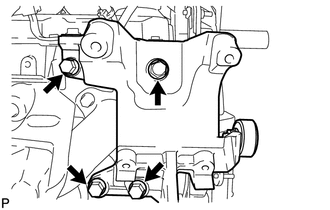
Remove the 4 bolts and No. 1 compressor mounting bracket.
-
-
REMOVE TIMING BELT COVER
-
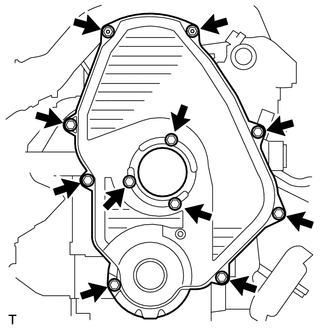
Remove the 11 bolts, washers, timing belt cover, and 2 timing belt cover gaskets.
-
-
REMOVE TIMING BELT GUIDE
-
Remove the timing belt guide.
-
-
SET NO. 1 CYLINDER TO TDC/COMPRESSION
-

*a Timing Mark Turn Using the crankshaft pulley bolt, align the groove of the crankshaft pulley with the timing pointer by turning the crankshaft clockwise.
-
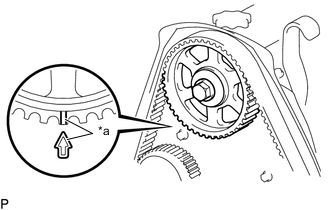
*a Timing Mark Check that the timing marks of the camshaft timing pulley and No. 2 timing belt cover are aligned.
If not, turn the crankshaft 1 revolution (360°).
-
-
REMOVE TIMING BELT
Tech Tips
If reusing the timing belt, draw a direction arrow on the timing belt (in the direction the belt moves when the engine is running), and place matchmarks on the pulleys and timing belt.
-

*a Timing Mark Turn Turn the crankshaft 90° counterclockwise, and align the timing mark of the crankshaft timing pulley with the protrusion of the timing belt case sub-assembly.
Note
If the timing belt is disengaged, having the crankshaft timing pulley at the wrong angle can cause the piston head and valve head to come into contact with each other when removing the camshaft timing pulley, causing damage. Therefore, always set the crankshaft pulley at the correct angle.
-
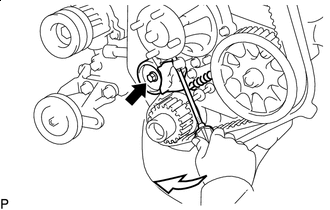

Pry Loosen the bolt, and shift the No. 1 timing belt idler sub-assembly to the left as far as possible.
-
Tighten the bolt, and then relieve the timing belt tension.
-
Remove the timing belt.
-
-
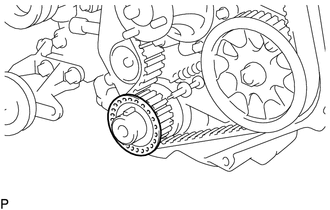
REMOVE NO. 1 TIMING BELT IDLER SUB-ASSEMBLY
-
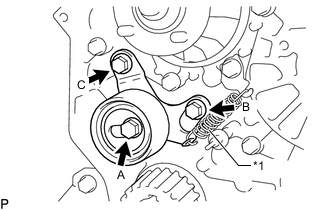
*1 Idler Tension Spring Remove the 2 bolts A and B.
-
Loosen bolt C, and remove the No. 1 timing belt idler sub-assembly and idler tension spring.
Tech Tips
Bolt C is combined with the No. 1 timing belt idler sub-assembly.
-