ВЫПУСКНАЯ ТРУБА УСТАНОВКА
PROCEDURE
-
INSTALL FRONT EXHAUST PIPE ASSEMBLY
-
Install a new gasket and the front exhaust pipe assembly to the exhaust manifold with 3 new nuts.
- Torque:
- 62 N*m { 632 kgf*cm, 46 ft.*lbf }
-
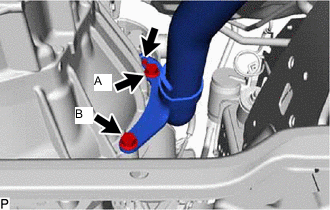
Install the No. 1 exhaust pipe support bracket with the 2 bolts.
- Torque:
- for bolt A
- 71 N*m { 724 kgf*cm, 52 ft.*lbf }
- for bolt B
- 68.7 N*m { 701 kgf*cm, 51 ft.*lbf }
-
Install the clamp with the bolt.
- Torque:
- 19 N*m { 194 kgf*cm, 14 ft.*lbf }
-
-
INSTALL FRONT NO. 2 EXHAUST PIPE SUB-ASSEMBLY
-
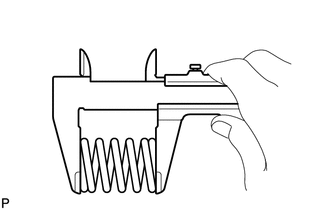
Using a vernier caliper, measure the free length of the compression spring.
Minimum free length 40 mm (1.57 in.) If the free length is less than the minimum, replace the compression spring.
-
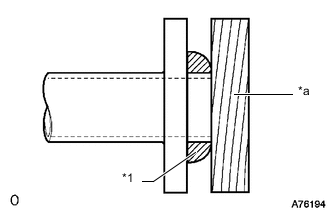
*1 Gasket *a Wooden Block Using a plastic-faced hammer and wooden block, tap on a new gasket until its surface is flush with the front exhaust pipe assembly.
Note
-
Be sure to install the gasket so that it is facing in the correct direction.
-
Do not reuse the gasket.
-
Do not damage the gasket.
-
When connecting the exhaust pipe, do not push on the gasket with the exhaust pipe.
-
-
Connect the front No. 2 exhaust pipe sub-assembly to the exhaust pipe support.
-
Install the front No. 2 exhaust pipe sub-assembly with the 2 compression springs and 2 bolts.
- Torque:
- 43 N*m { 438 kgf*cm, 32 ft.*lbf }
-
-
INSTALL TAILPIPE ASSEMBLY
-
Install a new gasket to the front No. 2 exhaust pipe sub-assembly.
-
Connect the tailpipe assembly to the 4 exhaust pipe supports.
-
Install the tailpipe assembly with the 2 nuts and 2 bolts.
- Torque:
- 43 N*m { 438 kgf*cm, 32 ft.*lbf }
-
-
INSPECT FOR EXHAUST GAS LEAK
If gas is leaking, tighten the areas necessary to stop the leak. Replace damaged parts as necessary.