ТОПЛИВНЫЙ БАК (для моделей с длинной колесной базой) УСТАНОВКА
PROCEDURE
-
INSTALL FUEL TANK TO FILLER PIPE HOSE
-
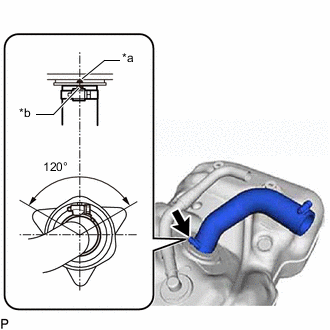
*a Protrusion *b Paint Mark (White) Install the fuel tank to filler pipe hose to the fuel tank assembly, and tighten the clamp to secure the hose.
Tech Tips
Make sure the hose clamp is oriented as shown in the illustration.
-
-
INSTALL FUEL SUCTION WITH PUMP AND GAUGE TUBE ASSEMBLY
-
INSTALL FUEL TANK CLAMP
-
INSTALL FUEL TANK CUSHION
-
Install the 2 fuel tank cushions to the fuel tank assembly.
-
-
INSTALL NO. 1 FUEL TANK HEAT INSULATOR
-
Install the No. 1 fuel tank heat insulator with the 4 No. 2 fuel tank brackets.
-
Install the nut.
- Torque:
- 5.5 N*m { 56 kgf*cm, 49 in.*lbf }
-
-
INSTALL FUEL TANK ASSEMBLY
-
Set the fuel tank assembly on an engine lifter and raise the fuel tank assembly.
Note
Do not allow the fuel tank assembly to contact the vehicle, especially the differential.
-
Fold back approximately half of each cushion so that the wire harness can be installed in the step below.
-
Attach the wire harness to the 6 clamps and connect the fuel sender gauge assembly connector.
Note
Be careful not to cut the wire harness.
-
Install the 2 fuel tank bands with the 2 fuel tank band pins and 2 clips.
-
Install the 2 fuel tank bands with the 2 bolts.
- Torque:
- 45 N*m { 459 kgf*cm, 33 ft.*lbf }
-
-
CONNECT FUEL TANK TO FILLER PIPE HOSE
-
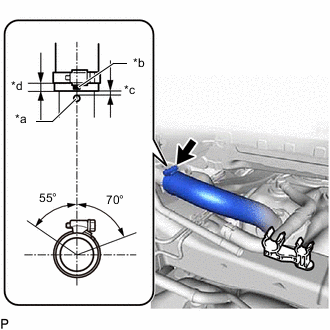
*a Protrusion *b Paint Mark (Yellow) *c 0 to 3 mm (0 to 0.118 in.) *d 2 to 7 mm (0.0787 to 0.276 in.) Connect the fuel tank to filler pipe hose to the fuel tank filler pipe sub-assembly, and tighten the clamp to secure the hose.
Tech Tips
Make sure the hose clamp is oriented as shown in the illustration.
-
-
CONNECT FUEL TANK BREATHER HOSE
-
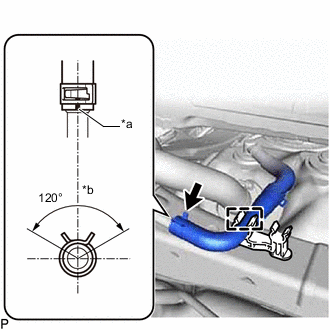
*a Paint Mark *b Top of Vehicle Connect the fuel tank breather hose to the fuel tank filler pipe sub-assembly, and slide the clamp to secure the hose.
Tech Tips
Make sure the hose clamp is oriented as shown in the illustration.
-
Attach the fuel tank breather hose to the clamp.
-
-
CONNECT FUEL TUBE
-
Connect the fuel tank main tube sub-assembly and fuel tank return tube, vent line tube.
-
-
INSTALL NO. 3 FUEL TUBE CLAMP
-
Install the No. 3 fuel tube clamp to the fuel tube.
-
-
INSTALL NO. 1 FUEL TANK PROTECTOR
-
Install the No. 1 fuel tank protector to the fuel tank assembly with the 5 nuts.
- Torque:
- 13 N*m { 133 kgf*cm, 10 ft.*lbf }
-
-
INSTALL FUEL TANK CAP ASSEMBLY
-
CONNECT CABLE TO NEGATIVE BATTERY TERMINAL
Note
When disconnecting the cable, some systems need to be initialized after the cable is reconnected.
-
INSPECT FOR FUEL LEAK