РАДИАТОР СНЯТИЕ
CAUTION / NOTICE / HINT
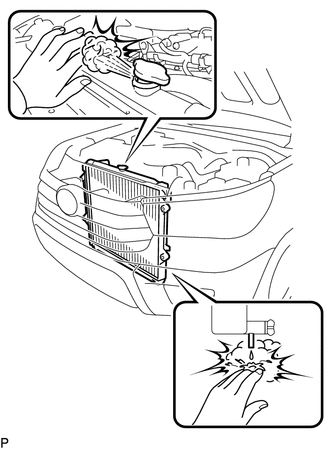
CAUTION:
Do not remove the radiator cap sub-assembly, cylinder block water drain cock plug or radiator drain cock plug while the engine and radiator assembly are still hot. Pressurized, hot engine coolant and steam may be released and cause serious burns.
PROCEDURE
-
REMOVE RADIATOR SIDE DEFLECTOR
-
REMOVE NO. 1 ENGINE UNDER COVER ASSEMBLY
-
DRAIN ENGINE COOLANT
-
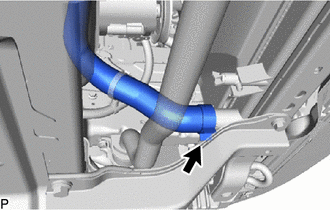
REMOVE NO. 1 RADIATOR HOSE
-
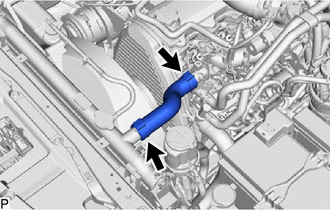
Slide the 2 hose clamps and remove the No. 1 radiator hose.
-
-
DISCONNECT VANE PUMP OIL RESERVOIR ASSEMBLY
-
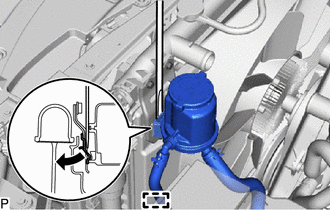
Detach the clamp to disconnect the pressure feed tube assembly from the fan shroud.
-
Detach the claw and disconnect the vane pump oil reservoir assembly from the oil reservoir bracket as shown in the illustration.
-
-
REMOVE OIL RESERVOIR BRACKET
-
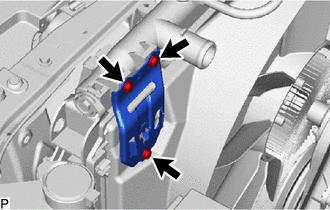
Remove the 3 bolts and oil reservoir bracket.
-
-
REMOVE RADIATOR RESERVOIR
-
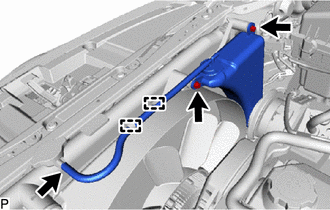
Disconnect the resorvoir hose and detach the 2 clamps from the fan shroud.
-
Remove the 2 bolts and radiator reservoir.
-
-
REMOVE FAN SHROUD
-
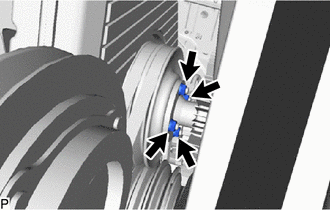
Loosen the 4 nuts holding the fan with fluid coupling assembly.
-
Remove the fan and generator V belt.
-
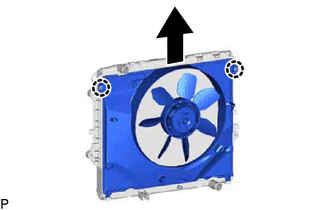
Detach the 2 claws and 2 guides to disconnect the fan shroud from the radiator assembly.
-
Remove the 4 nuts of the fluid coupling assembly and remove the fan shroud together with the fluid coupling assembly.
Note
Do not allow the radiator assembly to interfere with other parts.
-
Remove the fan pulley from the engine water pump assembly.
-
-
DISCONNECT NO. 2 RADIATOR HOSE
-
Slide the hose clamp and disconnect the No. 2 radiator hose from the radiator assembly.
-
-
REMOVE RADIATOR ASSEMBLY
-

Remove the 4 bolts.
-
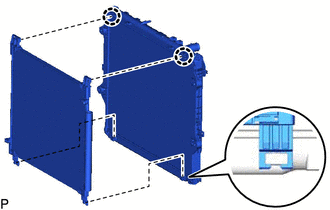
w/ Air conditioning system:
Detach the 2 claws and 2 guides to disconnect the cooler condenser assembly from the radiator assembly.
Note
-
Do not allow the radiator assembly to interfere with other parts.
-
Do not apply any excessive force to the cooler condenser assembly and cooler pipe.
-
-
Remove the radiator assembly from the vehicle.
-
-
REMOVE RADIATOR PROTECTOR (w/o Air Conditioning System)
-
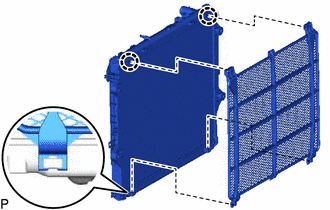
Detach the 2 claws and 2 guides to remove the radiator protector from the radiator assembly.
-
-
REMOVE RADIATOR DRAIN COCK PLUG
-
Remove the radiator drain cock plug from the radiator assembly.
-
Remove the O-ring from the radiator drain cock plug.
-