HORN INSTALLATION
PROCEDURE
-
INSTALL HIGH PITCHED HORN ASSEMBLY
-

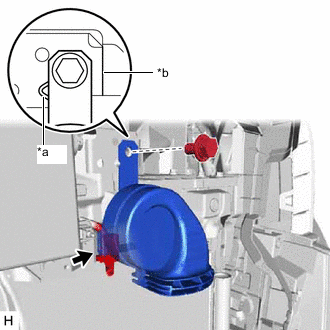
*a Location A *b Location B Align the stay of the high pitched horn assembly with location A on the body side.
Note
Make sure that the high pitched horn assembly does not overlap location B.
-
Install the high pitched horn assembly with the bolt.
- Torque:
- 19.1 N*m { 195 kgf*cm, 14 ft.*lbf }
-
Connect the connector.
-
-
INSTALL LOW PITCHED HORN ASSEMBLY
-
*a Location *b Radiator Support Bracket Side Align the stay of the low pitched horn assembly with the location on the body side.
Note
Make sure that the low pitched horn assembly does not stick out from the side of the radiator support bracket.
-
Install the low pitched horn assembly with the bolt.
- Torque:
- 19.1 N*m { 195 kgf*cm, 14 ft.*lbf }
-
Connect the connector.
-
-
INSTALL RADIATOR GRILLE
-
for ALPHARD:
-
for VELLFIRE:
-
-
INSTALL RADIATOR COVER SUB-ASSEMBLY
-
for ALPHARD:
-
for VELLFIRE:
-
-
ADJUST FRONT TELEVISION CAMERA ASSEMBLY (w/ Panoramic View Monitor System)