HEADLIGHT HOUSING(for ALPHARD) REPLACEMENT
CAUTION / NOTICE / HINT
Note
-
Perform work using clean rubber gloves.
-
Handle components indoors as much as possible to prevent foreign matter from entering and adhering to headlight assembly components.
-
Do not allow water to contact the interior components of the headlight assembly.
-
Do not work in areas with high humidity.
-
Do not reuse parts which have reduced fastening ability due to thread damage.
-
Do not touch the inner surface of the lens and metallic surfaces as much as possible, or they may become dirty.
-
Do not allow metallic surfaces to become dirty, as such surfaces become damaged even if they are only lightly wiped with a soft cloth.
-
Do not use solvent to clean components. Only clean them with a dry cloth.
-
When installing components, make sure that the wire harness is not pinched or pulled.
Tech Tips
-
Use the same procedure for the RH and LH sides.
-
The procedure listed below is for the LH side.
PROCEDURE
-
REMOVE HEADLIGHT ASSEMBLY LH
-
REMOVE HEADLIGHT HOUSING SUB-ASSEMBLY LH
-
Disassemble the headlight assembly LH and remove the reusable parts.
Tech Tips
-
If parts are non-reusable or damaged, prepare new parts.
-
The following parts are included to a new headlight housing sub-assembly LH. Therefore, it is not necessary to remove them from the headlight assembly LH.
Wire harness assembly
Cap
Spring nut
-
Perform the following procedure to remove and install the turn signal light reflector.
-
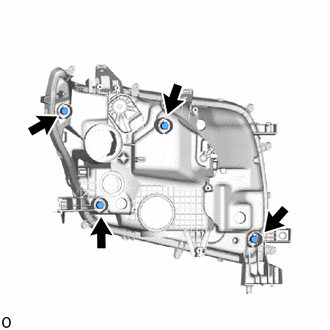
-

Remove the 3 screws and turn signal light reflector.
-
Install included parts:
This procedure describes the installation procedures for the following parts that are included with a new headlight housing sub-assembly LH.
-
Wire harness assembly
-
w/o Cornering Light:
Clearance light bracket
-
Pivot collar
-
Aiming screw holder
-
Cap
-
Spring nut
-
Insert the wire harness assembly into the headlight housing sub-assembly LH through the insertion hole.
Tech Tips
Pass the wire harness through using the wire harness cap.
-
Starting at the connector that is connected to the headlight light control ECU sub-assembly LH, connect the 3 wire harness clamps in installation directions (1) and (2), in that order.
Note
Route the wire harness assembly and install it as shown in the illustration so that there are no protruding, stretched or excessive lengths of wire.
Tech Tips
Connect the standard wire harness clamp to the taped part of the wire harness.
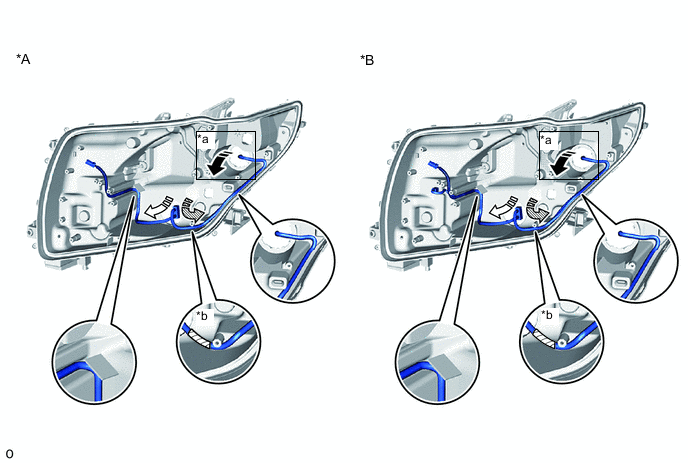
*A w/o Cornering Light *B w/ Cornering Light *a Insertion Hole *b Standard Wire Harness Clamp 
Insert wire harness assembly into headlight housing sub-assembly LH through here 
Install in this Direction (1) 
Install in this Direction (2) 
Taping -
Connect the wire harness clamp and connector on the outside of the headlight housing sub-assembly LH.
Tech Tips
-
Connect the clamp of the headlight housing sub-assembly LH to the position marked with white.
-
After installing the headlight lens assembly LH, close the wire harness cap.
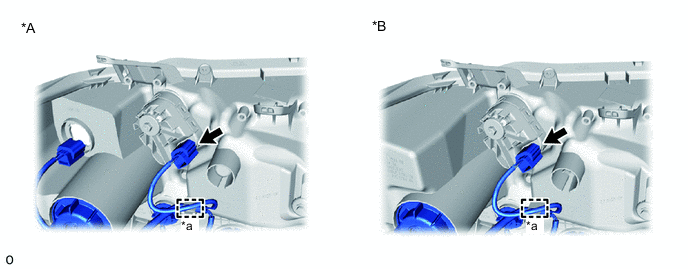
*A w/o Cornering Light *B w/ Cornering Light *a Connect clamp of headlight housing sub-assembly LH to position marked with white - - -
-
w/o Cornering Light:
Install the clearance light bracket with the 2 screws.
-
Install the 4 caps.
-
Install the spring nut.
-
Attach the claw to install the pivot collar and 2 aiming screw holders to the headlight unit assembly LH.
Note
Make sure to replace the pivot collar and aiming screw holder with the new ones included with the new headlight housing sub-assembly LH.
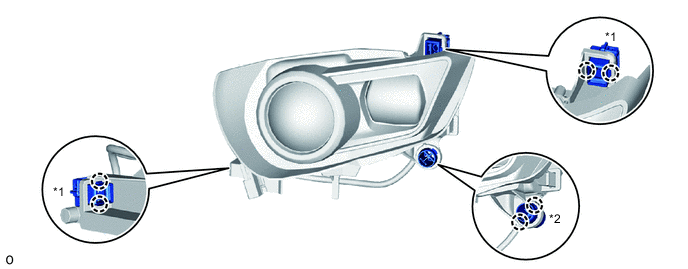
*1 Aiming screw holder *2 Pivot collar
-
-
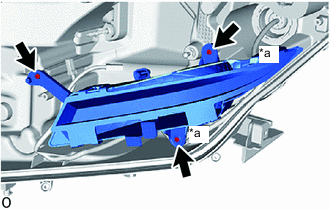
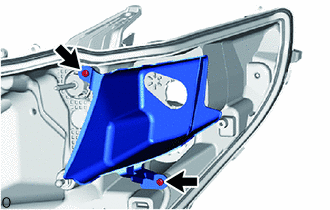
*a Area to Check for Wire Harness Pinching Install the turn signal light reflector:
-
Set the turn signal light reflector in place.
-
Make sure that the wire harness assembly is not pinched.
-
Install the 3 screws.
-
-
Install the reusable and replacement parts to the headlight housing sub-assembly LH.
Note
Before installing the headlight lens assembly LH, check the installation condition of the parts, the connection condition of the connector and the routing condition of the wire harness.
Tech Tips
Use the following included parts to install the headlight assembly LH.
w/o Cornering Light w/ Cornering Light
-
Headlight gasket
-
Clearance light LED unit LH installation "Torx" screw
-
Headlight gasket
-
-
-
INSTALL HEADLIGHT ASSEMBLY LH