BACK DOOR MOTOR UNIT REMOVAL
CAUTION / NOTICE / HINT
The necessary procedures(adjustment, calibration, initialization, or registration) that must be performed after parts are removed, installed or replaced during the back door motor unit removal/installation are shown below.
| Replacement Part or Procedure | Necessary Procedures | Effects / Inoperative when not Performed | Link |
|---|---|---|---|
| Back door motor unit | Reset back door close position | Power back door system |
Note
Check that the power back does not operate before proceeding with work.
PROCEDURE
-
REMOVE REAR NO. 2 SEAT ASSEMBLY LH
-
REMOVE REAR DOOR SCUFF PLATE LH
-
REMOVE REAR NO. 1 FLOOR BOARD ASSEMBLY
-
REMOVE REAR NO. 2 FLOOR BOARD ASSEMBLY
-
REMOVE REAR NO. 3 FLOOR BOARD ASSEMBLY
-
REMOVE UTILITY BOX SUB-ASSEMBLY
-
REMOVE BACK DOOR STRIKER COVER
-
REMOVE BACK DOOR SCUFF PLATE
-
REMOVE REAR UPPER NO. 2 FLOOR BOARD PLATE
-
REMOVE NO. 2 LUGGAGE COMPARTMENT TRIM HOOK
-
REMOVE ROPE HOOK ASSEMBLY
-
REMOVE DECK SIDE GARNISH LH
-
REMOVE REAR QUARTER TRIM PANEL ASSEMBLY LH
-
REMOVE CENTER BACK DOOR GARNISH
-
REMOVE BACK DOOR SERVICE HOLE COVER LH
-
REMOVE BACK DOOR SIDE GARNISH LH
-
DISCONNECT POWER BACK DOOR ROD
-
REMOVE INNER UPPER ROOF SIDE GARNISH LH
-
REMOVE BACK DOOR MOTOR UNIT
-
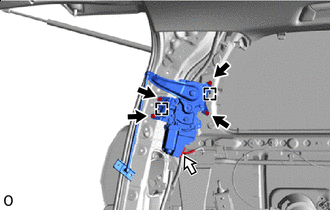

Bolt 
Connector Disconnect the connector.
-
Remove the 4 bolts.
-
Detach the hook and remove the back door motor unit.
-