SLIDING ROOF HOUSING REASSEMBLY
PROCEDURE
-
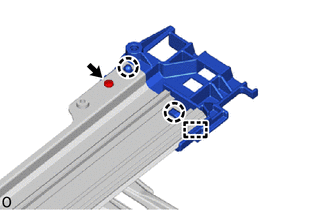
INSTALL SLIDING ROOF GUIDE BLOCK RH
-
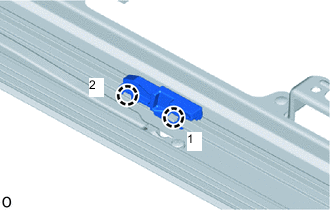
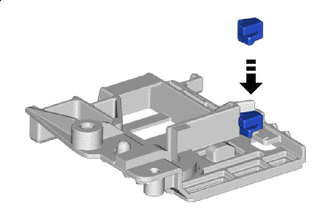
Attach the claw in the order shown in the illustration and install the sliding roof guide block RH.
-
-
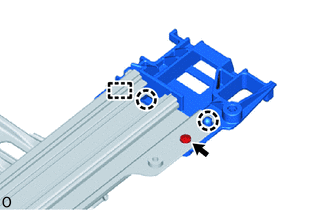
INSTALL SLIDING ROOF GUIDE BLOCK LH
Tech Tips
Use the same procedure described for the RH side.
-
INSTALL SLIDING ROOF DRIVE CABLE RH
-
Install the sliding roof drive cable RH to the rear slide roof housing sub-assembly.
-
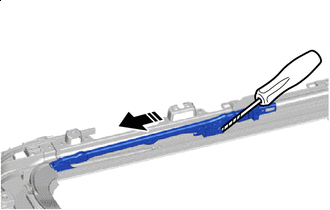

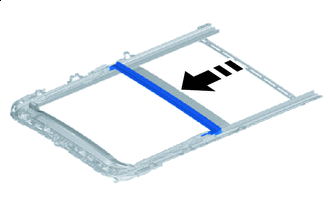
Protective Tape 
Slide Using a screwdriver, slide the sliding roof drive cable RH as shown in the illustration to the end.
Tech Tips
Tape the screwdriver tip before use.
-
-
INSTALL SLIDING ROOF DRIVE CABLE LH
-
Install the sliding roof drive cable LH to the rear slide roof housing sub-assembly.
-
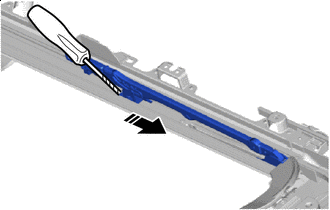
Protective Tape Slide Using a screwdriver, slide the sliding roof drive cable LH as shown in the illustration to the end.
Tech Tips
Tape the screwdriver tip before use.
-
-
ADJUST FULLY CLOSED POSITION
-
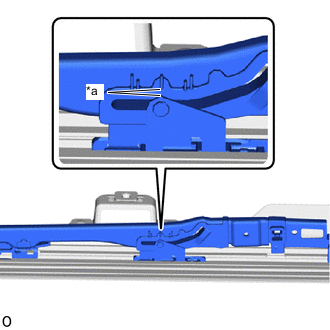
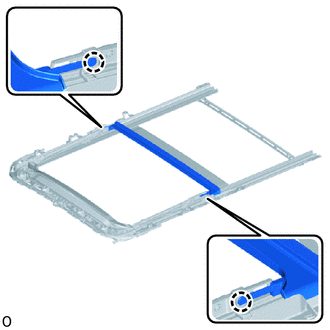
*a Alignment Mark Slide the sliding roof drive cable and align the alignment marks.
Tech Tips
The illustration shown is for the RH side. Use the same procedure for the LH side.
-
-
INSTALL REAR ROOF DRIP CHANNEL
-
Slide Slide the rear roof drip channel as shown in the illustration to install it to the rear slide roof housing sub-assembly.
-
Attach the claw to install the rear roof drip channel to the sliding roof drive cable.
-
-
INSTALL NO. 2 SUNSHADE TRIM SUB-ASSEMBLY
-
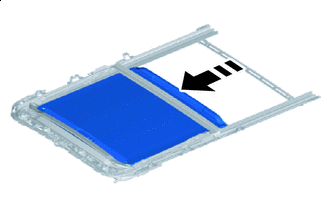
Slide Slide the No. 2 sunshade trim sub-assembly as shown in the illustration to install it to the rear slide roof housing sub-assembly.
-
Install in this Direction When there is no stopper on sliding roof drain hose joint:
-
Install the stopper to the sliding roof drain hose joint RH as shown in the illustration.
Tech Tips
Use the same procedure for both stoppers.
-
-
Attach the claw and guide and install the sliding roof drain hose joint RH with the stopper.
-
Install the screw.
- Torque:
- 2.0 N*m { 20 kgf*cm, 18 in.*lbf }
-
Attach the claw and guide and install the sliding roof drain hose joint LH with the stopper.
-
Install the screw.
- Torque:
- 2.0 N*m { 20 kgf*cm, 18 in.*lbf }
-
-
INSTALL SLIDING ROOF DRIVE GEAR ASSEMBLY
-
Apply MP grease around the gear of the sliding roof drive gear assembly.
-
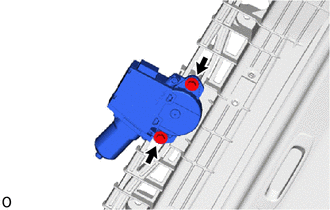
Install the sliding roof drive gear assembly with the 2 bolts.
- Torque:
- 5.4 N*m { 55 kgf*cm, 48 in.*lbf }
-
-
INSTALL NO. 2 REMOVABLE ROOF BRACKET
Tech Tips
-
Use the same procedure for the RH and LH sides.
-
The procedure listed below is for the LH side.
-
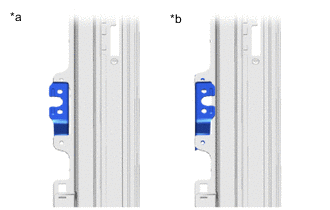
*a CORRECT *b INCORRECT Correctly alighn a new No. 2 removable roof bracket as shown in the illustration.
-

Vehicle Front Support the No. 2 removable roof bracket as shown in the illustration.
-
Temporarily install the 2 new φ4 mm (0.157 in.) rivets.
-
Install a nose piece to an air riveter or hand riveter. Then insert the mandrel part of a new φ4 mm (0.157 in.) rivet into the nose piece.
-
Place the 2 rivets so that they are to the installation holes.
-
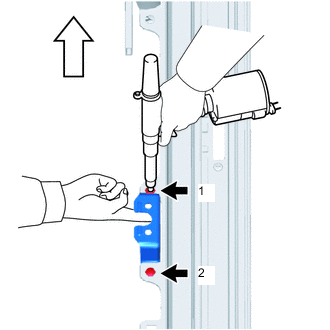
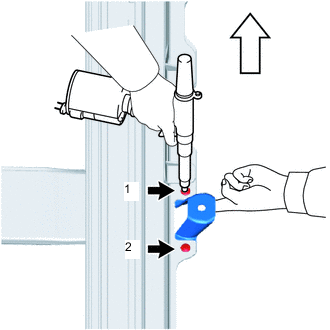
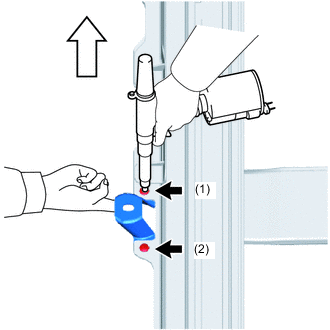
Using an air riveter or hand riveter, install the No. 2 removable roof bracket with 2 new rivets in the order shown in the illustration.
Note
-
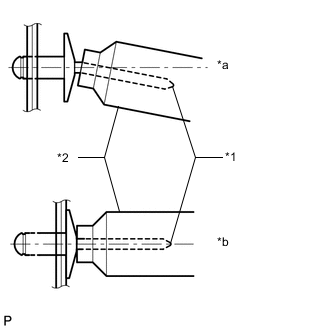
*a INCORRECT *b CORRECT *1 Mandrel *2 Riveter Do not pry the rivet with the riveter, as this will cause damage to the riveter and mandrel.
-
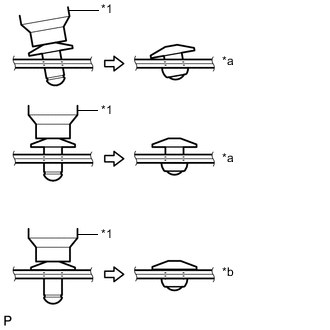
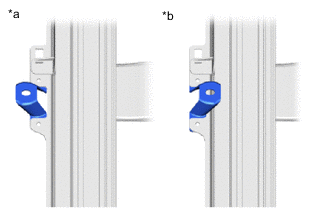
*a INCORRECT *b CORRECT *1 Riveter Confirm that the rivets are seated properly against the bracket.
-
Do not tilt the riveter when installing the rivet to the bracket.
-
Do not leave any space between the rivet head and bracket.
-
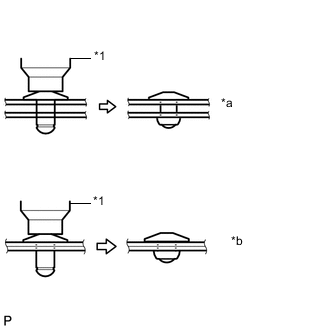
*a INCORRECT *b CORRECT *1 Riveter Do not leave any space between the bracket and rear slide roof housing sub-assembly. Firmly hold together the 2 items while installing the rivet.
-
-
-
INSTALL REMOVABLE ROOF HOUSING SIDE MOUNTING BRACKET RH
Tech Tips
The shapes of the removable roof housing side mounting bracket RH and LH differ. Therefore, make sure to confirm the shapes prior to installation.
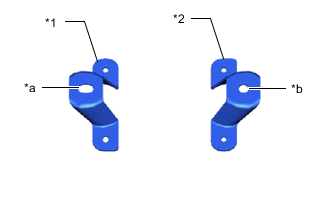
*1 Removable Roof Housing Side Mounting Bracket LH *2 Removable Roof Housing Side Mounting Bracket RH *a Ellipse *b Circle
-
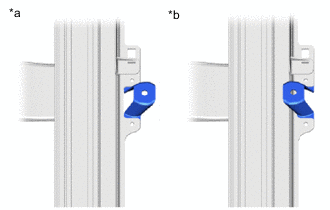
*a CORRECT *b INCORRECT Correctly alighn a new removable roof housing side mounting bracket RH as shown in the illustration.
-
Vehicle Front Support the removable roof housing side mounting bracket RH as shown in the illustration.
-
Temporarily install the 2 new φ4 mm (0.157 in.) rivets.
-
Install a nose piece to an air riveter or hand riveter. Then insert the mandrel part of a new φ4 mm (0.157 in.) rivet into the nose piece.
-
Place the 2 rivets so that they are to the installation holes.
-
Using an air riveter or hand riveter, install the removable roof housing side mounting bracket RH with 2 new rivets in the order shown in the illustration.
Note
-
*a INCORRECT *b CORRECT *1 Mandrel *2 Riveter Do not pry the rivet with the riveter, as this will cause damage to the riveter and mandrel.
-
*a INCORRECT *b CORRECT *1 Riveter Confirm that the rivets are seated properly against the bracket.
-
Do not tilt the riveter when installing the rivet to the bracket.
-
Do not leave any space between the rivet head and bracket.
-
*a INCORRECT *b CORRECT *1 Riveter Do not leave any space between the bracket and rear slide roof housing sub-assembly. Firmly hold together the 2 items while installing the rivet.
-
-
-
INSTALL REMOVABLE ROOF HOUSING SIDE MOUNTING BRACKET LH
Tech Tips
The shapes of the removable roof housing side mounting bracket RH and LH differ. Therefore, make sure to confirm the shapes prior to installation.
*1 Removable Roof Housing Side Mounting Bracket LH *2 Removable Roof Housing Side Mounting Bracket RH *a Ellipse *b Circle
-
*a CORRECT *b INCORRECT Correctly alighn a new removable roof housing side mounting bracket LH as shown in the illustration.
-
Vehicle Front Support the removable roof housing side mounting bracket LH as shown in the illustration.
-
Temporarily install the 2 new φ4 mm (0.157 in.) rivets.
-
Install a nose piece to an air riveter or hand riveter. Then insert the mandrel part of a new φ4 mm (0.157 in.) rivet into the nose piece.
-
Place the 2 rivets so that they are to the installation holes.
-
Using an air riveter or hand riveter, install the removable roof housing side mounting bracket LH with 2 new rivets in the order shown in the illustration.
Note
-
*a INCORRECT *b CORRECT *1 Mandrel *2 Riveter Do not pry the rivet with the riveter, as this will cause damage to the riveter and mandrel.
-
*a INCORRECT *b CORRECT *1 Riveter Confirm that the rivets are seated properly against the bracket.
-
Do not tilt the riveter when installing the rivet to the bracket.
-
Do not leave any space between the rivet head and bracket.
-
*a INCORRECT *b CORRECT *1 Riveter Do not leave any space between the bracket and rear slide roof housing sub-assembly. Firmly hold together the 2 items while installing the rivet.
-
-