FRONT SIDE FIX WINDOW GLASS INSTALLATION
PROCEDURE
-
INSTALL FRONT SIDE FIX WINDOW ASSEMBLY LH
-
*1 Vehicle Body 
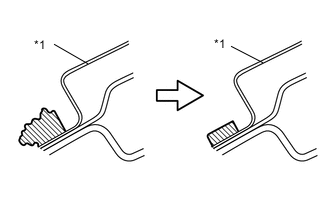
Adhesive Clean and shape the contact surface of the vehicle body.
-
On the contact surface of the vehicle body, use a knife to cut away excess adhesive as shown in the illustration.
Tech Tips
Leave as much adhesive on the vehicle body as possible.
Note
Be careful not to damage the vehicle body.
-
Clean the contact surface of the vehicle body with cleaner.
Tech Tips
Even if all the adhesive has been removed, clean the vehicle body.
-
-
Front side fix window assembly LH preliminary installation procedures.
-
Using a suction cup, install a new front side fix window assembly LH.
-
Apply Primer M to the exposed part of the vehicle body.
Note
-
Do not apply too much Primer M.
-
Do not apply Primer M to the adhesive.
-
Be careful when applying primer to the panel joints and spot welds.
-
-
-
Apply Primer G to the front side fix window assembly LH in the locations shown in the illustration.

*a Back Side of Front Side Fix Window LH *b Adhesive Application Center Line Primer M Application Area - - Note
Do not apply too much Primer G.
-
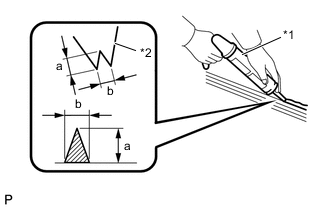
*1 Sealer Gun *2 Nozzle Cut off the tip of a cartridge nozzle as shown in the illustration.
Standard Area Measurement a 8.0 mm (0.3150 in.) b 6.0 mm (0.2362 in.) -
Load a sealer gun with the cartridge.
-
Apply a bead of adhesive as shown in the illustration.
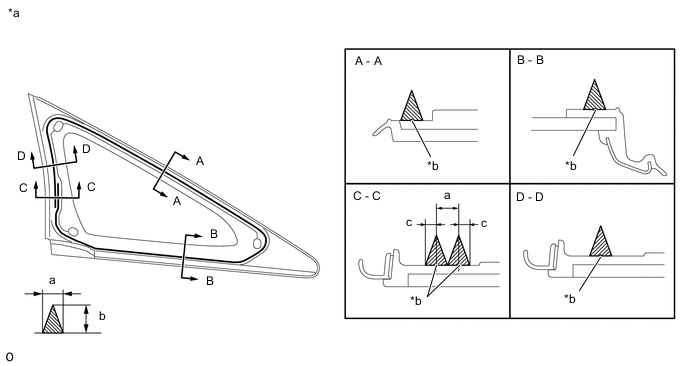
*a Back Side of Front Side Fix Window LH *b Adhesive Application Center Line Adhesive - - Standard Area Measurement a 6.0 mm (0.2362 in.) b 8.0 mm (0.3150 in.) c 3.0 mm (0.1181 in.) Note
Apply the adhesive after Primer G has been allowed to dry (approx. 3 min).
-
Install front side fix window assembly.
-
Using a suction cup, attach the 5 clips to install a new front side fix window assembly LH.
Note
-
Install the front side fix window assembly LH after Primer M on the vehicle body has been allowed to dry (approx. 3 min).
-
From the interior, check that the front side fix window assembly LH is securely attached.
-
-
Lightly press the front side fix window assembly LH so that it is securely fit to the vehicle body.
Tech Tips
Press the glass with a force of 98 N (10 kgf, 22 lbf) or more.
-
-
Using a scraper, remove any excess adhesive or apply as necessary.
-
Remove any excess adhesive before it hardens.
-
Hold the front side fix window assembly LH in place securely with protective tape or equivalent until the adhesive hardens.
Tech Tips
Follow the instructions for each adhesive manufacturer or the corresponding owner's manual for the minimum amount of time necessary prior to driving the vehicle.
-
-
INSPECT FOR LEAK AND REPAIR
-
After the adhesive has hardened, apply water from the outside of the vehicle. Check that no water leaks into the cabin.
-
If water leaks into the cabin, allow the water to dry and add adhesive.
-
Remove the protective tape.
-
-
INSTALL LOWER FRONT PILLAR GARNISH LH
-
INSTALL FRONT PILLAR GARNISH LH
-
INSTALL PILLAR ASSIST GRIP ASSEMBLY
-
INSTALL ASSIST GRIP PLUG