ION GENERATOR(for Rear Side) INSTALLATION
PROCEDURE
-
INSTALL NO. 2 ROOF HEADLINING RETAINER BRACKET
-

Attach the claw to install the No. 2 roof headlining retainer bracket.
-
Install the screw.
-
-
INSTALL REAR AIR DUCT SUB-ASSEMBLY
-
w/ Sliding Roof:
Attach the claw to install the rear air duct sub-assembly.
-
w/o Sliding Roof:
Attach the claw to install the rear air duct sub-assembly.
-
-
INSTALL NO. 2 ION GENERATOR SUB-ASSEMBLY
-
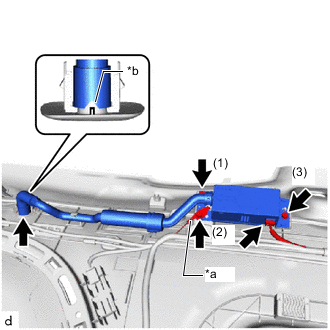
*a Ground Wire *b Standard Position w/ Sliding Roof:
-
Install the No. 2 ion generator sub-assembly with rear air duct sub-assembly.
-
Tighten the 3 screws, ground wire in the order shown in the illustration.
-
Install the rear air duct sub-assembly to the No. 2 roof headlining retainer bracket.
-
Securely connect the connector to the No. 2 ion generator sub-assembly until it makes a "click" sound.
-
-
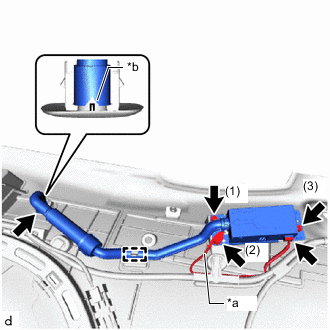
*a Ground Wire *b Standard Position w/o Sliding Roof:
-
Install the No. 2 ion generator sub-assembly with rear air duct sub-assembly.
-
Tighten the 3 screws, ground wire in the order shown in the illustration.
-
Install the rear air duct sub-assembly to the No. 2 roof headlining retainer bracket.
-
Securely connect the connector to the No. 2 ion generator sub-assembly until it makes a "click" sound.
-
-
-
INSTALL ROOF HEADLINING ASSEMBLY