REAR NO. 1 SEAT ASSEMBLY(for Manual Captain Seat) REASSEMBLY
CAUTION / NOTICE / HINT
CAUTION:
When working with sharp areas such as the rear No. 1 seat assembly frame, wear protective gloves to prevent injury to your hands.
Tech Tips
The procedure listed below is for the RH side. Use the same procedure for the RH and LH sides, unless otherwise specified.
PROCEDURE
-
INSTALL NO. 1 SEAT LEG SUB-ASSEMBLY RH
-
INSTALL REAR SEAT LOCK ASSEMBLY (for Super Long Slide Seat)
-
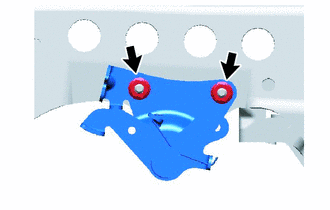
Install the rear seat lock assembly with the 2 nuts.
- Torque:
- 4.0 N*m { 41 kgf*cm, 35 in.*lbf }
-
-
INSTALL REAR SEAT CUSHION BRACKET
-
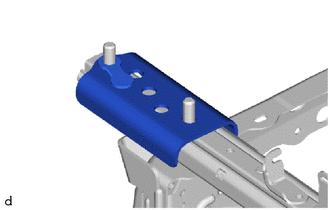
Install the rear seat cushion bracket.
-
-
INSTALL NO.1 SEAT CUSHION FRAME SUB-ASSEMBLY RH
-
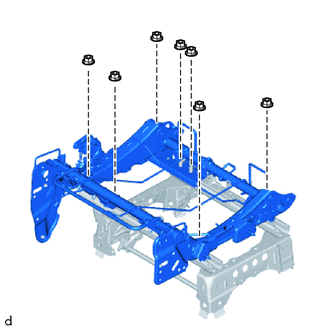
Install the No. 1 seat cushion frame sub-assembly RH with the 7 nuts.
- Torque:
- 42 N*m { 428 kgf*cm, 31 ft.*lbf }
-
-
INSTALL REAR SEAT LOCK HOOK RH
-

Install the rear seat lock hook RH with the 2 bolts.
- Torque:
- 42 N*m { 428 kgf*cm, 31 ft.*lbf }
-
-
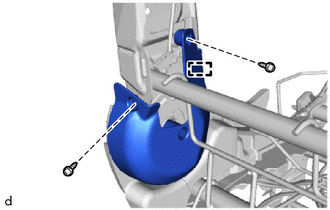
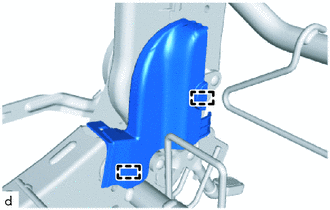
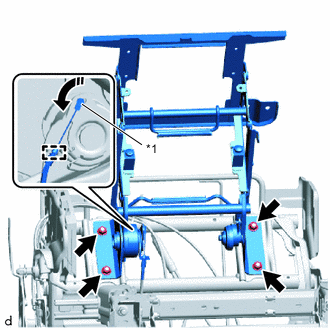
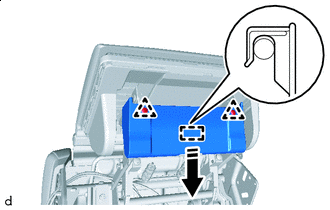
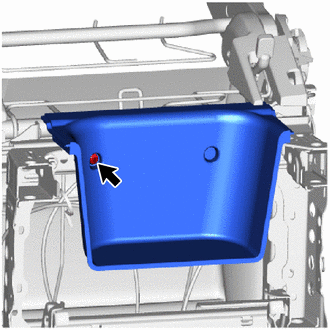
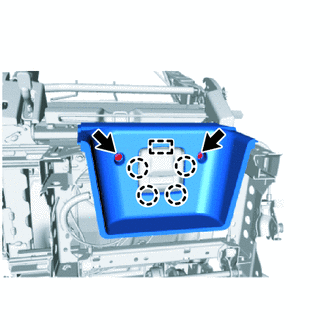
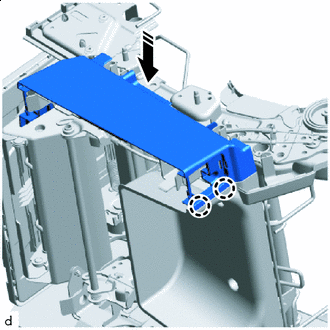
INSTALL NO. 1 SEATBACK FRAME SUB-ASSEMBLY RH
-
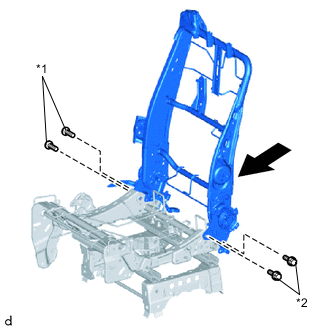
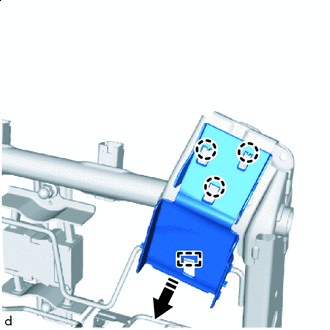
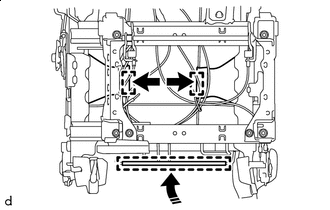
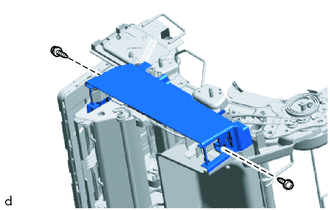
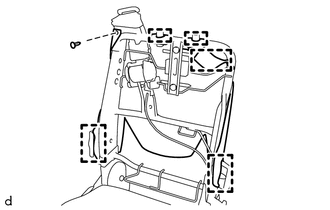
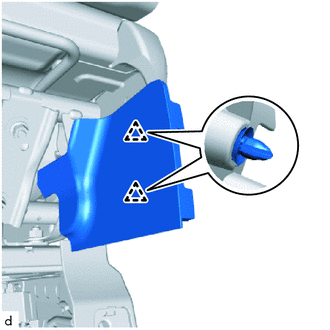
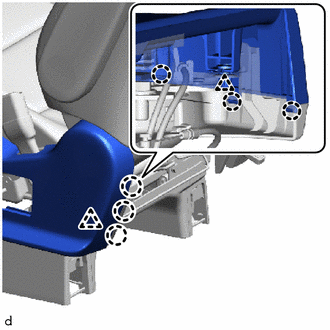
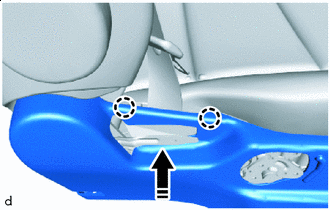
*1 TORX Bolt *2 Bolt Temporarily install the No. 1 seatback frame sub-assembly RH with the 2 "TORX" bolts and 2 bolts.
-
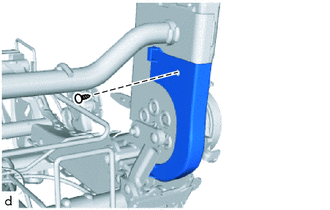
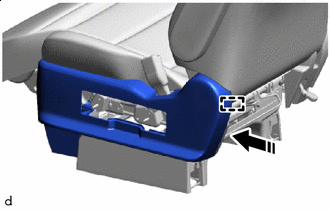
Using a T55 "TORX" socket wrench, install the No. 1 seatback frame sub-assembly RH with the 2 TORX bolts.
- Torque:
- 30 N*m { 306 kgf*cm, 22 ft.*lbf }
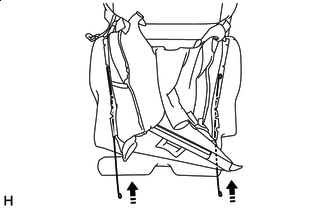
Tech Tips
Tighten the bolts while pushing the No. 1 seatback frame sub-assembly RH in the direction of the arrow shown in the illustration.
-
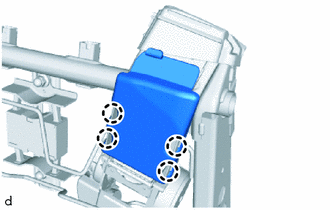
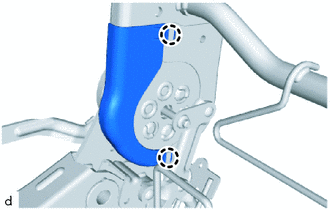
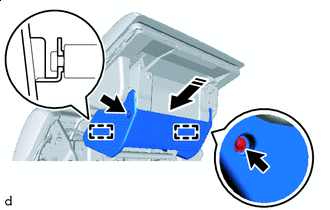
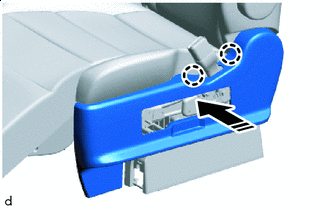
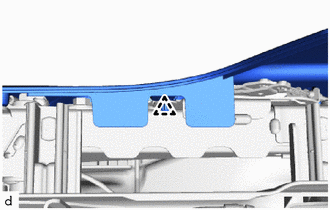
Tighten the 2 bolts.
- Torque:
- 42 N・m { 428 kgf・cm }
Tech Tips
In the same way as when tightening the "TORX" bolts, tighten the bolts while pushing the No. 1 seatback frame sub-assembly RH in the direction of the arrow shown in the illustration.
-
-
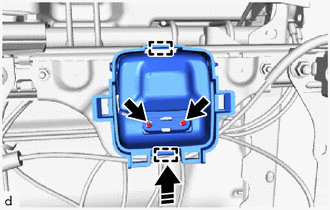
INSTALL REAR SEAT LOCK CONTROL CABLE (for Super Long Slide Seat)
-
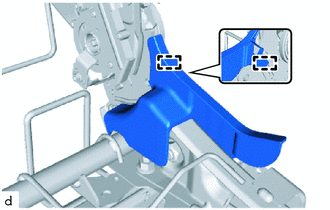
Connect the cable end by turning it in the direction of the arrow in the illustration and attach the casing cap.
*1 Cable End 
Install in this Direction *a Cable Positioning Tape (Pink) - - Tech Tips
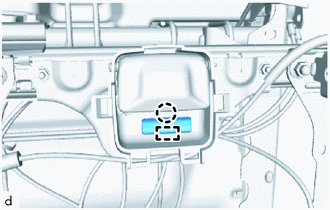
Install the green casing cap middle bar (third bar).
-
Attach the clamp and install the cable tie to areas with cable positioning tape, and then install the rear seat lock control cable.
-
-
INSTALL SEAT TRACK CONTROL CABLE ASSEMBLY
-
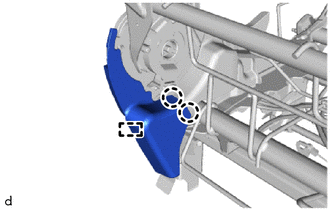
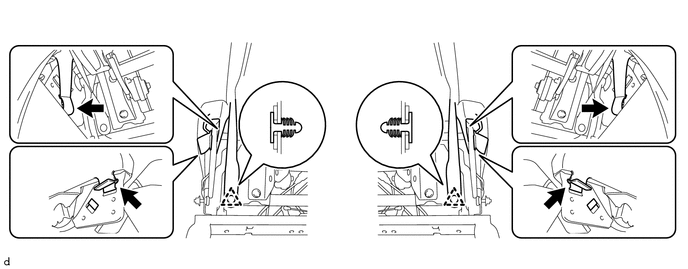
Connect the cable end by turning them in the direction of the arrows in the illustration.
-
Attach the casing cap and install the seat track control cable assembly.
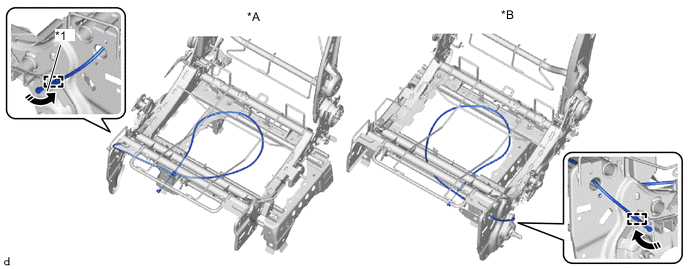
*A for RH Side *B for LH Side *1 Cable End Install in this Direction Tech Tips
Install the natural-colored casing cap (first bar).
-
-
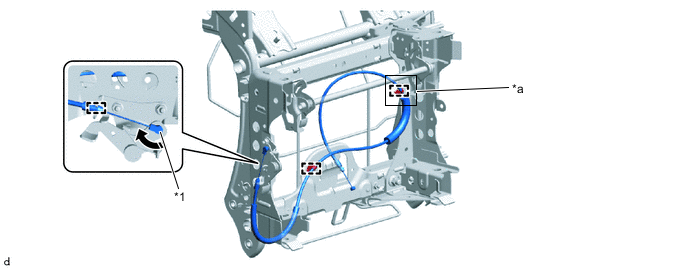
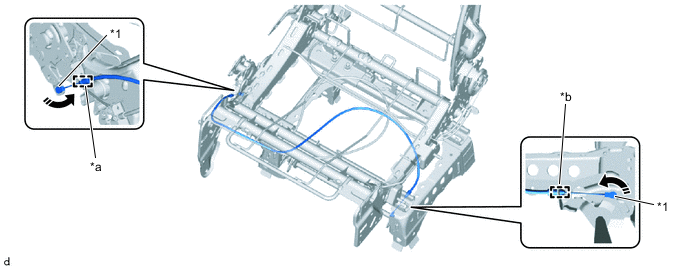
INSTALL REAR NO. 1 SEAT LOCK CABLE ASSEMBLY
-
Connect the 2 cable ends by turning them in the direction of the arrows in the illustration.
-
Attach the 2 casing cap and install the rear No. 1 seat lock cable assembly.
*1 Cable End Install in this Direction Tech Tips
-
Install the *a blue casing cap (first bar).
-
Install the *b orange casing cap (first bar).
-
-
-
INSTALL RECLINING ADJUSTING CABLE ASSEMBLY
-
Connect the 2 cable ends by turning them in the direction of the arrows in the illustration.
-
Attach the 2 casing cap and install the reclining adjusting cable assembly.
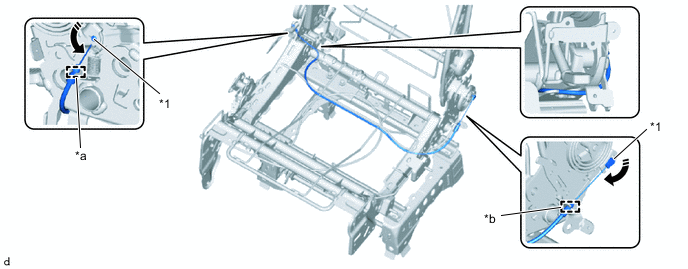
*1 Cable End Install in this Direction Tech Tips
-
Install the *a natural-colored casing cap (first bar).
-
Install the *b pink casing cap (first bar).
-
-
-
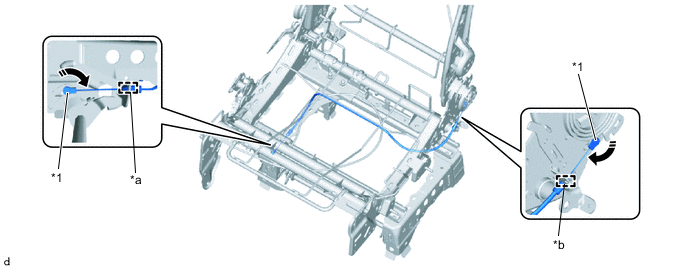
INSTALL SEAT TRACK CONTROL CABLE ASSEMBLY
-
Connect the 2 cable ends by turning them in the direction of the arrows in the illustration.
-
Attach the 2 casing cap and install the seat track control cable assembly.
*1 Cable End Install in this Direction Tech Tips
-
Install the *a pink casing cap (first bar)
-
Install the *b yellow casing cap (first bar).
-
-
-
INSTALL REAR NO. 1 SEAT TRACK CONTROL CABLE ASSEMBLY LH
-
Connect the 3 cable ends by turning them in the direction of the arrows in the illustration.
-
Attach the 3 casing cap and install the rear No. 1 seat track control cable assembly LH.
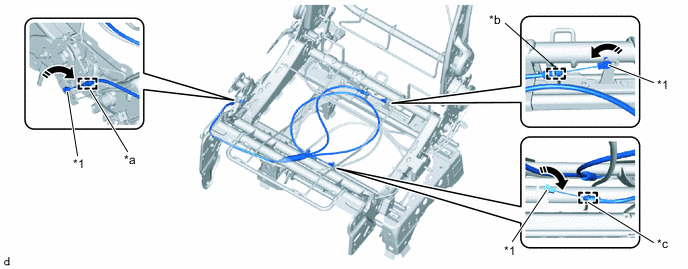
*1 Cable End Install in this Direction Tech Tips
-
Install the *a orange casing cap (first bar).
-
Install the *b gray casing cap (first bar).
-
Install the *c orange casing cap (first bar).
-
-
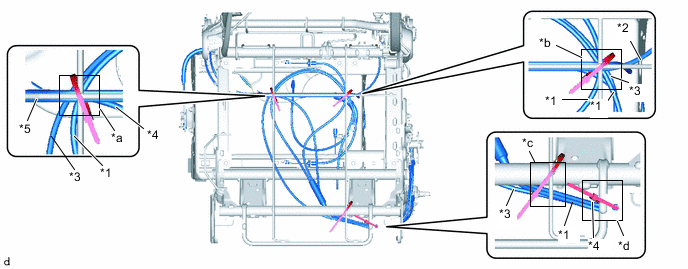
for Seat RH Side
-
Install 4 new cable ties to the areas with positioning tape on the cables.

*1 Rear No. 1 Seat Track Control Cable Assembly LH *2 Reclining Adjusting Cable Assembly *3 Seat Track Control Cable Assembly *4 Seat Track Control Cable Assembly *5 Rear No. 1 Seat Lock Cable Assembly - - *a Cable Positioning Tape (White) *Only ottoman cable is red *b Cable Positioning Tape (Yellow) *Only one for ottoman cable has protector *c Cable Positioning Tape (Light Blue) *d Cable Positioning Tape (Pink)
-
-
for Seat LH Side
-
Install 4 new cable ties to the areas with positioning tape on the cables.
*1 Rear No. 1 Seat Track Control Cable Assembly LH *2 Reclining Adjusting Cable Assembly *3 Seat Track Control Cable Assembly *4 Seat Track Control Cable Assembly *5 Rear No. 1 Seat Lock Cable Assembly - - *a Cable Positioning Tape (White) *Only one for ottoman cable has protector *b Cable Positioning Tape (Yellow) *Only ottoman cable is red *c Cable Positioning Tape (Light Blue) *d Cable Positioning Tape (Pink)
-
-
-
INSTALL REAR SEATBACK SPRING DAMPER RH
-
Install the rear seatback spring damper RH with the 2 nuts.
- Torque:
- 14.5 N*m { 148 kgf*cm, 11 ft.*lbf }
-
-
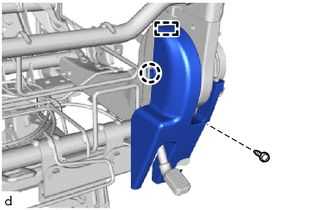
INSTALL REAR SEAT SHOULDER BELT HOLE COVER RH
-
Install in this Direction Move the rear seat shoulder belt hole cover RH in the direction indicated by the arrow shown in the illustration and insert the guide
-
Attach the claw and install the rear seat shoulder belt hole cover RH.
-
-
INSTALL NO. 1 SEAT 3 POINT TYPE BELT ASSEMBLY RH
-
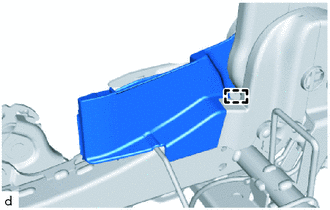
INSTALL REAR SEAT SHOULDER BELT HOLE COVER RH
-
Attach the claw and install the rear seat shoulder belt hole cover RH.
-
-
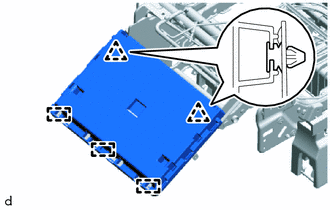
INSTALL REAR NO. 1 SEAT RECLINING ADJUSTER INSIDE COVER
-
Insert the guide and install the rear No. 1 seat reclining adjuster inside cover.
-
-
INSTALL REAR NO. 1 SEAT RECLINING ADJUSTER INSIDE COVER
-
Insert the guide and claw and install the rear No. 1 seat reclining adjuster inside cover.
-
-
INSTALL REAR NO. 1 SEAT RECLINING ADJUSTER INSIDE COVER
-
Insert the guide and temporarily install the reclining adjuster inside cover LH (for Rear No. 1 Seat).
-
Install the rear No. 1 seat reclining adjuster inside cover with the 2 screws.
-
-
INSTALL REAR NO. 1 SEAT RECLINING ADJUSTER INSIDE COVER
-
Install the rear No. 1 seat reclining adjuster inside cover with the clip.
-
-
INSTALL REAR NO. 1 SEAT RECLINING ADJUSTER INSIDE COVER
-
Attach the claw and install the rear No. 1 seat reclining adjuster inside cover.
-
-
INSTALL REAR NO. 1 SEAT RECLINING ADJUSTER INSIDE COVER
-
Insert the guide and install the rear No. 1 seat reclining adjuster inside cover.
-
-
INSTALL REAR NO. 1 SEAT RECLINING ADJUSTER INSIDE COVER
-
Attach the claw and guide and install the rear No. 1 seat reclining adjuster inside cover.
-
Install the screw.
-
-
INSTALL REAR NO. 1 SEAT RECLINING ADJUSTER INSIDE COVER
-
Insert the guide and install the rear No. 1 seat reclining adjuster inside cover.
-
-
INSTALL REAR SEAT FOOTREST ADJUSTER ASSEMBLY
-
*1 Cable End Install in this Direction Install the rear seat footrest adjuster assembly with the 4 nuts.
- Torque:
- 22 N*m { 224 kgf*cm, 16 ft.*lbf }
-
Connect the cable end by turning it in the direction of the arrow in the illustration.
-
Attach the casing cap.
Tech Tips
Install the red casing cap middle bar (third bar).
-
-
INSTALL REAR SEAT LEGREST COVER
-
Attach the clip and guide and install the rear seat leg rest cover.
-
-
INSTALL SEAT COVER WIRE
-
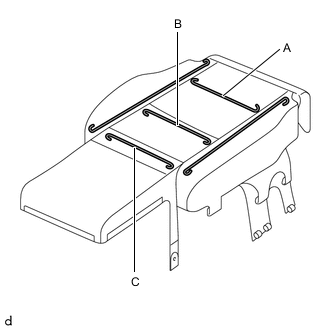
Install the seat cover wire.
Tech Tips
-
Wire 1000 mm (3.28 ft.) or longer and shaped wire are available as supplied parts.
-
When a wire that is less than 1000 mm in length is needed.
-
Make sure to read the precautions before preparing the wire.
Dimensions A 260 mm B 300 mm C 340 mm Tech Tips
The dimensions shown in the illustration are the length.
-
-
-
INSTALL NO. 1 SEAT CUSHION COVER SUB-ASSEMBLY RH
Tech Tips
-
Refer to the precautions on wrinkles to avoid creating any on the No. 1 seat cushion cover sub-assembly RH when installing the seat cover.
-
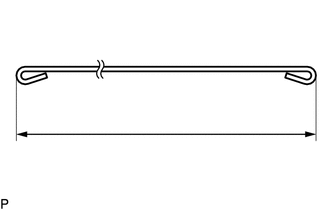
Align the seam allowance in a single direction as shown in the illustration.
-
Set the No. 1 seat cushion cover sub-assembly RH.
-
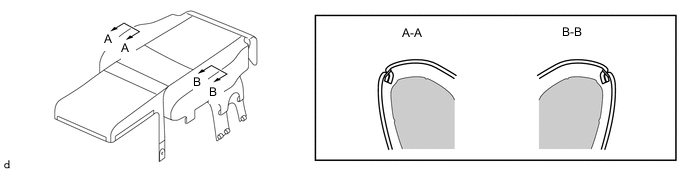
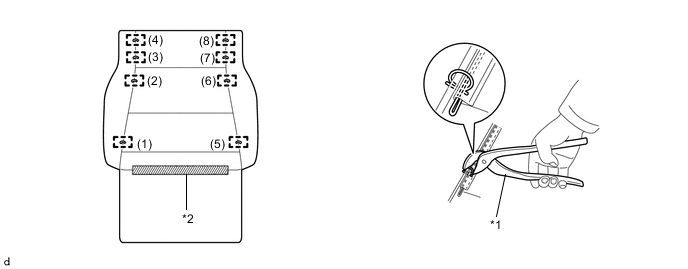
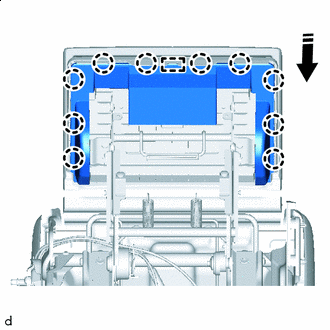
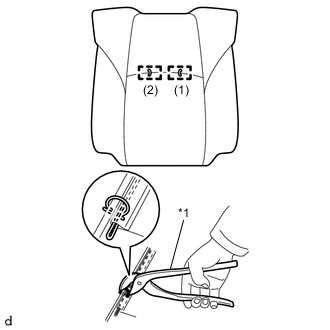
Using hog ring pliers, install 9 new hog rings.
Note
-
Do not damage the No. 1 seat cushion cover sub-assembly RH or allow it to become dirty.
-
Be sure to securely tighten the hog rings as shown in the illustration while preventing wrinkles from forming on the center of the No. 1 seat cushion pad RH and fabric.
*1 Hog Ring Pliers - - -
-
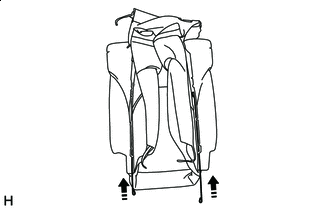
Install in this Direction Return the seat cover wire to its original position.
-
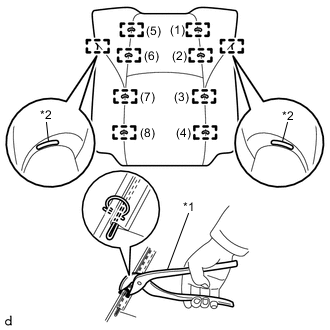
Using hog ring pliers, install the No. 1 seat cushion cover sub-assembly RH to the No. 1 seat cushion pad with 8 new hog rings and fastening tape.
Note
-
Do not damage the No. 1 seat cushion cover sub-assembly RH or allow it to become dirty.
-
Be sure to securely tighten the hog rings as shown in the illustration while preventing wrinkles from forming on the center of the No. 1 seat cushion pad and fabric.
*1 Hog Ring Pliers *2 Fastening Tape -
-
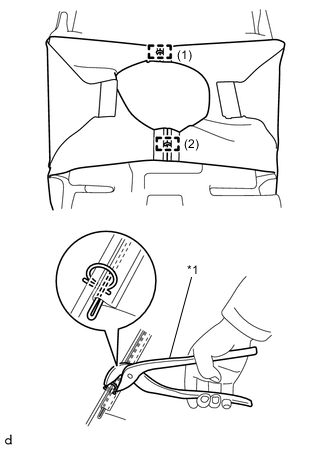
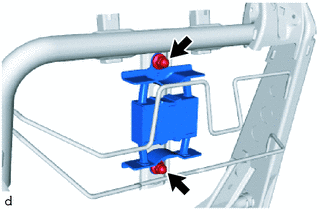
*1 Hog Ring Pliers Using hog ring pliers, connect the 2 straps of the No. 1 seat cushion cover sub-assembly RH to the No. 1 seat cushion pad with 2 new hog rings.
Note
-
Do not damage the No. 1 seat cushion cover sub-assembly RH or allow it to become dirty.
-
Be sure to tighten the hog rings securely as shown in the illustration.
-
-
-
INSTALL SEAT CUSHION COVER WITH PAD
-
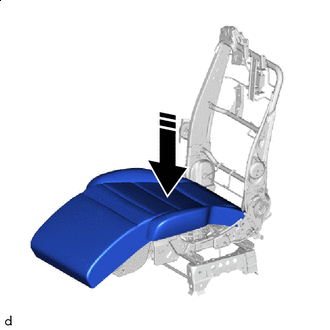
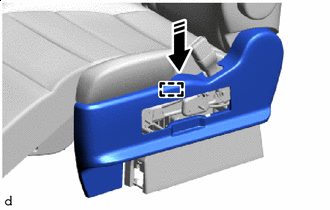
Install in this Direction Install the seat cushion cover with pad as indicated by the arrow shown in the illustration.
-
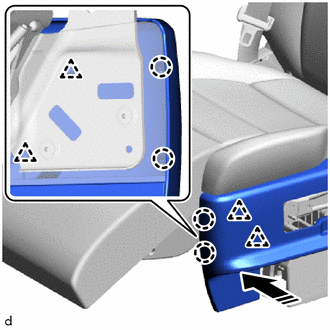
Install in this Direction Attach the hook.
-
Install in this Direction Attach the hook.
-
Attach the hook and 2 clips and install the seat cushion cover with pad.
-
-
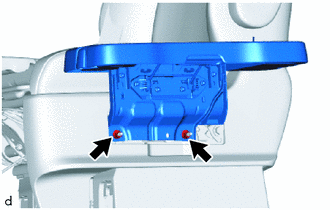
INSTALL REAR SEAT LEGREST BOARD
-
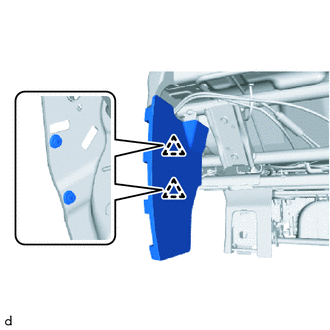
Install in this Direction Push in the installation direction shown in the illustration to attach the guide.
-
Attach the claw and install the rear seat legrest cover.
-
-
INSTALL NO. 2 REAR SEAT LEGREST COVER
-
Install in this Direction Move the No. 2 rear seat leg rest cover in the direction indicated by the arrow shown in the illustration to insert the guide and install the No. 2 rear seat leg rest cover.
-
Attach the 2 clips.
-
-
INSTALL NO. 1 REAR SEAT LEGREST COVER
-
Install in this Direction Move the No. 1 rear seat leg rest cover in the direction indicated by the arrow shown in the illustration to insert the guide and install the No. 1 rear seat leg rest cover.
-
Install the 2 screws.
-
-
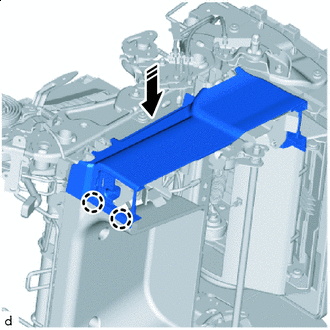
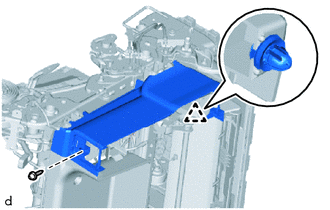
INSTALL REAR SEAT LOCK CONTROL LEVER SUB-ASSEMBLY (for Super Long Slide Seat)
-

Install in this Direction Connect the cable end to the rear seat lock control lever sub-assembly by turning the cable end in the direction of the arrow shown in the illustration.
-
Attach the casing cap.
-
Move the rear seat lock control lever sub-assembly in the direction indicated by the arrow shown in the illustration to insert the guide and install the rear seat lock control lever sub-assembly.
-
Install the 2 screws.
-
-
INSTALL REAR SEAT COVER CAP LH (for Super Long Slide Seat)
-
Attach the claw and guide and install the rear seat cover cap LH.
-
-
INSTALL REAR SEAT LEG COVER RH
-
for LH Side, except Super Long Slide Seat:
-
Install the rear seat leg cover RH with the screw.
-
-
for LH Side, for Super Long Slide Seat:
-
Attach the claw and guide and install the rear seat leg cover RH.
-
Install the 2 screws.
-
-
-
INSTALL NO. 1 SEAT LEG COVER SUB-ASSEMBLY RH
-
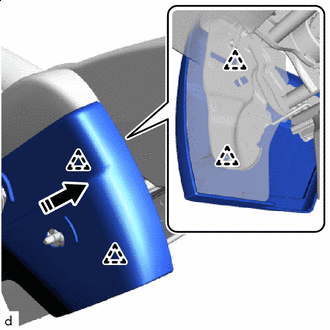
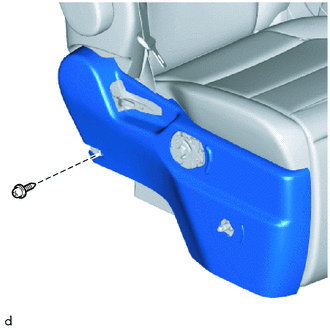
Install in this Direction Attach the claw and install the No. 1 seat leg cover sub-assembly RH as shown in the illustration.
-
Install the screw and attach the clip.
-
-
INSTALL NO. 1 SEAT LEG COVER SUB-ASSEMBLY LH
-
Install in this Direction Attach the claw and install the No. 1 seat leg cover sub-assembly LH as shown in the illustration.
-
Install the 2 screws.
-
-
INSTALL SEAT COVER WIRE
-
Install the seat cover wire.
Tech Tips
-
Wire 1000 mm (3.28 ft.) or longer and shaped wire are available as supplied parts.
-
When a wire that is less than 1000 mm in length is needed.
-
Make sure to read the precautions before preparing the wire.
Dimensions A 260 mm B 300 mm C 530 mm Tech Tips
The dimensions shown in the illustration are the length.
-
-
-
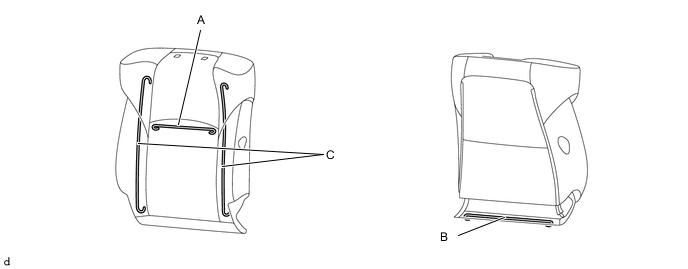
INSTALL SEPARATE TYPE REAR SEATBACK COVER
Tech Tips
-
Refer to the precautions on wrinkles to avoid creating any on the separate type rear seatback cover when installing the seat cover.
-
Align the seam allowance in a single direction as shown in the illustration.
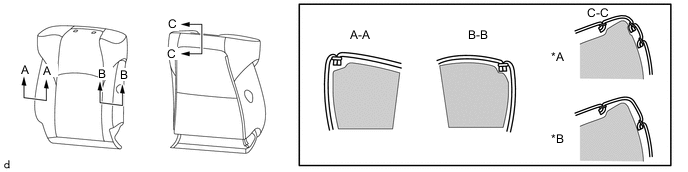
*A Type A *B Type B
-
Set the separate type rear seatback cover.
-
*1 Hog Ring Pliers Using hog ring pliers, install 2 new hog rings.
Note
-
Do not damage the separate type rear seatback cover or allow it to become dirty.
-
Be sure to securely tighten the hog rings as shown in the illustration while preventing wrinkles from forming on the center of the separate type rear seatback cover and fabric.
-
-
Install in this Direction Return the seat cover wire to its original position.
-
*1 Hog Ring Pliers *2 Fastening Tape Using hog ring pliers, install the separate type rear seatback cover with 8 new hog rings and fastening tape.
Note
-
Do not damage the separate type rear seatback cover RH or allow it to become dirty.
-
Be sure to securely tighten the hog rings as shown in the illustration while preventing wrinkles from forming on the center of the separate type rear seatback cover and fabric.
-
-
-
INSTALL NO. 1 REAR SEAT PROTECTOR RH
-
Insert the guide, fold back the folding part and install the No. 1 rear seat protector RH.
-
Attach the clip.
-
-
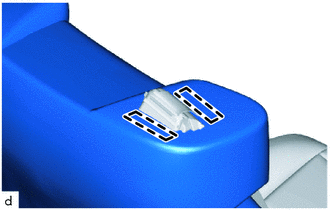
INSTALL SEATBACK COVER WITH PAD
-

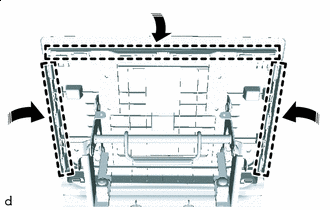
Install in this Direction (1) 
Install in this Direction (2) Push in installation direction (1) shown in the illustration to install the seatback cover with pad.
-
Push in the rear end of the seatback cover with pad in installation direction (2) shown in the illustration.
-
Attach the hook.
-
Close the fasteners.
-
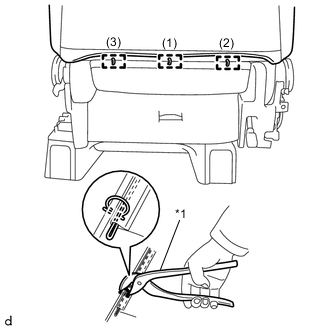
*1 Hog Ring Pliers Using hog ring pliers, install the seatback cover with pad using 3 new hog rings.
Note
-
Do not damage the seatback cover or allow it to become dirty.
-
Be sure to tighten the hog rings securely as shown in the illustration.
-
-
Store the fasteners.
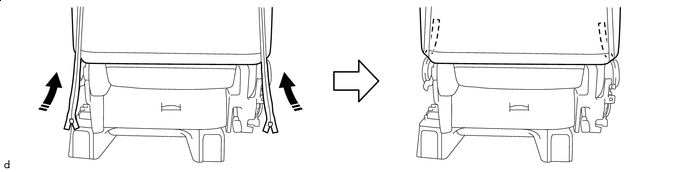
Install in this Direction - - -
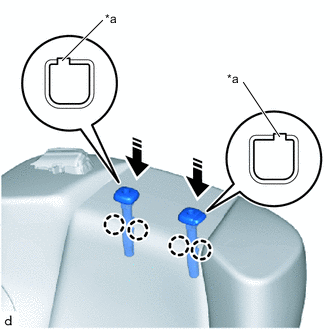
Install in this Direction *a Protrusion Align the headrest support protrusions with the grooves in the No. 1 seatback frame sub-assembly RH.
-
Press in the direction indicated by the arrow shown in the illustration and attach the claw to install the 2 headrest supports.
-
-
CONNECT NO. 1 SEAT 3 POINT TYPE BELT ASSEMBLY RH
-
Connect the seat belt anchor with the bolt.
- Torque:
- 42 N*m { 428 kgf*cm, 31 ft.*lbf }
-
-
INSTALL REAR SEAT SHOULDER BELT COVER RH
-
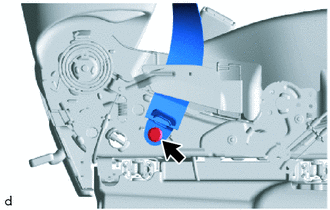
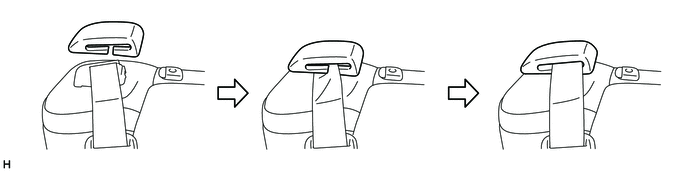
Attach the rear seat shoulder belt cover RH to the No. 1 seat 3 point type belt assembly RH as shown in the illustration.
-
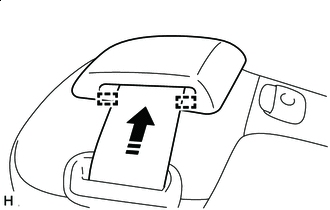
Install in this Direction Push as shown in the illustration to insert the guide.
-
Install in this Direction Push as shown in the illustration to attach the claw and install the rear seat shoulder belt cover RH.
-
-
INSTALL REAR SEAT ARMREST ASSEMBLY RH
-
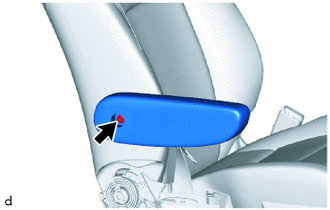
Install the rear seat armrest assembly RH with the bolt.
- Torque:
- 24 N*m { 245 kgf*cm, 18 ft.*lbf }
-
-
INSTALL REAR SEAT ARMREST ASSEMBLY LH
-
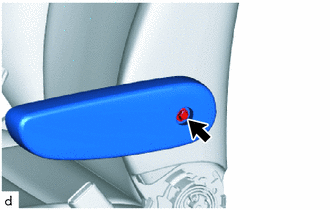
Install the rear seat armrest assembly LH with the bolt.
- Torque:
- 24 N*m { 245 kgf*cm, 18 ft.*lbf }
-
-
INSTALL NO. 1 SEAT ARMREST CAP
Tech Tips
Use the same procedure for the other locations.
-
Attach the claw and install the No. 1 seat armrest cap.
-
-
INSTALL REAR NO. 1 SEAT INNER BELT ASSEMBLY RH
-
INSTALL RECLINING ADJUSTER INSIDE COVER LH
-
Attach the clip and install the reclining adjuster inside cover LH.
-
-
INSTALL REAR SEAT CUSHION MOULDING LH
-
Install in this Direction Move the part as shown in the illustration to insert the guide
-
Install in this Direction Move the part as shown in the illustration to attach the claw.
-
Attach the clip and claw on the rear side of the rear seat cushion moulding LH.
-
Install in this Direction Move the center of the rear seat cushion moulding LH as shown in the illustration to insert the guide.
-
Move the front side of the rear seat cushion moulding LH as shown in the illustration to attach the clip and claw.
-
-
INSTALL REAR SEAT SIDE TABLE ASSEMBLY
-
Install the rear seat side table assembly with the 2 nuts.
- Torque:
- 14.5 N*m { 148 kgf*cm, 11 ft.*lbf }
-
-
INSTALL SEAT ADJUSTER COVER CAP LH
-

Insert the guide and claw and install the seat adjuster cover cap LH.
-
Install the screw.
-
-
INSTALL RECLINING ADJUSTER INSIDE COVER RH
-
Attach the clip and install the reclining adjuster inside cover RH.
-
-
INSTALL NO. 1 REAR SEAT RECLINING COVER RH
-

Depress the lever and bring the part to the installation position.
-

Install in this Direction Move the rear side of the No. 1 rear seat reclining cover RH as shown in the illustration to insert the guide.
-
Install in this Direction Move the center of the No. 1 rear seat reclining cover RH as shown in the illustration to attach the claw.
-

Attach the claw on the rear side of the No. 1 rear seat reclining cover RH.
-
Attach the clip on the bottom side of the center of the No. 1 rear seat reclining cover RH.
-
Install in this Direction Move the part as shown in the illustration to attach the clip
-

Install in this Direction Move the part as shown in the illustration to attach the claw.
-
Install the screw.
-
-
INSTALL NO. 1 SUB SEAT LINK ARM
-
First, attach the snap ring to the No. 1 sub seat link arm, and then install the No. 1 sub seat link arm.
-
-
INSTALL REAR SEAT CUSHION RH
-
Install the rear seat cushion RH with the screw.
-
-
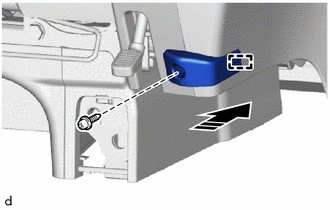
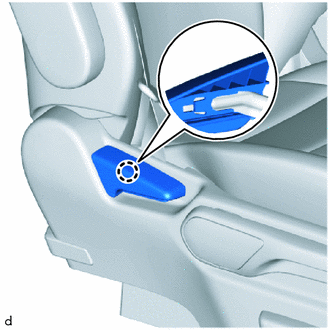
INSTALL SEAT TRACK HANDLE CONTROL LEVER RH
-
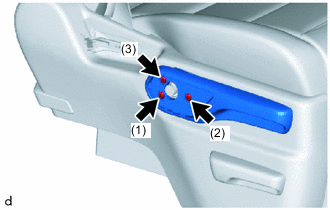
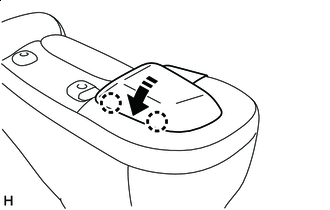
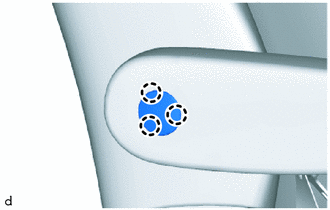
Install the seat track handle control lever RH with the 3 screws.
Tech Tips
Tighten the screws in the order shown in the illustration.
-
-
INSTALL SEAT ADJUSTER COVER CAP RH
-
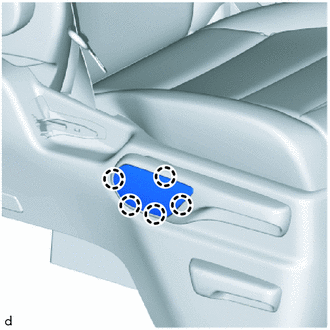
Attach the claw and install the seat adjuster cover cap RH.
-
-
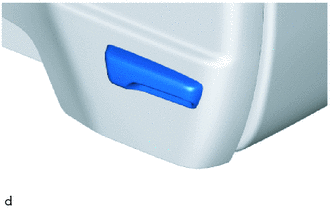
INSTALL NO. 1 RECLINING ADJUSTER RELEASE HANDLE RH
-
Attach the claw and install the No. 1 reclining adjuster release handle RH.
-