TRIP SWITCH REMOVAL
PROCEDURE
-
REMOVE CENTER NO. 1 INSTRUMENT CLUSTER FINISH PANEL (for Separate Console Box Type)
-
REMOVE CENTER NO. 2 INSTRUMENT CLUSTER FINISH PANEL (for Separate Console Box Type)
Tech Tips
Use the same procedure as for the center No. 1 instrument cluster finish panel. (for Separate Console Box Type)
-
REMOVE NO. 2 BOX BOTTOM MAT (for Integrated Console Box Type)
-
REMOVE INSTRUMENT PANEL FINISH PANEL END LH (for Integrated Console Box Type)
-
REMOVE INSTRUMENT PANEL FINISH PANEL END RH (for Integrated Console Box Type)
Tech Tips
Use the same procedure as for the instrument panel finish panel end LH. (for Integrated Console Box Type)
-
REMOVE UPPER INSTRUMENT PANEL FINISH PANEL
-
REMOVE INSTRUMENT PANEL FINISH PANEL ASSEMBLY
-
REMOVE TRIP SWITCH
-
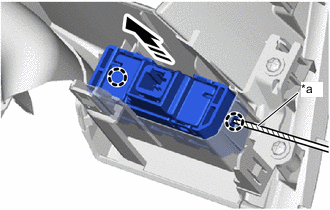
*a Protective Tape 
Remove in this Direction Using a screwdriver with its tip wrapped in protective tape, disengage the claws to remove the trip switch as shown in the illustration.
-