REAR AIR CONDITIONING UNIT REMOVAL
CAUTION / NOTICE / HINT
Tech Tips
Before removing the rear air conditioning unit, set the air conditioning to FOOT mode.
PROCEDURE
-
RECOVER REFRIGERANT FROM REFRIGERATION SYSTEM
-
DRAIN ENGINE COOLANT
-
for 2AR-FE:
-
for 2GR-FKS:
-
-
REMOVE REAR BUMPER COVER
-
REMOVE WHEEL ASSEMBLY (Rear RH)
-
REMOVE REAR WHEEL HOUSE LINER RH
-
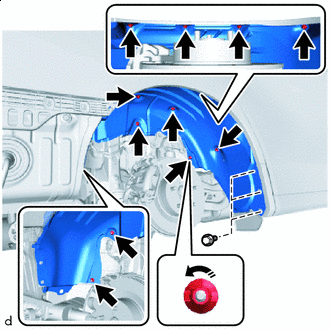

Rotation Direction Remove the 3 screws.
-
Rotate and remove the 11 screw clips with your fingers.
-
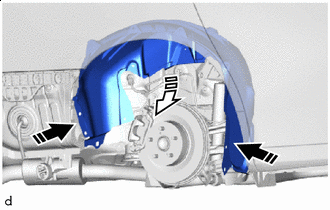
Remove in this Direction (1) 
Remove in this Direction (2) Bend the liner inward and detach it from the stud bolts to remove the rear wheel house liner RH.
-
-
DISCONNECT HEATER WATER HOSE INLET B
-
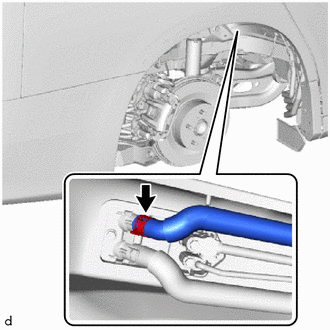
Using pliers, grip the claws of the clip and slide the clip to disconnect the heater water inlet hose B.
Note
-
Do not apply excessive force to the water hose and heater water inlet hose B.
-
Prepare a drain pan or cloth in case the coolant leaks.
-
-
-
DISCONNECT HEATER WATER HOSE OUTLET B
-
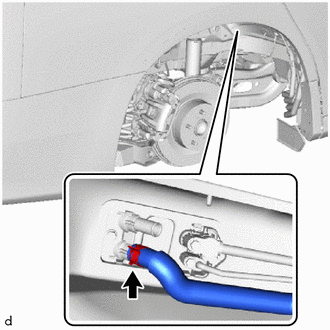
Using pliers, grip the claws of the clip and slide the clip to disconnect the heater water outlet hose B.
Note
-
Do not apply excessive force to the water hose and heater water outlet hose B.
-
Prepare a drain pan or cloth in case the coolant leaks.
-
-
-
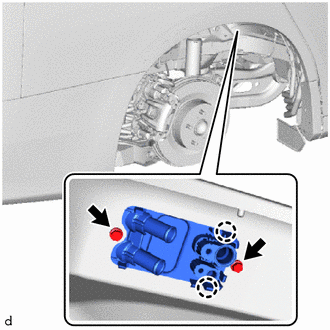
DISCONNECT COOLER REFRIGERANT SUCTION PIPE B
-
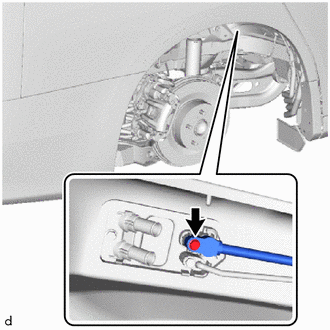
Remove the bolt and disconnect the cooler refrigerant suction pipe B.
-
Remove the O-ring from the cooler refrigerant suction pipe B.
Note
Seal the openings of the disconnected parts using vinyl tape to prevent the entry of moisture and foreign matter.
-
-
DISCONNECT COOLER REFRIGERANT LIQUID PIPE D
-
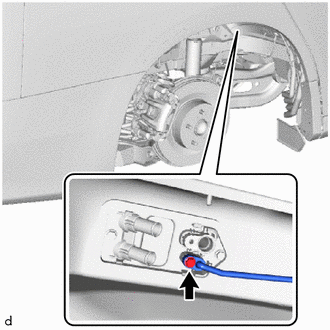
Remove the bolt and disconnect the cooler refrigerant liquid pipe D.
-
Remove the O-ring from the cooler refrigerant liquid pipe D.
Note
Seal the openings of the disconnected parts using vinyl tape to prevent the entry of moisture and foreign matter.
-
-
REMOVE REAR NO. 2 SEAT ASSEMBLY RH
-
REMOVE REAR NO. 1 FLOOR BOARD ASSEMBLY
-
REMOVE REAR NO. 2 FLOOR BOARD ASSEMBLY
-
REMOVE REAR NO. 3 FLOOR BOARD ASSEMBLY
-
REMOVE UTILITY BOX SUB-ASSEMBLY
-
REMOVE REAR UPPER NO. 1 FLOOR BOARD PLATE
-
REMOVE BACK DOOR SCUFF PLATE
-
REMOVE REAR DOOR SCUFF PLATE RH
-
REMOVE DECK SIDE GARNISH RH
-
REMOVE NO. 1 LUGGAGE COMPARTMENT TRIM HOOK
-
REMOVE ROPE HOOK ASSEMBLY
-
REMOVE REAR QUARTER TRIM PANEL ASSEMBLY RH
-
REMOVE INNER UPPER ROOF SIDE GARNISH RH
-
REMOVE REAR NO. 2 SEAT TRACK ASSEMBLY RH
-
REMOVE COOLER PLATE
-
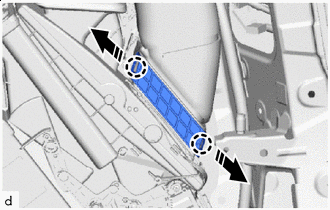
Remove in this Direction Detach the claw and remove the cooler plate.
-
-
REMOVE NO. 1 COOLER AIR DUCT
-
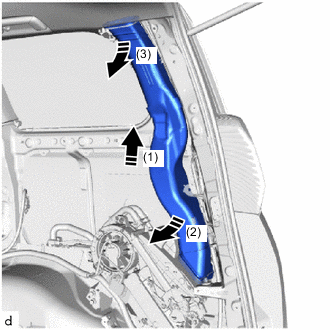
Order of Removal Remove the No. 1 cooler air duct as shown in the illustration.
-
-
REMOVE REAR COOLING UNIT ASSEMBLY
-
Remove the 2 bolts.
-
Detach the claw and disconnect the penetration cover from the body.
-