REAR NO. 1 SEAT OUTER BELT ASSEMBLY(for Power Captain Seat with Memory) INSTALLATION
CAUTION / NOTICE / HINT
CAUTION:
Wear protective gloves. Sharp areas on the parts may injure your hands.
Tech Tips
-
Use the same procedure for the RH and LH sides.
-
The procedure listed below is for the LH side.
-
A bolt without a torque specification is shown in the standard bolt chart.
PROCEDURE
-
INSTALL NO. 1 SEAT 3 POINT TYPE BELT ASSEMBLY LH
-


Push the seatback forwards 
Push it backwards until it reaches the first position where it locks Push the seatback forwards, and then push it backwards until it reaches the first position where it locks.
-
Attach the guide to install the retractor of the No. 1 seat 3 point type belt assembly LH with the nut.
- Torque:
- 42 N*m { 428 kgf*cm, 31 ft.*lbf }
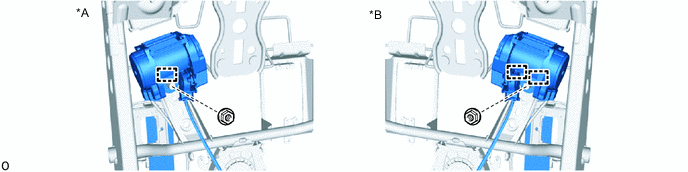
*A for RH Seat *B for LH Seat -
Temporarily install the reclining sensor of the No. 1 seat 3 point type belt assembly LH with the 3 nuts.

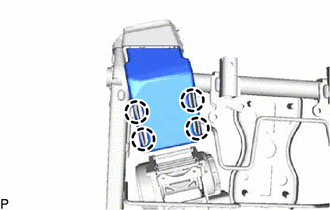
*a Pin Punch 3 *b Reclining Sensor *c Nut Installation Hole - - -
Insert pin punch 3 into the zero point alignment hole of the No. 1 seat 3 point type belt assembly LH.
-
Install the 3 nuts in the order shown in the illustration.
- Torque:
- 3.5 N*m { 36 kgf*cm, 31 in.*lbf }
-
Pull out pin punch 3.
-
Attach the claw and install the rear seat shoulder belt cover LH.
-
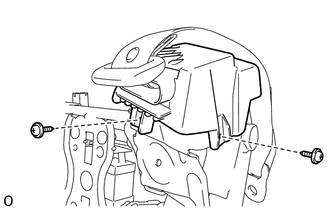
Install the seat belt guide with the 2 screws.
-
-
INSTALL REAR SEAT INNER RECLINING COVER LH
-
INSTALL REAR NO. 2 SEAT PROTECTOR
-
INSTALL SEPARATE TYPE REAR SEATBACK COVER WITH PAD
-
INSTALL REAR SEAT LOCK CONTROL LEVER SUB-ASSEMBLY
-
INSTALL SEAT STAND FRAME CAP
-
INSTALL REAR SEAT SHOULDER BELT COVER LH
-
INSTALL NO. 1 SEAT 3 POINT TYPE BELT ASSEMBLY LH (for Seat Anchor)
-
Check that the No. 1 seat 3 point type belt assembly LH is not twisted.
-

*a Protruding Part Install the floor anchor of the No. 1 seat 3 point type belt assembly LH with the bolt.
- Torque:
- 42 N*m { 428 kgf*cm, 31 ft.*lbf }
Note
The anchor part of the No. 1 seat 3 point type belt assembly LH must not overlap the protruding part.
-
-
INSTALL REAR NO. 1 SEAT INSIDE RECLINING ADJUSTER COVER
-
INSTALL REAR SEAT ARMREST FRAME SUB-ASSEMBLY RH
-
INSTALL REAR SEAT TURN TABLE ASSEMBLY LH
-
INSTALL REAR NO.1 SEAT LEG BRACKET
-
INSTALL REAR NO. 1 SEAT ARMREST ASSEMBLY RH
-
INSTALL REAR SEAT CUSHION MOULDING LH
-
INSTALL SEAT ADJUSTER COVER CAP RH
-
INSTALL RECLINING ADJUSTER COVER RH
-
INSTALL REAR NO. 1 SEAT INNER BELT ASSEMBLY LH
-
INSTALL REAR NO. 1 SEAT INSIDE RECLINING ADJUSTER COVER
-
INSTALL REAR SEAT ARMREST FRAME SUB-ASSEMBLY LH
-
INSTALL REAR SEAT RECLINING COVER LH
-
INSTALL SEAT ADJUSTER COVER CAP LH
-
INSTALL REAR SEAT CUSHION
-
INSTALL REAR NO. 1 SEAT ARMREST ASSEMBLY LH
-
INSTALL REAR NO. 1 SEAT RECLINING COVER LH
-
INSTALL NO. 1 RECLINING ADJUSTER RELEASE HANDLE LH
-
INSTALL REAR NO. 1 SEAT ASSEMBLY LH