REAR NO. 1 SEAT OUTER BELT ASSEMBLY(for Manual Captain Seat) REMOVAL
CAUTION / NOTICE / HINT
CAUTION:
Wear protective gloves. Sharp areas on the parts may injure your hands.
Tech Tips
-
Use the same procedure for the RH and LH sides.
-
The procedure listed below is for the RH side.
PROCEDURE
-
REMOVE REAR NO. 1 SEAT ASSEMBLY RH
-
REMOVE NO. 1 RECLINING ADJUSTER RELEASE HANDLE RH
-
REMOVE SEAT ADJUSTER COVER CAP RH
-
REMOVE SEAT TRACK HANDLE CONTROL LEVER RH
-
REMOVE REAR SEAT CUSHION RH
-
REMOVE NO. 1 SUB SEAT LINK ARM
-
REMOVE NO. 1 REAR SEAT RECLINING COVER RH
-
REMOVE SEAT ADJUSTER COVER CAP LH (for RH Seat)
-
REMOVE REAR SEAT SIDE TABLE ASSEMBLY (for RH Seat)
-
REMOVE REAR SEAT CUSHION MOULDING LH
-
REMOVE REAR NO. 1 SEAT INNER BELT ASSEMBLY RH
-
REMOVE NO. 1 SEAT ARMREST CAP
-
REMOVE REAR SEAT ARMREST ASSEMBLY RH
-
REMOVE REAR SEAT ARMREST ASSEMBLY LH
-
REMOVE REAR SEAT SHOULDER BELT COVER RH
-
REMOVE NO. 1 SEAT 3 POINT TYPE BELT ASSEMBLY RH (for Seat Anchor)
-
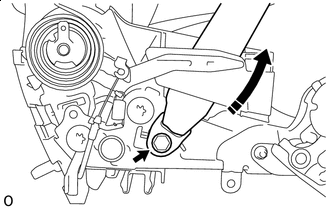

Remove in this Direction Remove the bolt and disconnect the No. 1 seat 3 point type belt assembly RH (for Seat Anchor).
-
Pull out the No. 1 seat 3 point type belt assembly RH as shown in the illustration.
-
-
REMOVE SEPARATE TYPE REAR SEATBACK COVER
-
REMOVE NO. 1 REAR SEAT PROTECTOR RH
-
REMOVE REAR NO. 1 SEAT RECLINING ADJUSTER INSIDE COVER
-
REMOVE NO. 1 SEAT 3 POINT TYPE BELT ASSEMBLY RH
-

Remove the 2 screws and seat belt guide.
-
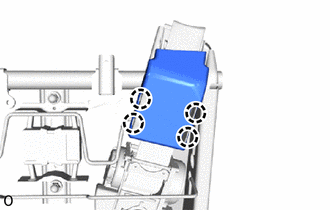
Detach the claw and remove the rear seat shoulder belt hole cover RH.
-
Remove the 3 nuts (B) and disconnect the reclining sensor.
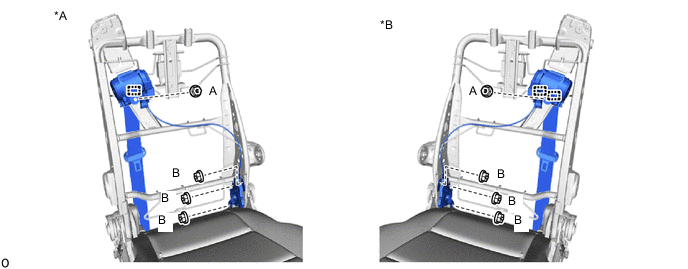
*A for RH Seat *B for LH Seat -
Remove the nut (A).
-
Detach the guide and remove the No. 1 seat 3 point type belt assembly LH.
-