OCCUPANT DETECTION SENSOR REMOVAL
CAUTION / NOTICE / HINT
The necessary procedures (adjustment, calibration, initialization or registration) that must be performed after parts are installed, removed or replaced during the occupant detection sensor removal/installation are shown below.
| Replacement Part or Procedure | Necessary Procedures | Effects/Inoperative Functions when not Performed | Link |
|---|---|---|---|
| Disconnect cable from negative (-) battery terminal | Drive the vehicle until stop and start control is permitted (approximately 5 to 60 minutes) | Stop and Start System (for 2AR-FE) | |
| Stop and Start System (for 2GR-FKS) | |||
| Memorize steering angle neutral point | Panoramic View Monitor System | ||
| Initialize back door lock | Power Door Lock Control System | ||
| Initialize servo motor | Air Conditioning System | ||
| Reset slide door close position | Power Slide Door System | ||
| Reset back door close position | Power Back Door System |
CAUTION:
-
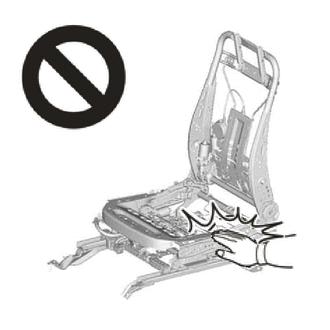
Wear protective gloves. Sharp areas on the parts may injure your hands.
-
There is risk of injury.
Tech Tips
-
Use the same procedure for RHD and LHD vehicles.
-
The procedure listed below is for LHD vehicles.
PROCEDURE
-
REMOVE FRONT SEAT ASSEMBLY LH (for Manual Seat)
-
REMOVE FRONT SEAT LEG ASSEMBLY LH (for Manual Seat)
-
REMOVE FRONT SEAT LEG COVER (for Manual Seat)
-
REMOVE RECLINING ADJUSTER RELEASE HANDLE LH (for Manual Seat)
-
REMOVE FRONT SEAT CUSHION SHIELD LH (for Manual Seat)
-
REMOVE FRONT SEAT INNER CUSHION SHIELD LH (for Manual Seat)
-
REMOVE FRONT SEAT INNER BELT ASSEMBLY LH (for Manual Seat)
-
REMOVE SEAT CUSHION COVER WITH PAD (for Manual Seat)
-
REMOVE SEPARATE TYPE FRONT SEAT CUSHION PAD (OCCUPANT DETECTION SENSOR) (for Manual Seat)
-
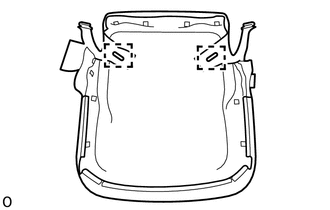
Remove the 2 hog rings.
-
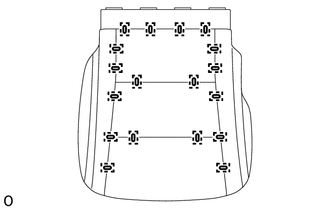
Remove the 18 hog rings and separate type front seat cushion pad (occupant detection sensor) from the separate type front seat cushion cover.
-
-
REMOVE FRONT SEAT ASSEMBLY RH (for Power Seat)
-
REMOVE FRONT SEAT LEG ASSEMBLY RH (for Power Seat)
-
REMOVE FRONT SEAT LEG COVER (for Power Seat)
-
REMOVE FRONT SEAT CUSHION SHIELD RH (for Power Seat)
-
REMOVE FRONT SEAT INNER CUSHION SHIELD RH (for Power Seat)
-
REMOVE SEAT CUSHION COVER WITH PAD (for Power Seat)
-
REMOVE SEPARATE TYPE FRONT SEAT CUSHION PAD (OCCUPANT DETECTION SENSOR) (for Power Seat)
-
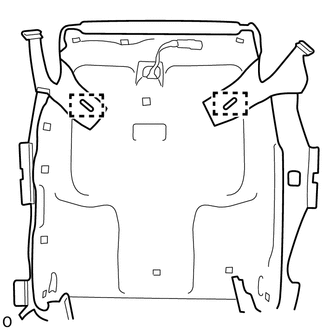
Remove the 2 hog rings.
-
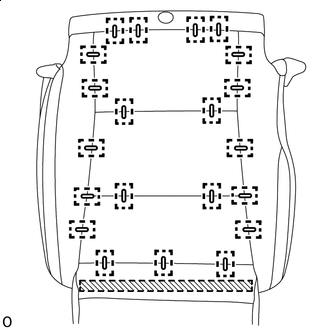

Fastening Tape Remove the 21 hog rings, detach the fastening tape and remove the separate type front seat cushion pad (occupant detection sensor) from the separate type front seat cushion cover.
-