REAR NO. 1 SEAT ASSEMBLY(for Power Captain Seat with Memory) REASSEMBLY
CAUTION / NOTICE / HINT
CAUTION:
Wear protective gloves. Sharp areas on the parts may injure your hands.
Tech Tips
-
Use the same procedure for RHD and LHD vehicles.
-
The procedures listed below are for LHD vehicles.
-
Use the same procedure for the RH and LH sides.
-
The procedure listed below is for the LH side.
-
A bolt without a torque specification is shown in the standard bolt chart.
PROCEDURE
-
INSTALL REAR SEAT CUSHION FRAME SUB-ASSEMBLY LH
-
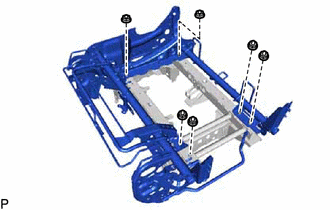
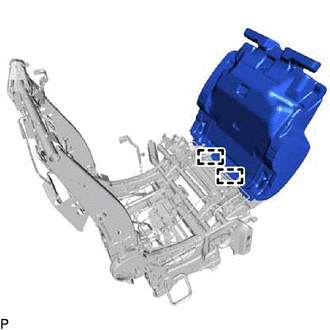
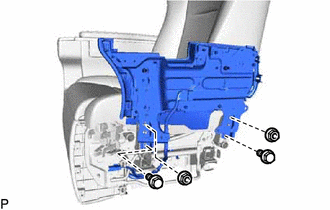
Install the rear seat cushion frame sub-assembly LH to the No. 1 seat leg sub-assembly LH with the 6 nuts.
- Torque:
- 42 N*m { 428 kgf*cm, 31 ft.*lbf }
-
-
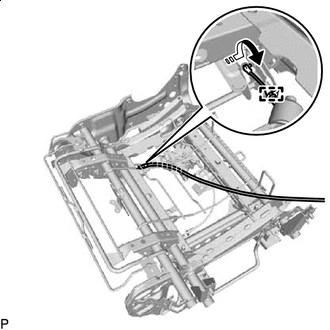
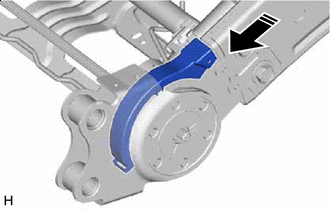
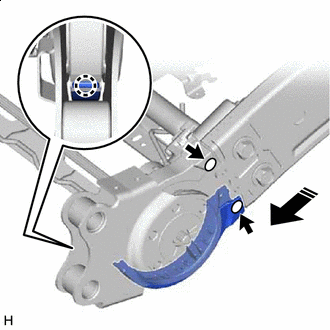
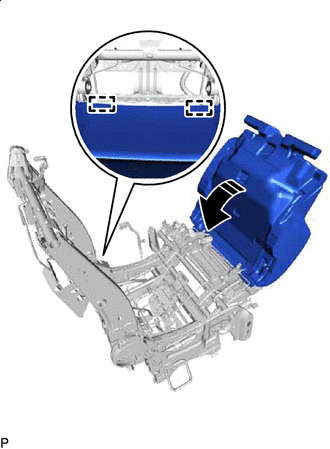
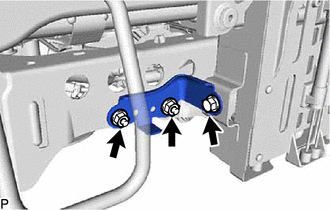
INSTALL POWER SEAT MOTOR ASSEMBLY
-
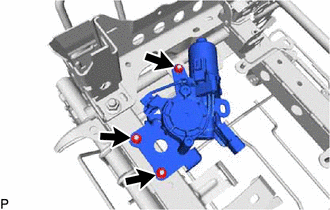
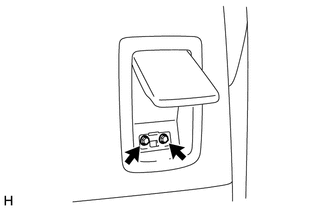
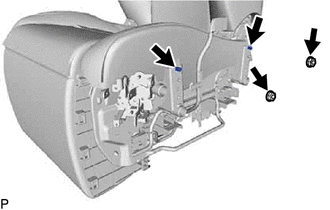
Install the power seat motor assembly with the 3 nuts.
- Torque:
- 8.5 N*m { 87 kgf*cm, 75 in.*lbf }
-
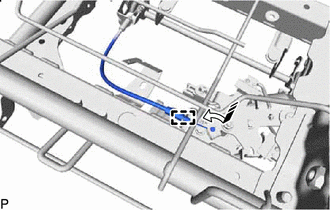

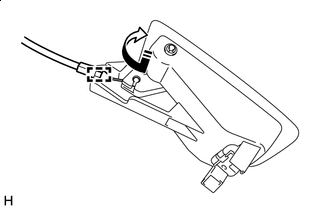
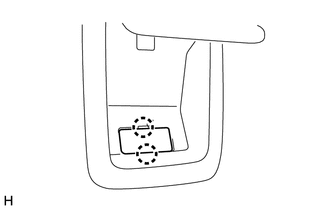
Install in this Direction While turning the cable end as shown in the illustration, connect it.
-
Attach the cable clamp.
-
-
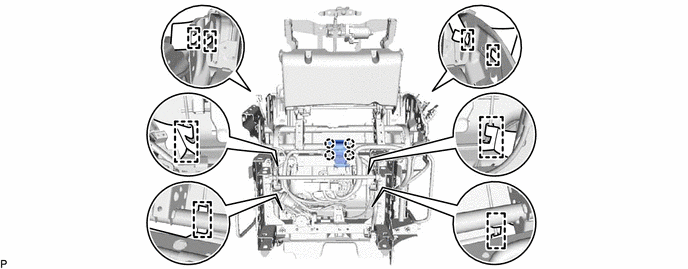
INSTALL REAR SEAT WIRE LH
-
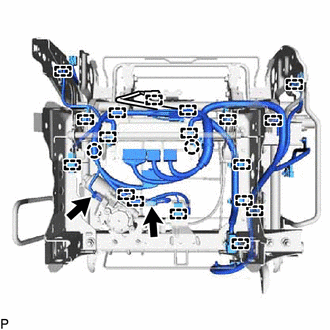
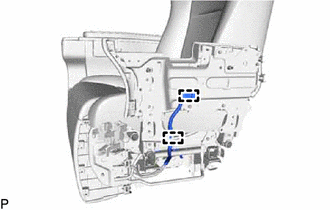
Attach the claw and wire harness clamp to install the rear seat wire LH.
-
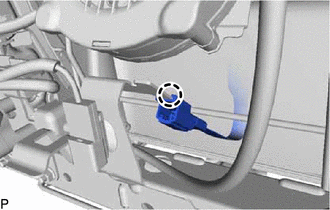
Connect the 2 connectors.
-
-
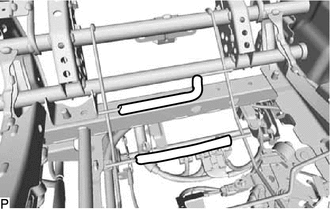
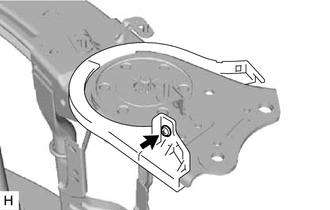
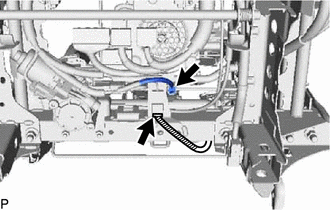
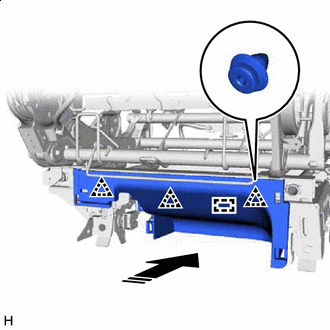
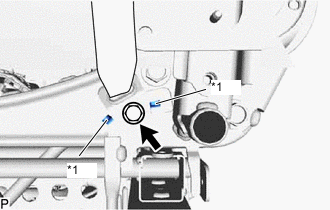
INSTALL SEAT TRACK CONTROL CABLE ASSEMBLY
-
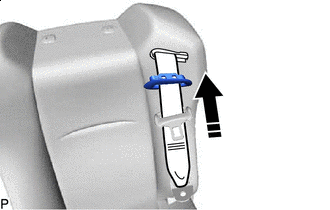
Install in this Direction While turning the cable end as shown in the illustration, connect it.
-
Attach the cable clamp to install the seat track control cable assembly.
Tech Tips
Install at the middle level of the cable clamp (triple level) side.
-
-
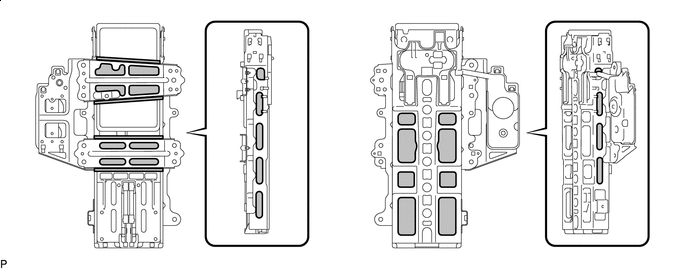
INSTALL SEATBACK FELT
-
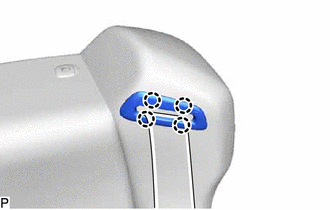
Clean and remove any oil from the installation area of the seatback felt.
-
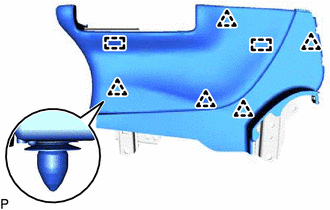
Install 2 new pieces of seatback felt.
-
-
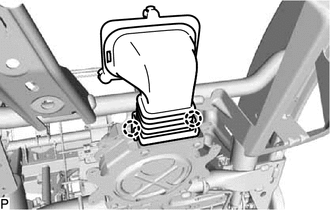
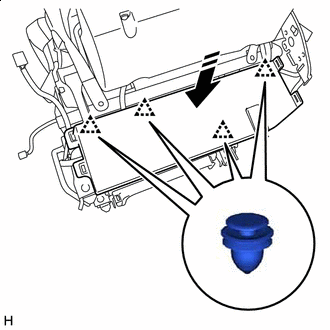
INSTALL SEAT CUSHION CLIMATE CONTROL DUCT
-
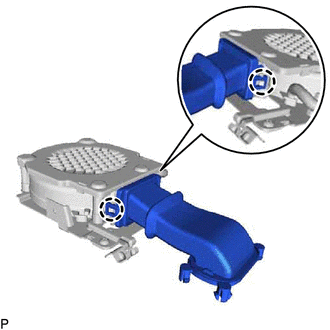
Attach the claw to install the seat cushion climate control duct.
-
-
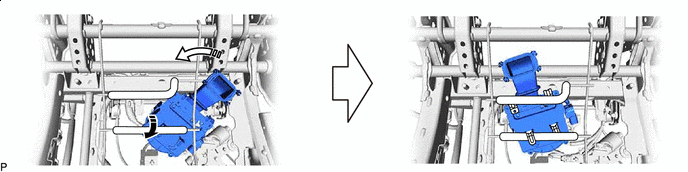
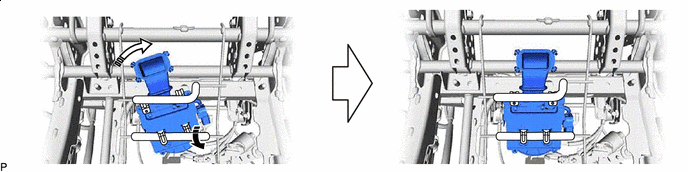
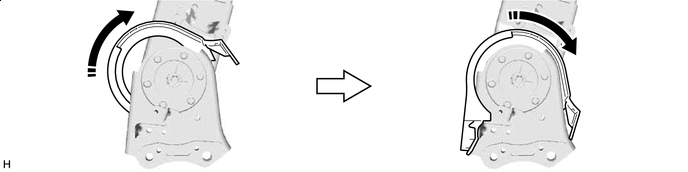
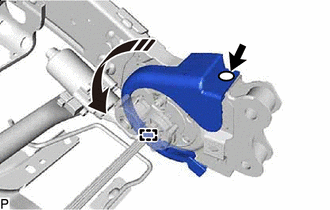
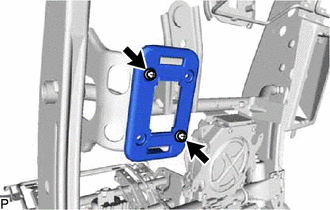
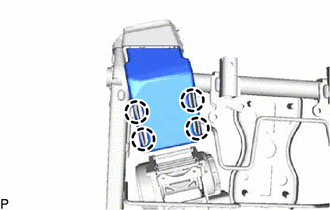
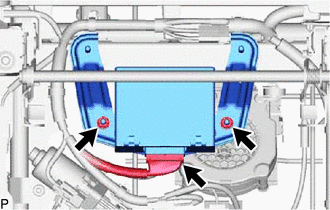
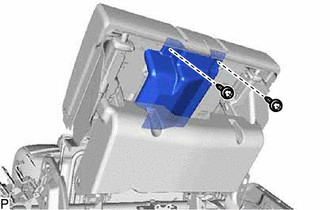
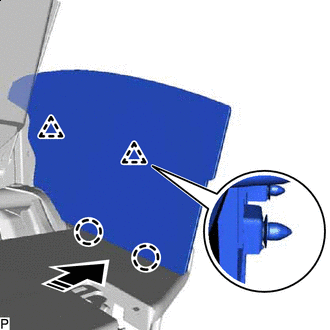
INSTALL SEAT CLIMATE CONTROL BLOWER LH
-
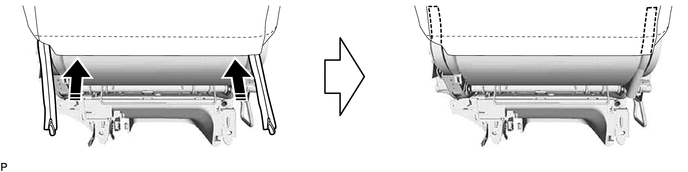
Lift up in installation direction (1) shown in the illustration to attach the hook.
Install in this Direction (1) 
Install in this Direction (2) -
Rotate the rear seat climate control blower LH in installation direction (2) shown in the illustration.
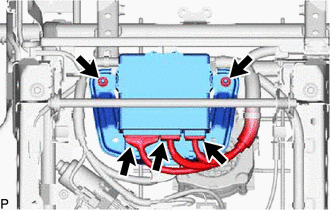
-
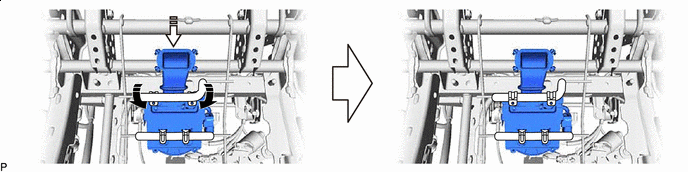
Lift up in installation direction (1) shown in the illustration to attach the hook.
Install in this Direction (1) Install in this Direction (2) -
Rotate the rear seat climate control blower LH in installation direction (2) shown in the illustration.
-
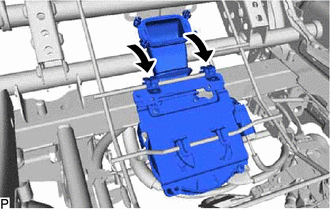
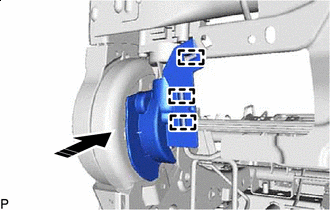
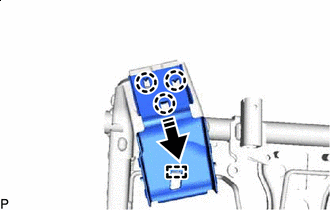
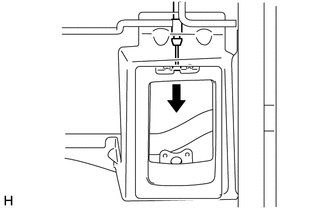
Lift up in installation direction (1) shown in the illustration to attach the hook.
Install in this Direction (1) Install in this Direction (2) -
Push down the rear seat climate control blower LH in installation direction (2) shown in the illustration.
-
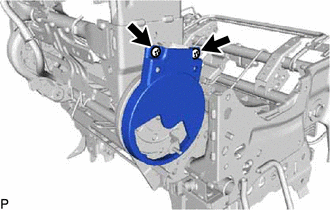
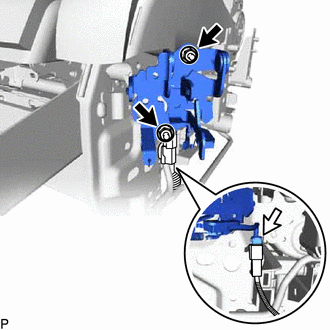
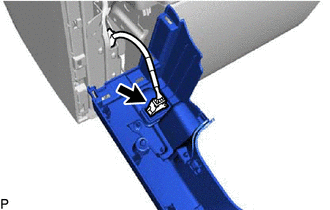
Return the clamp in the direction indicated by the arrow shown in the illustration.
-
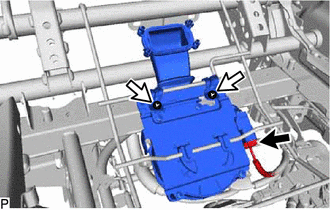
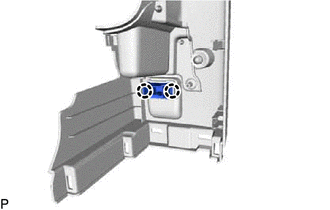
Install the rear seat climate control blower LH with the 2 screws.
-
Connect the connector.
-
-
INSTALL REAR NO. 1 SEAT INSIDE RECLINING ADJUSTER COVER
-
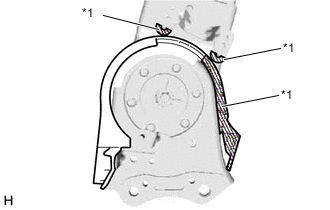
*1 Protective Tape Apply protective tape as shown in the illustration.
-
While turning the rear No. 1 seat inside reclining adjuster cover as shown in the illustration, install it.
Install in this Direction - - -
Install the screw.
-
-
INSTALL RECLINING COVER PROTECTOR RH
-
Install in this Direction Install the reclining cover protector RH.
-
-
INSTALL RECLINING COVER PROTECTOR RH
-
Install in this Direction Attach the claw and install the reclining cover protector RH with the 2 clips.
-
-
INSTALL REAR NO. 1 SEAT INSIDE RECLINING ADJUSTER COVER
-
Install in this Direction Insert the guide and install the rear No. 1 seat inside reclining adjuster cover with the clip.
-
-
INSTALL INSIDE RECLINING ADJUSTER COVER LH
-
Install in this Direction Attach the clamp and install the inside reclining adjuster cover LH.
-
-
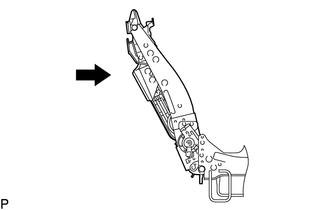
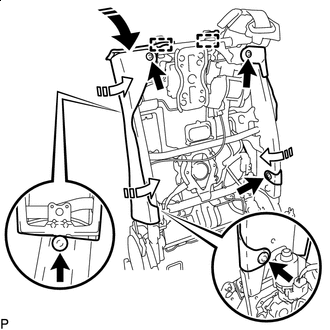
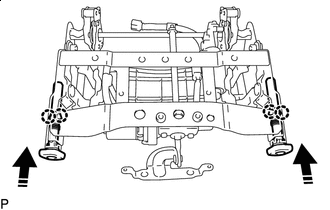
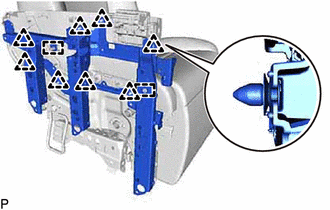
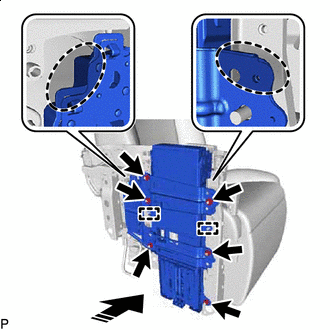
INSTALL NO. 1 SEATBACK FRAME SUB-ASSEMBLY LH
-
Temporarily install the No. 1 seatback frame sub-assembly LH with the 4 bolts.
-
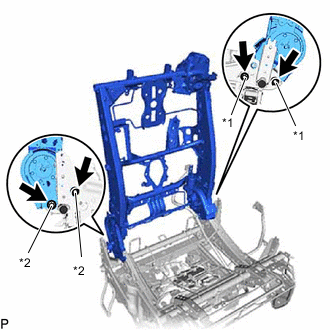
*1 Bolt A *2 Bolt B Tighten the 4 bolts to install the No. 1 seatback frame sub-assembly LH.
- Torque:
- for Bolt A
- 55 N*m { 561 kgf*cm, 41 ft.*lbf }
- for Bolt B
- 42 N*m { 428 kgf*cm, 31 ft.*lbf }
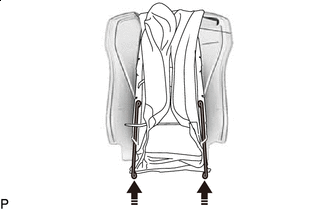
Tech Tips
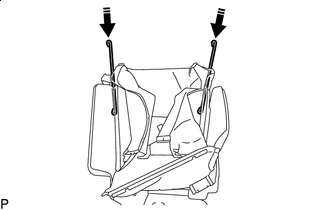
Tighten the bolts while pushing the No. 1 seatback frame sub-assembly LH as shown in the illustration.
-
Attach the wire harness clamp.
-
-
INSTALL REAR NO. 1 SEAT INSIDE RECLINING ADJUSTER COVER
-
Install the rear No. 1 seat inside reclining adjuster cover with the 2 clips.
-
-
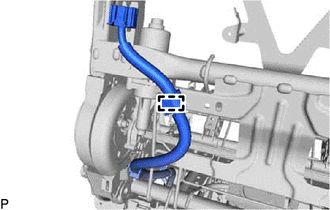
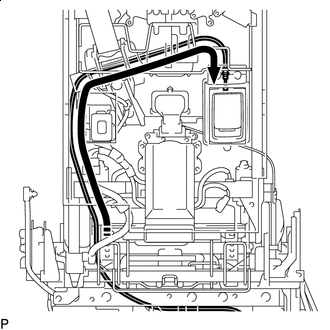
INSTALL NO. 2 SEAT WIRE
-
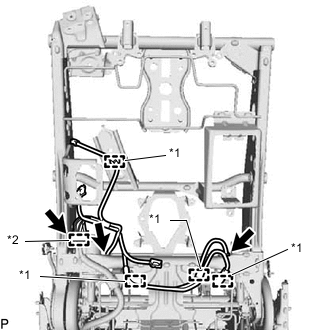
*1 Wire harness clamp *2 Connector clamp Attach the wire harness clamp and connector clamp.
-
Connect the 3 connectors and install the No. 2 seat wire.
-
-
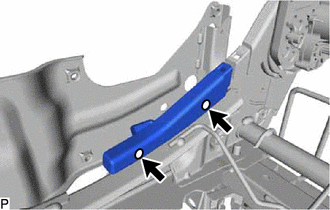
INSTALL REAR SEATBACK SPRING DAMPER RH
-
Install the rear seatback spring damper RH with the 2 nuts.
- Torque:
- 14.5 N*m { 148 kgf*cm, 11 ft.*lbf }
-
-
INSTALL REAR SEATBACK SPRING DAMPER
-
Install the rear seatback spring damper with the 2 nuts.
- Torque:
- 14.5 N*m { 148 kgf*cm, 11 ft.*lbf }
-
-
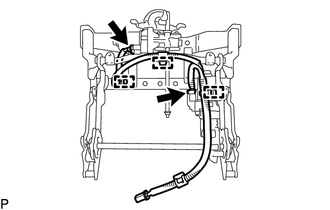
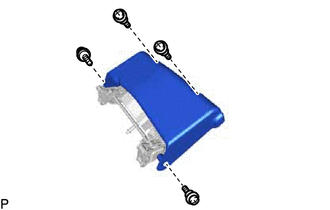
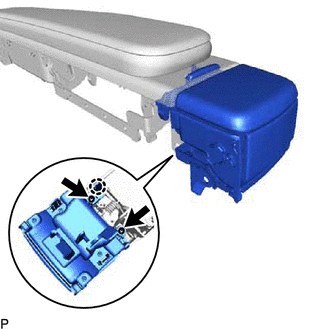
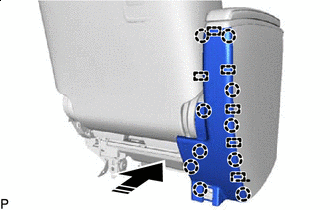
INSTALL REAR SEATBACK CLIMATE CONTROL BLOWER LH
-
Install the rear seatback climate control blower LH with the 4 screws.
-
Connect the connector.
-
-
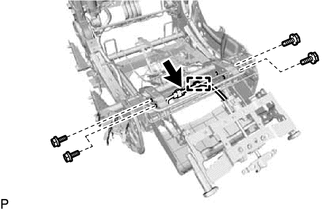
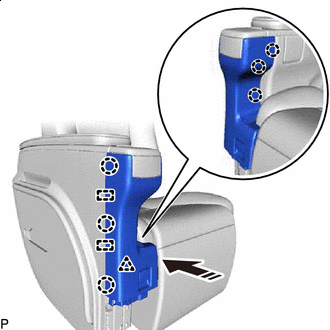
INSTALL REAR NO. 1 SEATBACK CLIMATE CONTROL DUCT
-
Install the rear No. 1 seatback climate control duct with the 4 screws.
-
-
INSTALL REAR NO. 2 SEATBACK CLIMATE CONTROL DUCT
-
Attach the claw to install the rear No. 2 seatback climate control duct.
-
-
INSTALL POWER SEAT SWITCH BEZEL
-
Install the power seat switch bezel with the 2 screws.
-
-
INSTALL REAR SEAT SHOULDER BELT COVER LH
-
Install in this Direction Push as shown in the illustration to insert the guide.
-
Attach the claw to install the rear seat shoulder belt cover LH.
-
-
INSTALL NO. 1 SEAT 3 POINT TYPE BELT ASSEMBLY LH
-
INSTALL REAR SEAT INNER RECLINING COVER LH
-
Install the rear seat inner reclining cover LH with the 2 screws.
-
-
INSTALL REAR SEAT SHOULDER BELT COVER LH
-
Attach the claw to install the rear seat shoulder belt cover LH.
-
-
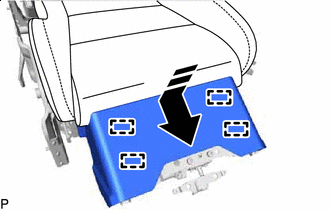
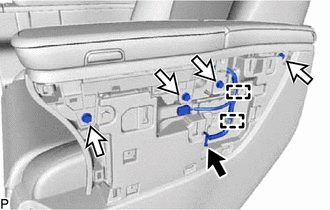
INSTALL REAR NO. 2 SEAT PROTECTOR
-
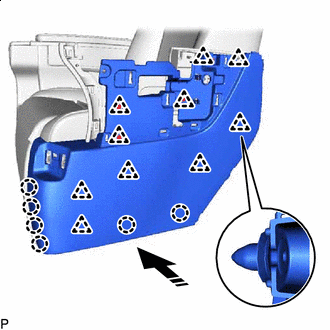
Install in this Direction (1) Install in this Direction (2) Insert the guide.
-
Install the rear No. 2 seat protector with the 5 clips.
-
Install in this Direction Connect the seat track control cable assembly to the rear No. 2 seat protector.
-
-
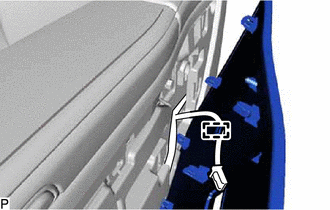
INSTALL NO. 3 FRAME WIRE
-
Attach the wire harness clamp to install the No. 3 frame wire.
-
Connect the 2 connectors.
-
-
INSTALL REAR SEAT LEGREST COVER
-
Install the rear seat legrest cover with the 4 screws.
-
-
INSTALL REAR SEAT HEADREST SUPPORT
-
Install in this Direction Attach the claw to install the 2 rear seat headrest supports.
-
-
INSTALL REAR LOWER INNER RECLINING ADJUSTER ARM SUB-ASSEMBLY LH
-
Install the rear lower inner reclining adjuster arm sub-assembly LH with the 4 bolts.
- Torque:
- 22 N*m { 224 kgf*cm, 16 ft.*lbf }
-
Attach the wire harness clamp.
-
Connect the connector.
-
-
INSTALL SEAT HEATER ASSEMBLY
-
INSTALL SEAT COVER WIRE
-
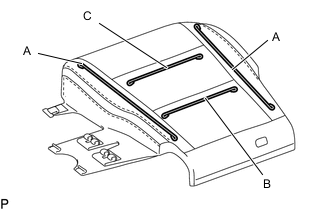
Install the seat cover wire.
Tech Tips
-
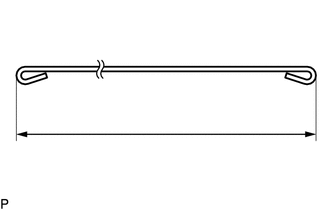
Wire 1000 mm (3.28 ft.) or longer and shaped wire are available as supplied parts.
-
When a wire that is less than 1000 mm in length is needed, cut or shape 1000 mm (3.28 ft.) wire into the dimensions shown in the illustration.
-
Make sure to read the precautions before preparing the wire.
Dimensions A 370 mm (1.21 ft.) B 240 mm (9.45 in.) C 260 mm (10.2 in.) Tech Tips
The dimensions shown in the illustration are the lengths.
-
-
-
INSTALL SEPARATE TYPE REAR SEAT CUSHION COVER
Tech Tips
-
When installing the seat cover, refer to the precautions in order to prevent wrinkles from forming.
-
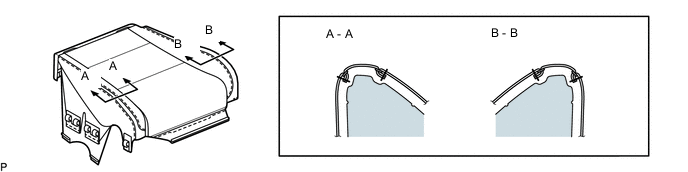
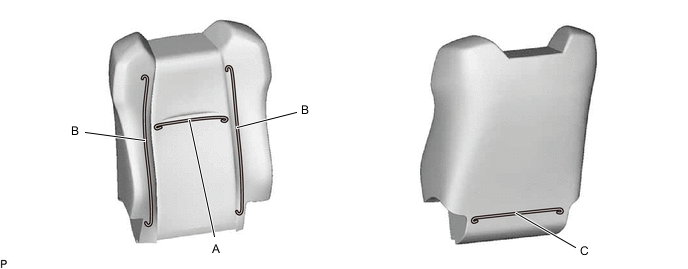
Align the seam allowance in a single direction as shown in the illustration.
-
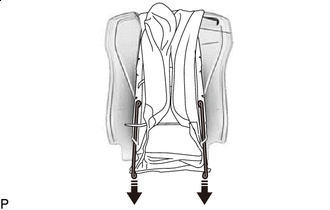
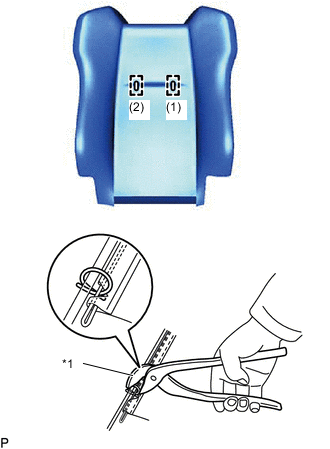
Remove in this Direction Slide the seat cover wire until it reaches a position where the hog rings in the center can be installed.
-
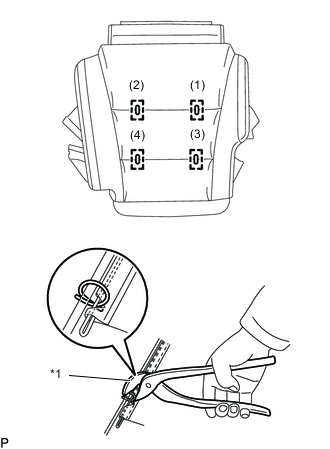
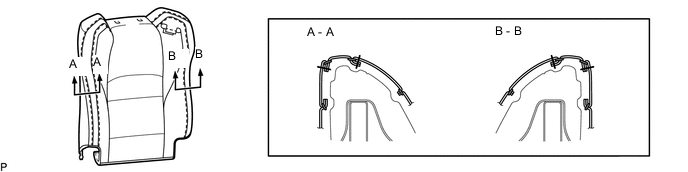
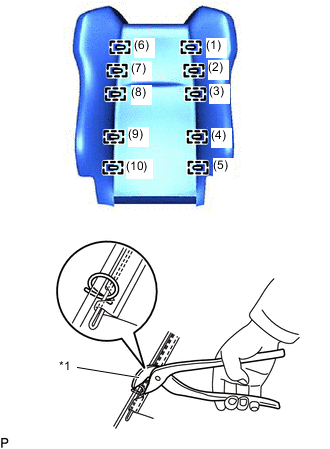
*1 Hog Ring Pliers Using hog ring pliers, install the separate type rear seat cushion cover to the rear seat cushion pad LH with 4 new hog rings in the order shown in the illustration.
Note
-
Be careful not to damage the separate type rear seat cushion cover.
-
Be sure to securely install the hog rings as shown in the illustration while preventing wrinkles from forming on the separate type rear seat cushion cover.
-
-
Install in this Direction Return the seat cover wire to its original position.
-
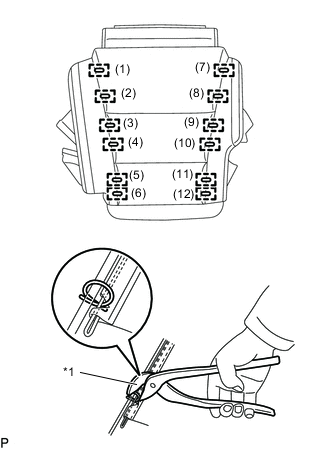
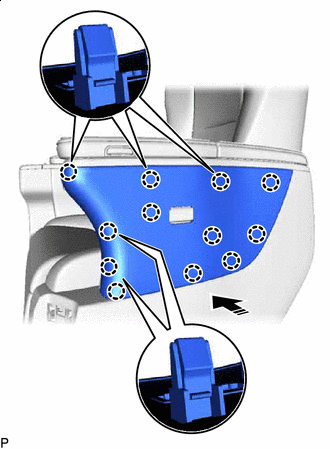
*1 Hog Ring Pliers Using hog ring pliers, install the separate type rear seat cushion cover to the rear seat cushion pad LH with 12 new hog rings in the order shown in the illustration.
Note
-
Be careful not to damage the separate type rear seat cushion cover.
-
Be sure to securely install the hog rings as shown in the illustration while preventing wrinkles from forming on the separate type rear seat cushion cover.
-
-
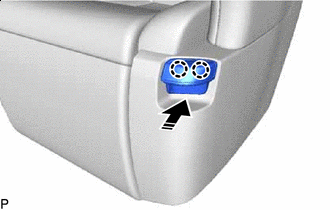
*1 Hog Ring Pliers Using hog ring pliers, install the separate type rear seat cushion cover with 6 new hog rings in the order shown in the illustration.
Note
-
Be careful not to damage the separate type rear seat cushion cover.
-
Be sure to securely install the hog rings as shown in the illustration while preventing wrinkles from forming on the separate type rear seat cushion cover.
-
-
-
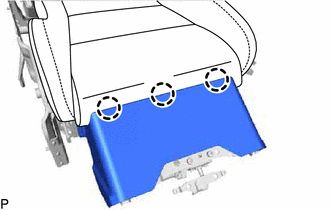
INSTALL SEPARATE TYPE REAR SEAT CUSHION COVER WITH PAD
-
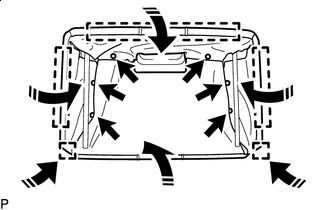
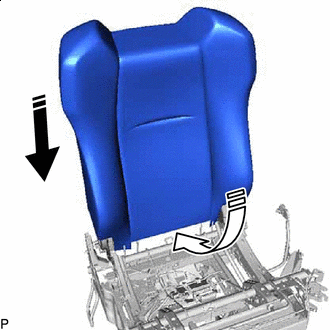
Attach the hook.
-
Install in this Direction Rotate the separate type rear seat cushion cover with pad as shown in the illustration and insert the guide.
-
Attach the hook to install the separate type rear seat cushion cover with pad.
-
Attach the claw to connect the seat cushion climate control duct.
-
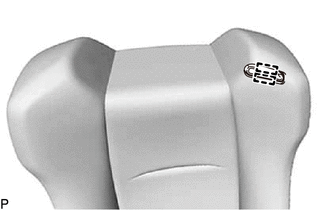
Attach the claw and connect the occupant detection sensor connector.
-
Connect the 2 connectors.
-
-
INSTALL REAR SEAT CLIMATE CONTROL ECU LH
-
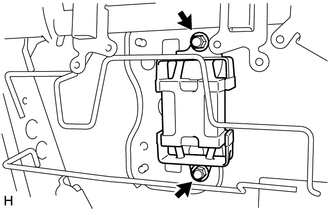
Install the rear seat climate control ECU LH with the 2 nuts.
-
Connect the connector.
-
-
INSTALL POSITION CONTROL ECU ASSEMBLY
-
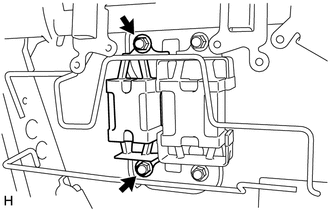
Install the position control ECU assembly with the 2 nuts.
-
Connect the 3 connectors.
-
-
INSTALL SEAT TRACK LOCK OPEN LEVER SUB-ASSEMBLY LH
-
Install the seat track lock open lever sub-assembly LH with the 2 nuts.
- Torque:
- 14 N*m { 143 kgf*cm, 10 ft.*lbf }
-
Connect the connector.
-
-
INSTALL REAR NO. 1 SEAT FOOTREST COVER
-
Install in this Direction Insert the guide and install the rear No. 1 seat footrest cover.
-
Attach the claw and connect the separate type rear seat cushion cover.
-
-
INSTALL REAR SEAT FOOTREST PANEL
-
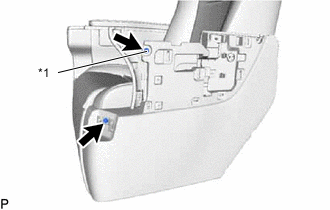
Install in this Direction Install the rear seat footrest panel to the rear seat footrest frame.
-
-
INSTALL REAR SEAT FOOTREST COVER SUB-ASSEMBLY RH
-
Install in this Direction Attach the hook.
-
Install the rear seat footrest cover with the 6 clips.
-
Install in this Direction Install the rear seat footrest assembly with the 2 bolts.
- Torque:
- 14 N*m { 143 kgf*cm, 10 ft.*lbf }
-
-
INSTALL REAR SEAT LEGREST COVER
-
Install the rear seat legrest cover with the 2 screws.
-
-
INSTALL REAR SEAT LEG COVER LH
-
Install in this Direction Attach the clip and guide to install the rear seat leg cover LH.
-
-
INSTALL REAR SEAT LEG SIDE COVER LH
-
Install in this Direction Attach the clip to install the rear seat leg side cover LH.
-
-
INSTALL REAR NO. 1 SEAT INSIDE RECLINING ADJUSTER COVER
-
Install in this Direction Attach the clip and claw to install the rear No. 1 seat inside reclining adjuster cover.
-
-
INSTALL REAR NO. 1 SEAT INNER BELT ASSEMBLY LH
-
INSTALL SEAT HEATER ASSEMBLY
-
INSTALL SEAT COVER WIRE
-
Install the seat cover wire.
Tech Tips
-
Wire 1000 mm (3.28 ft.) or longer and shaped wire are available as supplied parts.
-
When a wire that is less than 1000 mm in length is needed, cut or shape 1000 mm (3.28 ft.) wire into the dimensions shown in the illustration.
-
Make sure to read the precautions before preparing the wire.
Dimensions A 260 mm (10.2 in.) B 530 mm (1.74 ft.) C 350 mm (1.15 ft.) - - Tech Tips
The dimensions shown in the illustration are the lengths.
-
-
-
INSTALL SEPARATE TYPE REAR SEATBACK COVER
Tech Tips
-
When installing the seat cover, refer to the precautions in order to prevent wrinkles from forming.
-
Align the seam allowance in a single direction as shown in the illustration.
-
Remove in this Direction Slide the seat cover wire until it reaches a position where the hog rings in the center can be installed.
-
*1 Hog Ring Pliers Using hog ring pliers, install the separate type rear seatback cover to the separate type rear seatback pad with 2 new hog rings in the order shown in the illustration.
Note
-
Be careful not to damage the separate type rear seatback cover.
-
Be sure to securely install the hog rings as shown in the illustration while preventing wrinkles from forming on the separate type rear seatback cover.
-
-
Install in this Direction Return the seat cover wire to its original position.
-
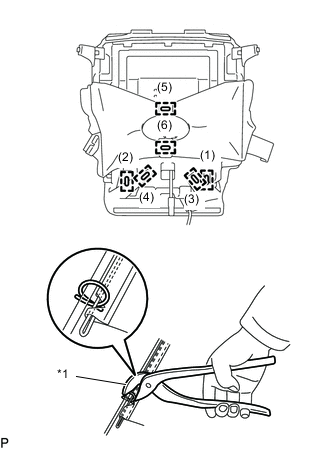
*1 Hog Ring Pliers Using hog ring pliers, install the separate type rear seatback cover to the separate type rear seatback pad with 10 new hog rings in the order shown in the illustration.
Note
-
Be careful not to damage the separate type rear seatback cover.
-
Be sure to securely install the hog rings as shown in the illustration while preventing wrinkles from forming on the separate type rear seatback cover.
-
-
-
INSTALL SEPARATE TYPE REAR SEATBACK COVER WITH PAD
-
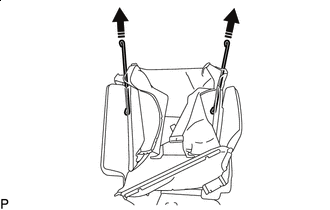
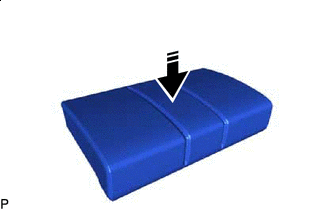
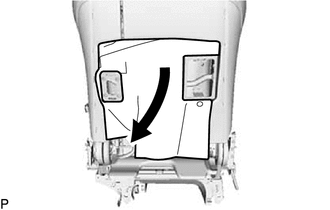
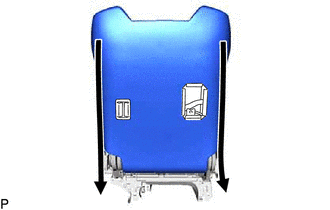
Install in this Direction (1) Install in this Direction (2) Push in installation direction (1) shown in the illustration to install the separate type rear seatback cover with pad.
-
Push in the rear end of the separate type rear seatback cover with pad in installation direction (2) shown in the illustration.
-
Attach the hook.
-
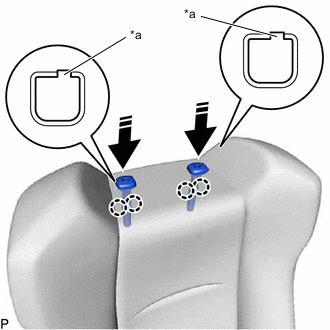
*a Protrusion Install in this Direction Align the rear seat headrest support protrusions with the grooves in the No. 1 seatback frame sub-assembly LH.
-
Push as shown in the illustration and attach the claw to install the 2 rear seat headrest supports.
-
Connect the connector of the seat heater assembly.
-
Attach the claw to connect the No. 2 seatback climate control duct.
-
Lower the rear No. 2 seat protector.
-
Close the 2 fasteners.
-

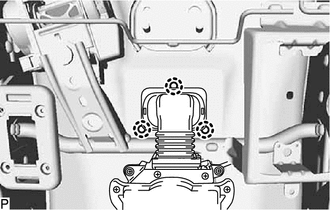
*1 Hog Ring Pliers Using hog ring pliers, install 3 new hog rings in the order shown in the illustration.
Note
-
Be careful not to damage the separate type rear seatback cover.
-
Be sure to securely install the hog rings as shown in the illustration while preventing wrinkles from forming on the separate type rear seatback cover.
-
-
Store the 2 fasteners.
-
-
INSTALL REAR SEAT LOCK CONTROL LEVER SUB-ASSEMBLY
-
Pull out the seat track control cable assembly.
-
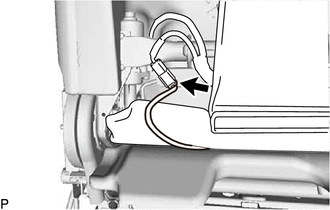
Install in this Direction While turning the seat track control cable assembly as shown in the illustration, connect it.
-
Attach the cable clamp.
-
Install the rear seat lock control lever sub-assembly with the 2 screws.
-
-
INSTALL SEAT STAND FRAME CAP
-
Attach the claw to install the seat stand frame cap.
-
-
INSTALL REAR SEAT SHOULDER BELT COVER LH
-
Install in this Direction Attach the rear seat shoulder belt cover LH to the No. 1 seat 3 point type belt assembly LH as shown in the illustration.
-
Attach the claw to install the rear seat shoulder belt cover LH.
-
-
CONNECT NO. 1 SEAT 3 POINT TYPE BELT ASSEMBLY LH
-
Check that the No. 1 seat 3 point type belt assembly LH is not twisted.
-
*1 Protruding Part Install the floor anchor of the No. 1 seat 3 point type belt assembly LH with the bolt.
- Torque:
- 42 N*m { 428 kgf*cm, 31 ft.*lbf }
Note
The anchor part of the No. 1 seat 3 point type belt assembly LH must not overlap the protruding part.
-
-
INSTALL REAR NO. 3 POWER SEAT SWITCH
-
INSTALL REAR NO. 1 SEAT INSIDE RECLINING ADJUSTER COVER
-

Install in this Direction Push as shown in the illustration to attach the claw, insert the guide and install the rear No. 1 seat inside reclining adjuster cover.
-
-
INSTALL REAR SEAT ARMREST FRAME SUB-ASSEMBLY RH
-
Attach the clip and insert the guide.
-
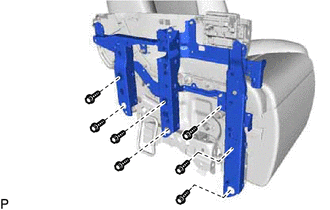
Install the rear seat armrest frame sub-assembly RH with the 7 bolts.
- Torque:
- 14 N*m { 143 kgf*cm, 10 ft.*lbf }
-
Install the 2 bolts.
- Torque:
- 4.5 N*m { 46 kgf*cm, 40 in.*lbf }
-
-
INSTALL REAR SEAT TURN TABLE ASSEMBLY LH
-

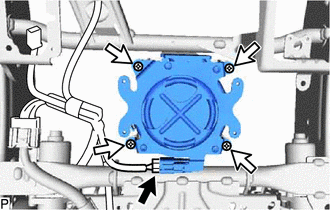
Place Hands Here Install in this Direction Insert the guide and install the rear seat turn table assembly LH with the 6 nuts.
- Torque:
- 14 N*m { 143 kgf*cm, 10 ft.*lbf }
CAUTION:
Do not place your hands in the openings in the sliding parts as this may result in injury.

Opening in Sliding Parts - -
-
-
INSTALL REAR NO. 1 SEAT LEG BRACKET
-
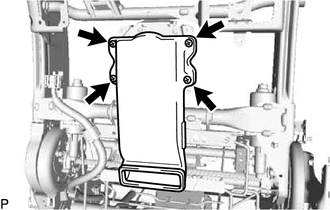
Temporarily install the rear No. 1 seat leg bracket with the 2 nuts and bolt.
-
While pressing the rear No. 1 seat leg bracket against the No. 1 seat leg sub-assembly LH and rear seat turn table assembly LH, tighten the 2 nuts.
- Torque:
- 4.5 N*m { 46 kgf*cm, 40 in.*lbf }
-
Tighten the bolt.
- Torque:
- 4.5 N*m { 46 kgf*cm, 40 in.*lbf }
-
-
INSTALL NO. 1 CUP HOLDER ASSEMBLY
-
Attach the claw to install the No. 1 cup holder assembly with the 2 screws.
-
-
INSTALL REAR NO. 1 SEAT ARMREST ASSEMBLY RH
-
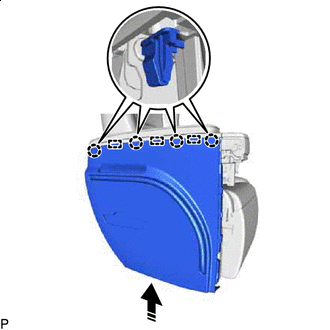
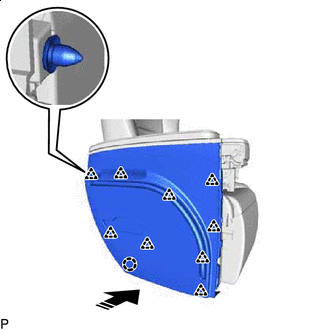
Push as shown in the illustration to attach the claw and clip.
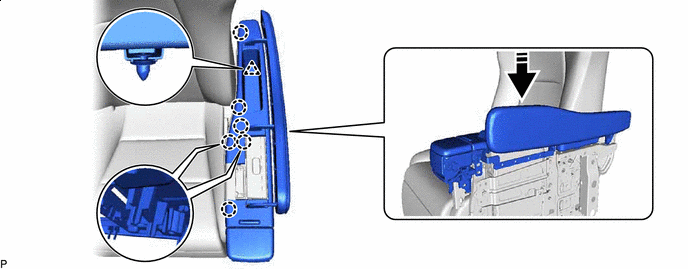
Install in this Direction -
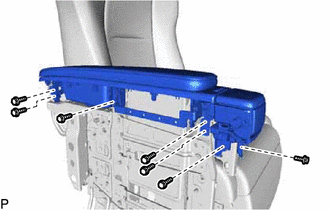
Install the rear No. 1 seat armrest assembly RH with the 7 bolts.
- Torque:
- 4.5 N*m { 46 kgf*cm, 40 in.*lbf }
-
-
INSTALL REAR SEAT CUSHION MOULDING LH
-
Install in this Direction Push as shown in the illustration, insert the guide and attach the claw.
-
Install in this Direction Push as shown in the illustration and attach the claw and clip to install the rear seat cushion moulding LH.
-
-
INSTALL SEAT ADJUSTER COVER CAP RH
-
Install in this Direction Push as shown in the illustration, insert the guide and attach the claw to install the seat adjuster cover cap RH.
-
-
INSTALL SEAT LEG GARNISH COVER
-
Attach the claw to install the seat leg garnish cover.
-
-
INSTALL RECLINING ADJUSTER COVER RH
Note
Do not reuse the reclining adjuster cover RH after removing it.
-
Connect the connector.
-
Install in this Direction Push as shown in the illustration, insert the guide and attach the clip and claw to install a new reclining adjuster cover RH.
-
-
INSTALL REAR NO. 1 SEAT INSIDE RECLINING ADJUSTER COVER
-
Insert the guide and attach the clip.
-

Install the rear No. 1 seat inside reclining adjuster cover to the rear seat armrest frame sub-assembly LH with the 2 bolts and screw.
- Torque:
- for Bolt
- 4.5 N*m { 46 kgf*cm, 40 in.*lbf }
-
-
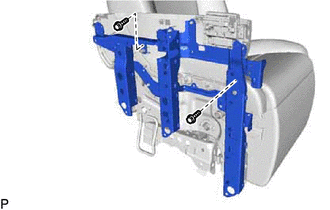
INSTALL REAR SEAT ARMREST FRAME SUB-ASSEMBLY LH
-
Clean and remove any oil from the threads of the 2 stud bolts for the rear seat cushion frame sub-assembly LH and those of the 2 fixing nuts for the rear seat armrest frame sub-assembly LH.
-
Apply adhesive to the threads of the 2 fixing nuts.
Adhesive Toyota Genuine Adhesive 1344, Three Bond 1344 or equivalent -
Install the rear seat armrest frame sub-assembly LH together with the rear No. 1 seat inside reclining adjuster cover with the 2 bolts and 2 nuts.
- Torque:
- 14 N*m { 143 kgf*cm, 10 ft.*lbf }
-
Attach the clamp to connect the wire harness.
-
-
INSTALL REAR SEAT RECLINING COVER LH
-
Install in this Direction Push as shown in the illustration and attach the claw and clip.
-
*1 Bolt A Install the rear seat reclining cover LH with the 2 bolts.
- Torque:
- for Bolt A
- 4.5 N*m { 46 kgf*cm, 40 in.*lbf }
-
-
INSTALL SEAT ADJUSTER COVER CAP LH
-

Install in this Direction Push as shown in the illustration, insert the guide and attach the claw to install the seat adjuster cover cap LH.
-
-
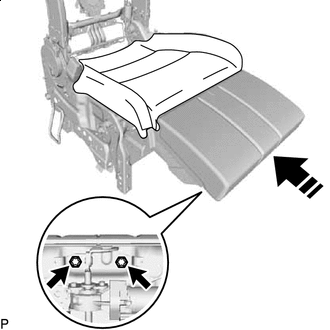
INSTALL REAR SEAT CUSHION
-
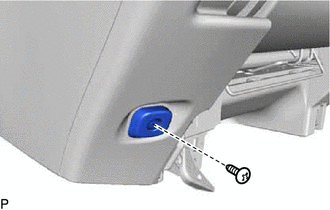
Install the rear seat cushion with the screw.
-
-
INSTALL REAR POWER SEAT SWITCH LH
-
INSTALL REAR NO. 1 SEAT ARMREST ASSEMBLY LH
-
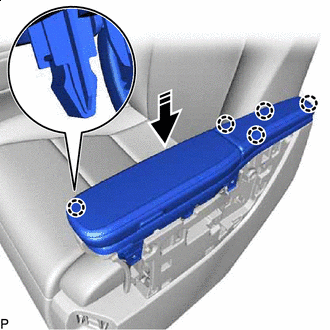
Install in this Direction Push as shown in the illustration and attach the claw to install the rear seat armrest assembly LH.
-
Install the 4 bolts.
- Torque:
- 4.5 N*m { 46 kgf*cm, 40 in.*lbf }
-
Attach the clamp and connector to connect the wire harness.
-
-
INSTALL REAR NO. 1 SEAT RECLINING COVER LH
-
Attach the clamp to connect the wire harness.
-
Install in this Direction Push as shown in the illustration and attach the claw to install the rear No. 1 seat reclining cover LH.
-
-
INSTALL REAR POWER SEAT SWITCH LH
-
INSTALL NO. 1 RECLINING ADJUSTER RELEASE HANDLE LH
-
Install in this Direction Push as shown in the illustration and attach the claw to install the No. 1 reclining adjuster release handle LH.
-