REAR NO. 2 SEAT ASSEMBLY REASSEMBLY
CAUTION / NOTICE / HINT
Tech Tips
The procedure listed below is for the LH side. Use the same procedure for the LH and RH sides, unless otherwise specified.
PROCEDURE
-
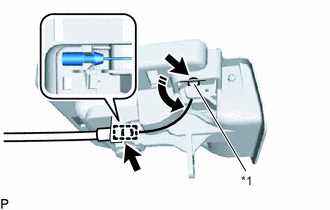
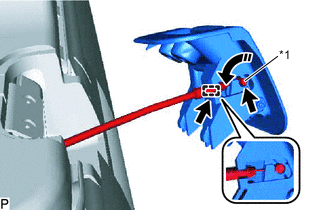
INSTALL REAR NO. 2 SEAT CUSHION LOCK CABLE ASSEMBLY LH
-
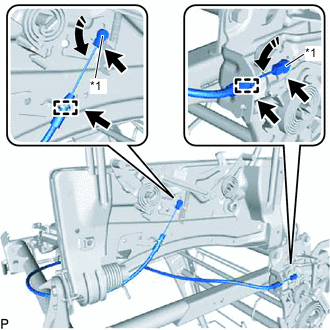
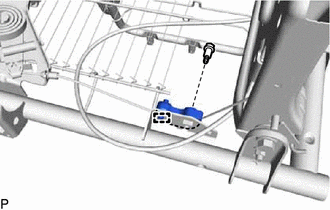
*1 Cable End 
Install in this Direction Rotate and install the cable end in the direction indicated by the arrow install the rear No. 2 seat cushion lock cable assembly LH.
-
Attach the casing cap.
-
-
INSTALL RECLINING REMOTE CONTROL CABLE ASSEMBLY
-
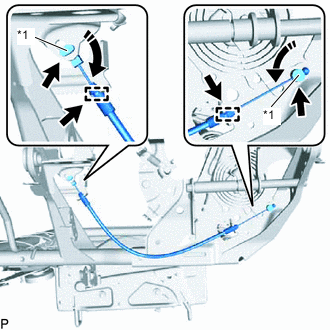
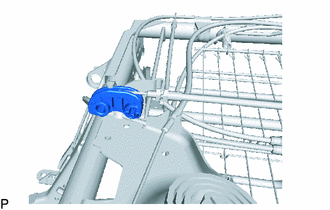
*1 Cable End Install in this Direction Rotate and install the cable end in the direction indicated by the arrow install the reclining remote control cable assembly.
-
Attach the casing cap.
-
-
INSTALL SEAT TRACK CONTROL CABLE ASSEMBLY
-
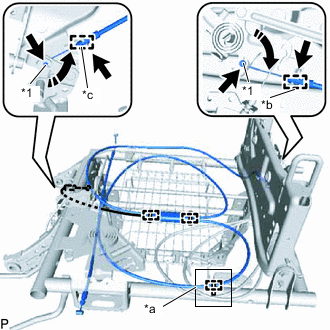
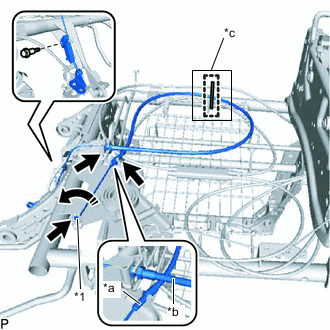
*1 Cable End Install in this Direction Rotate and install the cable end in the direction indicated by the arrow, attach the casing cap and install the seat track control cable assembly.
Tech Tips
-
Install the *b blue casing cap middle bar (third bar).
-
Install the *c natural-colored casing cap middle bar (third bar)
-
-
Install 3 new cable ties at the area with the cable positioning tape on part *a.
-
-
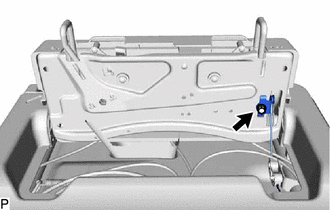
INSTALL NO. 2 SEAT RECLINING ADJUSTING CABLE ASSEMBLY LH
-
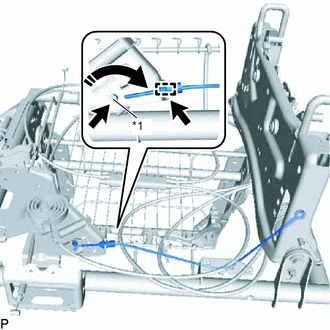
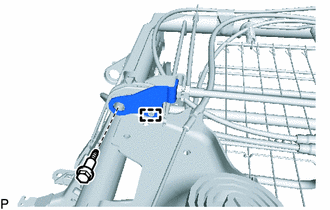
*1 Cable End Install in this Direction Rotate and install the cable end in the direction indicated by the arrow, attach the casing cap and install the No. 2 seat reclining adjusting cable assembly LH.
Tech Tips
Install the natural-colored casing cap (first bar).
-
-
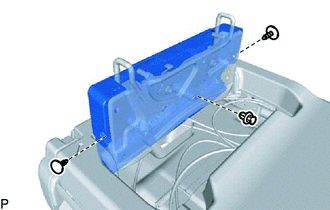
INSTALL REAR SEAT CUSHION SUPPORT GUIDE
-
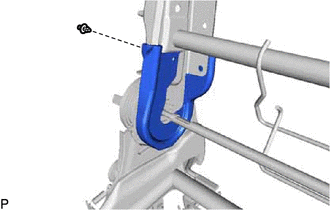
Pass the cable through the rear seat cushion support guide and insert the guide.
-
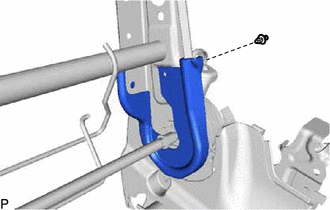
Install the rear seat cushion support guide with the bolt.
- Torque:
- 12.7 N*m { 130 kgf*cm, 9 ft.*lbf }
-
-
INSTALL REAR SEAT CUSHION WIRE SUB-ASSEMBLY
-
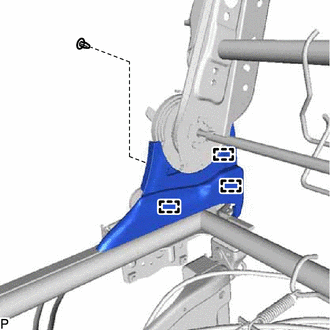
*1 Cable End *a Cable Positioning Tape (Red) Install in this Direction Rotate and install the cable end in the direction indicated by the arrow install the rear seat cushion wire sub-assembly.
-
Tighten the 2 cable nuts.
Note
Make sure that cable *b passes under cable *a.
-
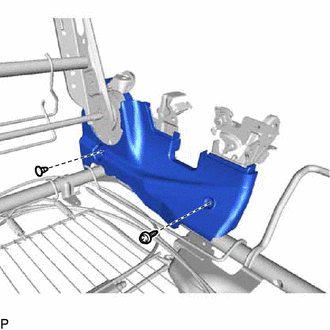
Install the 3 cables together with the bolt and new cable tie at the area with the cable positioning tape on part *c.
- Torque:
- 12.7 N*m { 130 kgf*cm, 9 ft.*lbf }
-
-
INSTALL REAR SEAT CUSHION SUPPORT GUIDE
-
Pass the cable through the rear seat cushion support guide, and then install the rear seat cushion support guide
-
Insert the guide and install the rear seat cushion support guide bracket with the bolt.
- Torque:
- 12.7 N*m { 130 kgf*cm, 9 ft.*lbf }
-
-
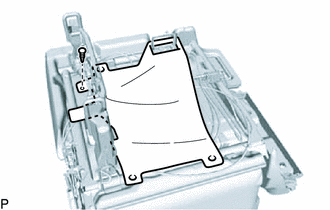
INSTALL REAR SEAT BACK PROTECTOR
-
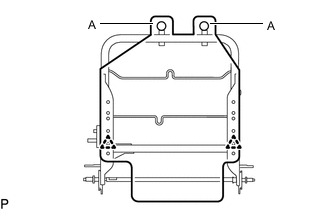
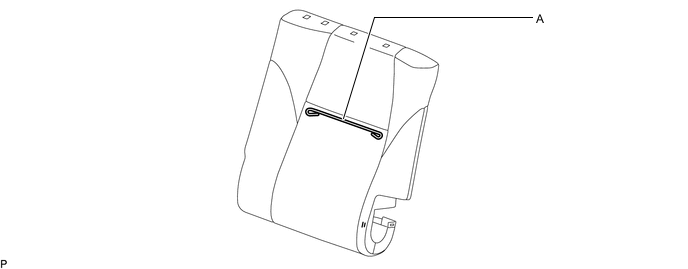
Install the rear seatback protector with the 2 clips, and then hook the parts labeled A shown in the illustration onto the headrest support bracket.
-
-
INSTALL REAR NO. 2 SEAT PROTECTOR LH
-
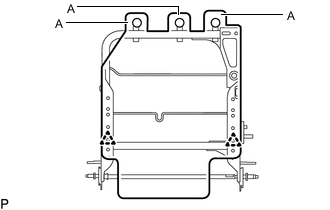
Install the rear No. 2 seat protector LH with the 2 clips, and then hook the parts labeled A shown in the illustration onto the headrest support bracket.
-
-
INSTALL REAR SEAT RECLINING INNER COVER LH
-
Insert the guide.
-
Install the rear seat reclining inner cover LH with the clip.
-
-
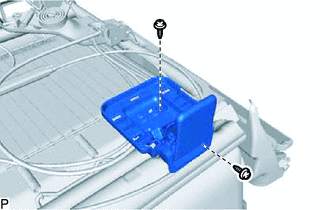
INSTALL REAR NO. 2 SEAT RECLINING ADJUSTER INSIDE COVER
-
Install the rear No. 2 seat reclining adjuster inside cover with the clip.
-
-
INSTALL REAR SEAT RECLINING INNER COVER LH
-
Install the rear seat reclining inner cover LH with the screw and clip.
-
-
INSTALL REAR NO. 2 SEAT RECLINING ADJUSTER INSIDE COVER
-
Install the rear No. 2 seat reclining adjuster inside cover with the clip.
-
-
INSTALL SEAT COVER WIRE
-
Install the seat cover wire.
Tech Tips
-
Wire 1000 mm (3.28 ft.) or longer and shaped wire are available as supplied parts.
-
When a wire that is less than 1000 mm in length is needed.
-
Make sure to read the precautions before preparing the wire.
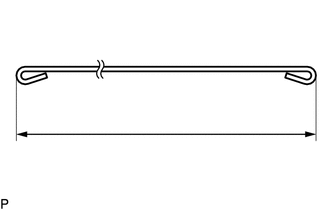
Dimensions A 230 mm Tech Tips
The dimensions shown in the illustration are the length.
-
-
-
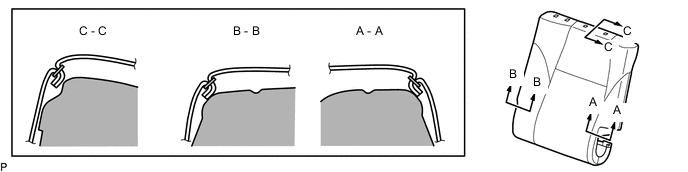
INSTALL NO. 2 SEATBACK COVER SUB-ASSEMBLY LH
Tech Tips
-
Refer to the precautions on wrinkles to avoid creating any on the rear seat cushion cover RH when installing the seat cover.
-
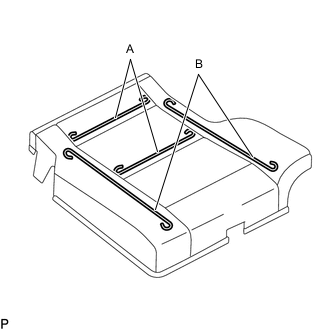
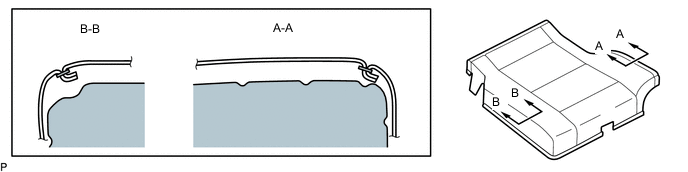
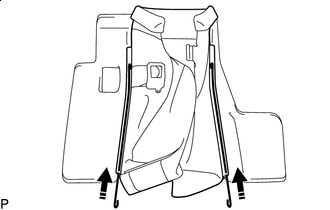
Align the seam allowance in a single direction as shown in the illustration.
-
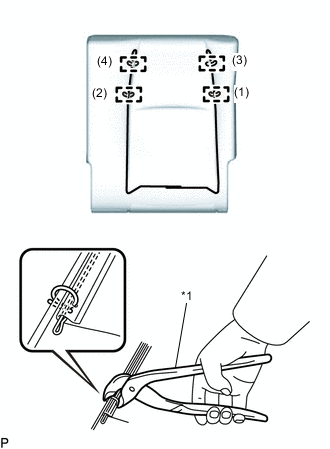
*1 Hog Ring Pliers Using hog ring pliers, install 4 new hog rings.
Note
-
Do not damage the No. 2 seatback cover sub-assembly LH or allow it to become dirty.
-
Make sure to securely install the hog rings to prevent wrinkles from forming on the center of the fabric and No. 2 seatback pad.
-
-
Pass the fastening rubber through the 2 holes of the pad
-
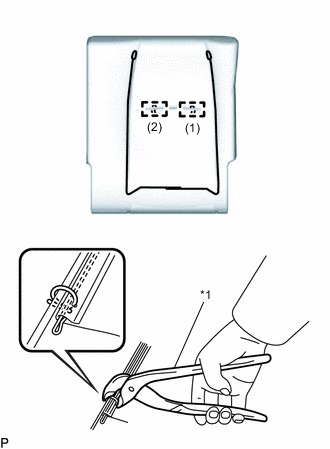
*1 Hog Ring Pliers Using hog ring pliers, install the No. 2 seatback cover sub-assembly LH to the No. 2 seatback pad with 2 new hog rings.
Note
-
Do not damage the No. 2 seatback cover sub-assembly LH or allow it to become dirty.
-
Make sure to securely install the hog rings to prevent wrinkles from forming on the center of the fabric and No. 2 seatback pad.
-
-
-
INSTALL SEATBACK COVER WITH PAD
-
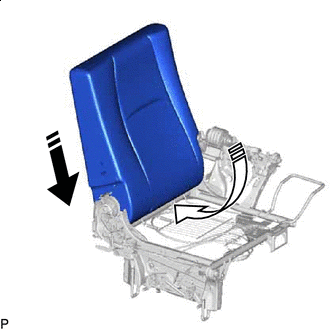
Install in this Direction (1) 
Install in this Direction (2) Push in installation direction (1) shown in the illustration to install the seatback cover with pad.
-
Push in the rear end of the seatback cover with pad in installation direction (2) shown in the illustration.
-
for Seat RH Side:
-
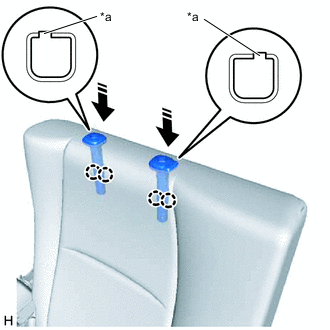
*a Protrusion Install in this Direction Align the rear No. 2 seat headrest support protrusions with the grooves in the seatback frame sub-assembly LH.
-
Press in the direction indicated by the arrow shown in the illustration and attach the claw to install the 2 rear No. 2 seat headrest support assemblies.
Note
Check that the claw of the rear No. 2 seat headrest support assembly is attached and the No. 2 seat headrest assembly is securely installed.
-
-
for Seat LH Side:
-
Align the rear No. 2 seat headrest support protrusions with the grooves in the seatback frame sub-assembly LH.
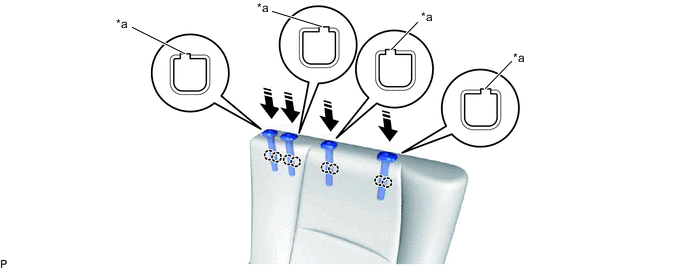
Install in this Direction *a Protrusion -
Press in the direction indicated by the arrow shown in the illustration and attach the claw to install the 4 rear No. 2 seat headrest support assemblies.
Note
Check that the claw of the rear No. 2 seat headrest support assembly is attached and the No. 2 seat headrest assembly and rear seat headrest assembly is securely installed.
-
-
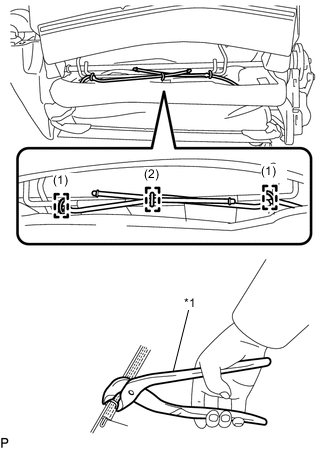
*1 Hog Ring Pliers Using hog ring pliers, install the fastening rubber with 3 new hog rings.
Note
Make sure to install the hog rings between the first and secnd balls from the end of the fastening rubber.
-

Attach the hook.
-
Close the fastener and install the seatback cover with pad.
-
-
INSTALL CENTER SEAT ARMREST ASSEMBLY LH (w/ Armrest)
-
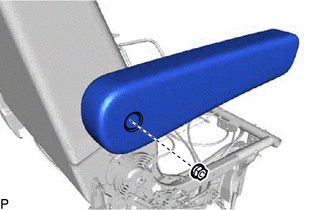
Install the center seat armrest assembly LH with the nut.
- Torque:
- 30 N*m { 306 kgf*cm, 22 ft.*lbf }
-
-
INSTALL NO. 2 SEAT ARMREST CAP (w/ Armrest)
-
Attach the claw and install the No. 2 seat armrest cap.
-
-
INSTALL SEAT COVER WIRE
-
Install the seat cover wire.
Tech Tips
-
Wire 1000 mm (3.28 ft.) or longer and shaped wire are available as supplied parts.
-
When a wire that is less than 1000 mm in length is needed.
-
Make sure to read the precautions before preparing the wire.
Dimensions A 260 mm B 390 mm Tech Tips
The dimensions shown in the illustration are the length.
-
-
-
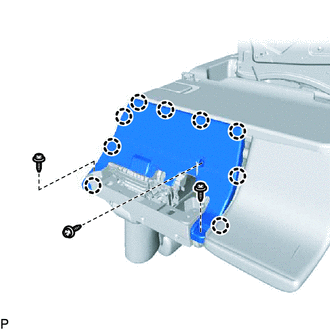
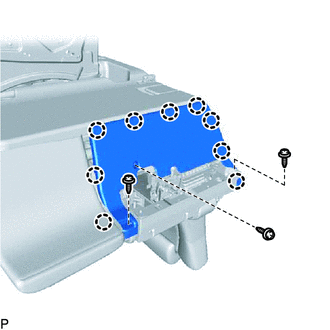
INSTALL NO. 2 SEAT CUSHION COVER SUB-ASSEMBLY LH
Tech Tips
-
Refer to the precautions on wrinkles to avoid creating any on the No. 2 seat cushion cover sub-assembly LH when installing the seat cover.
-
Align the seam allowance in a single direction as shown in the illustration.
-
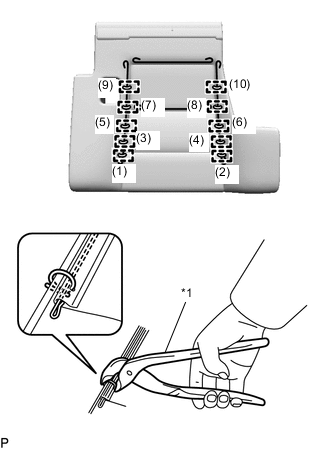
*1 Hog Ring Pliers Using hog ring pliers, install 8 new hog rings.
Note
-
Do not damage the No. 2 seat cushion cover sub-assembly LH or allow it to become dirty.
-
Make sure to securely install the hog rings to prevent wrinkles from forming on the center of the fabric and No. 2 seat cushion pad.
-
-
Install in this Direction Return the seat cover wire to its original position.
-
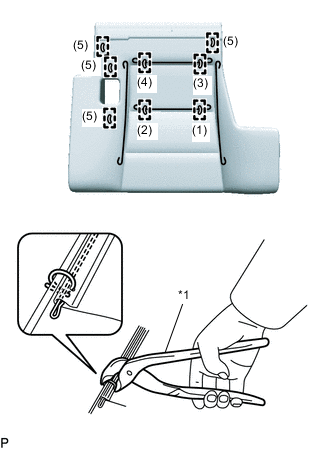
*1 Hog Ring Pliers Using hog ring pliers, install the No. 2 seat cushion cover sub-assembly LH to the No. 2 seat cushion pad with 10 new hog rings.
Note
-
Do not damage the No. 2 seat cushion cover sub-assembly LH or allow it to become dirty.
-
Make sure to securely install the hog rings to prevent wrinkles from forming on the center of the fabric and No. 2 seat cushion pad.
-
-
-
INSTALL SEAT CUSHION COVER WITH PAD
-
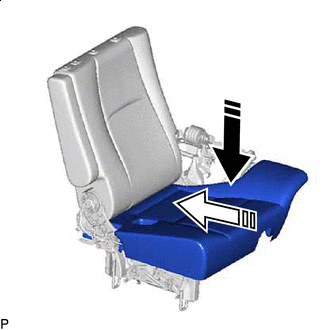
Install in this Direction (1) Install in this Direction (2) Install the seat cushion cover with pad from installation direction (1).
-
Push in the rear end of the seat cushion cover with pad in installation direction (2) shown in the illustration.
-
Using hog ring pliers, install 3 new hog rings as shown in the illustration.
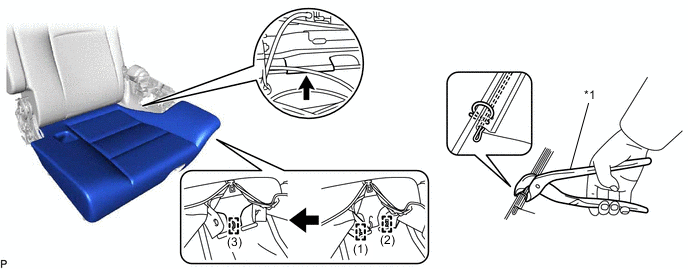
*1 Hog Ring Pliers - - -
Attach the hook and install the seat cushion cover with pad.
-
-
INSTALL REAR SEAT CUSHION COVER LH
-
Install the rear seat cushion cover LH with the clip.
-
-
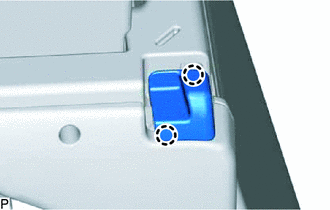
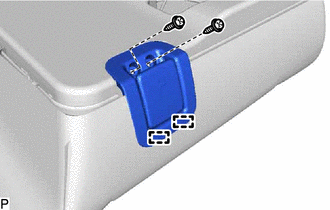
INSTALL NO. 2 SEAT CUSHION LOCK RELEASE LEVER ASSEMBLY
-
*1 Cable End Install in this Direction Rotate and install the cable end in the direction indicated by the arrow, attach the casing cap and install the No. 2 seat cushion lock release lever assembly.
Tech Tips
Install the natural-colored casing cap (first bar).
-
Install the No. 2 seat cushion lock release lever assembly with the 2 screws.
-
Attach the claw and install the cap.
-
-
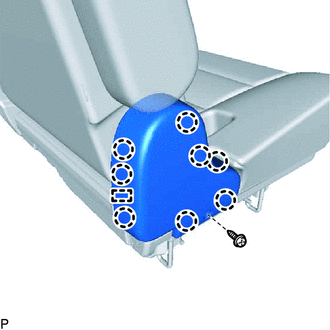
INSTALL REAR SEAT CUSHION UNDER COVER LH
-
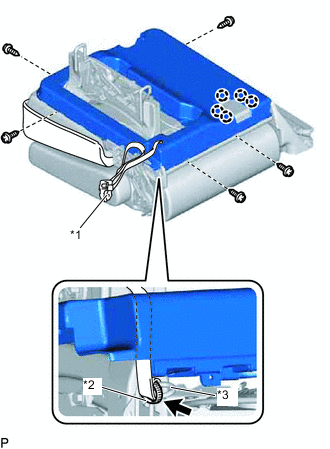
*1 Rear Seat Cushion Lock Hook LH *2 Clamp Pass the rear seat cushion lock hook LH through the hole of the rear seat cushion under cover LH.
-
Pass the rear seat cushion lock hook LH through part *3 shown in the illustration and then fold it back.
-
Pass the cable tie through the ring at the end of the rear seat cushion lock hook RH.
-
Attach the claw to temporarily install the seat cushion under cover.
-
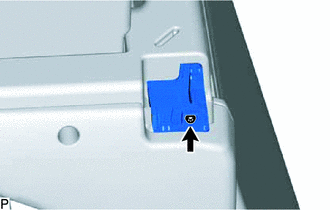
Install the rear seat cushion under cover LH with the 5 screws.
-
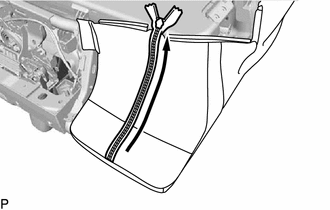
Close the fastener.
-
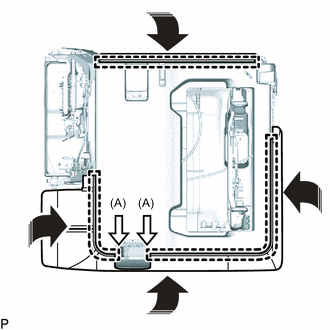
Install in this Direction Attach the hook in the direction indicated by arrow (A) shown in the illustration.
-
-
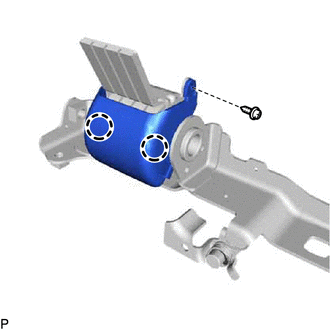
INSTALL NO. 3 RECLINING ADJUSTER RELEASE HANDLE LH
Note
Do not reuse the No. 3 reclining adjuster release handle LH after removing it.
-
Install a new No. 3 reclining adjuster release handle LH with the screw.
-
-
INSTALL REAR NO. 2 SEAT COVER CAP LH
Note
Do not reuse the rear No. 2 seat cover cap LH after removing it.
-
Attach the claw to install a new rear No. 2 seat cover cap LH.
-
-
INSTALL REAR SEAT LOCK CONTROL LEVER SUB-ASSEMBLY
-
*1 Cable End Install in this Direction Rotate and install the cable end in the direction indicated by the arrow, attach the casing cap and connect the seat track control cable assembly.
Tech Tips
Install the black casing cap (first bar).
-
Insert the guide.
-
Install the rear seat lock control lever sub-assembly with the 2 screws.
-
-
INSTALL REAR NO. 2 SEAT RECLINING COVER LH
-
Insert the guide and attach the claw.
-
Install the rear No. 2 seat reclining cover LH with the screw.
-
-
INSTALL REAR NO. 2 SEAT LAP TYPE BELT ASSEMBLY (for LH Side)
-
INSTALL REAR NO. 2 SEAT INNER BELT ASSEMBLY LH (for LH Side)
-
INSTALL NO. 2 SEAT LAP TYPE BELT ASSEMBLY (for RH Side)
-
INSTALL REAR NO.2 SEAT INNER BELT ASSEMBLY RH (for RH Side)
-
INSTALL SEAT LEG COVER
-

With the rear No. 2 seat leg folded down, install the seat leg cover.
-
Install the seat leg cover with the 3 clips.
-
Connect the No. 2 seat reclining adjusting cable assembly LH with the bolt.
- Torque:
- 29 N*m { 296 kgf*cm, 21 ft.*lbf }
-
-
INSTALL NO. 2 SEAT CUSHION STOPPER
-
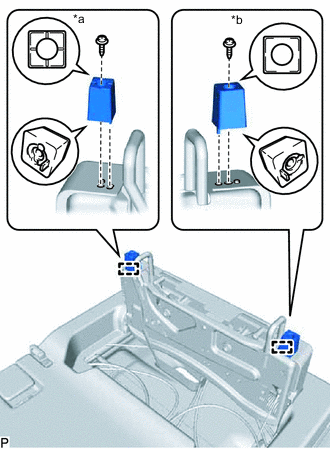
*a Vehicle of Font Side *b Vehicle of Rear Side Insert the guide.
-
Install the 2 No. 2 seat cushion stoppers with the 2 screws.
-
-
INSTALL REAR SEAT CUSHION HINGE LOWER COVER LH
-
Attach the claw.
-
Install the rear seat cushion hinge lower cover LH with the screw.
-
-
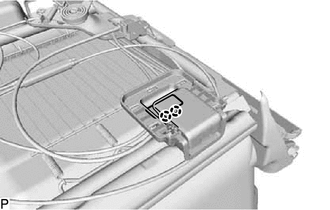
INSTALL REAR NO. 3 SEAT LOCK COVER LH
-
Install the rear No. 3 seat lock cover LH with the 3 screws.
-
-
INSTALL NO. 2 SEAT ADJUSTER COVER CAP
-
Insert the claw and guide and install the No. 2 seat adjuster cover cap.
-
-
INSTALL REAR NO. 2 SEAT HINGE SUB-ASSEMBLY LH
CAUTION:
-
Make sure to perform the following procedure, as the force of the rear No. 2 seat hinge sub-assembly LH spring is strong.
-
Make sure that your hands and fingers, etc. do not get caught in the rear No. 2 seat hinge sub-assembly LH.
-
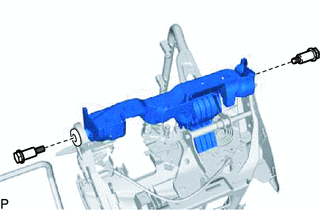
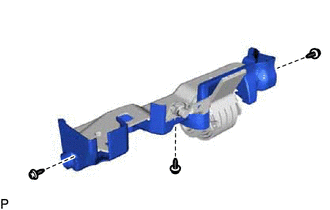
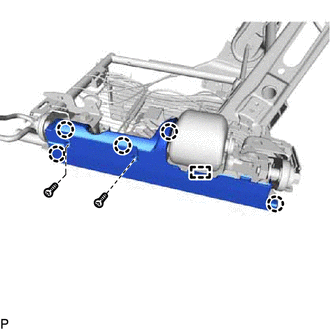
Install the rear No. 2 seat hinge sub-assembly LH with the 2 bolts.
- Torque:
- 42 N*m { 428 kgf*cm, 31 ft.*lbf }
-
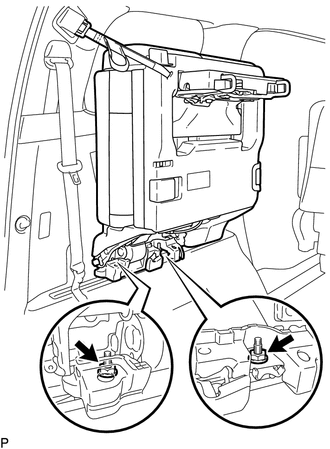
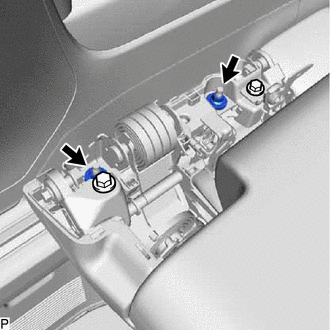
Set the rear No. 2 seat assembly LH to the vehicle in the flipped up position and temporarily install it with the 2 nuts as shown in the illustration.
CAUTION:
Perform this procedure with 2 or more people.
-
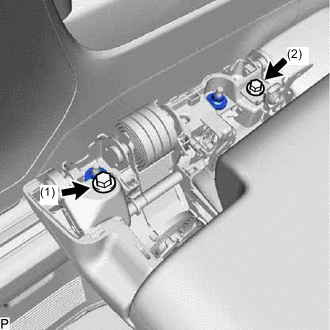
Lower the rear No. 2 seat assembly LH to the seated position and install stopper bolt (1) as shown in the illustration.
- Torque:
- 21 N*m { 214 kgf*cm, 15 ft.*lbf }
-
Connect the No. 2 seat reclining adjusting cable assembly LH with stopper bolt (2).
- Torque:
- 21 N*m { 214 kgf*cm, 15 ft.*lbf }
-
Remove the 2 temporarily installed nuts and rear No. 2 seat assembly LH from the vehicle again.
-
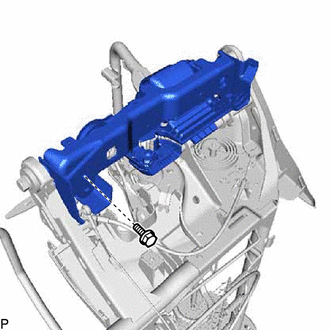
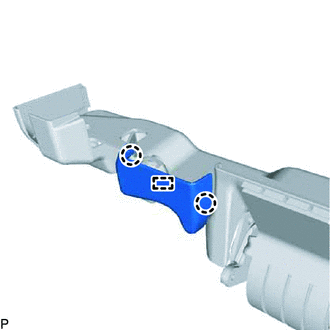
Install the bolt.
- Torque:
- 29 N*m { 296 kgf*cm, 21 ft.*lbf }
-
-
INSTALL REAR SEAT NO. 3 CUSHION HINGE COVER
-

Insert the guide, attach the claw and install the rear seat No. 3 cushion hinge cover to the rear No. 2 seat hinge sub-assembly LH.
-
-
INSTALL REAR SEAT CUSHION HINGE UPPER COVER LH
-
Insert the guide and attach the claw.
-
Install the rear seat cushion hinge upper cover LH with the 2 screws.
-
-
INSTALL REAR SEAT CUSHION HINGE LOWER COVER LH
-
Attach the claw.
-
Install the rear seat cushion hinge lower cover LH with the 3 screws.
-
-
INSTALL REAR SEAT CUSHION HINGE LOWER COVER RH
-
Attach the claw.
-
Install the rear seat cushion hinge lower cover RH with the 3 screws.
-