REAR DOOR SPEAKER INSTALLATION
CAUTION / NOTICE / HINT
Tech Tips
-
Use the same procedure for both the RH and LH sides.
-
The procedure described below is for the LH side.
PROCEDURE
-
INSTALL REAR NO. 2 SPEAKER ASSEMBLY
-
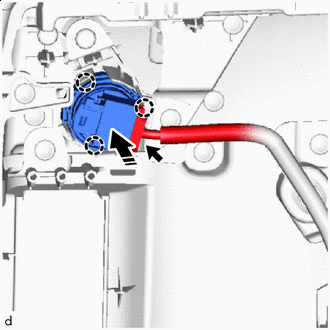

Install in this Direction Engage the claws to install the rear No. 2 speaker assembly as shown in the illustration.
Note
Do not touch the cone part of the rear No. 2 speaker assembly.
-
Connect the connector.
-
-
INSTALL REAR SPEAKER ASSEMBLY
-
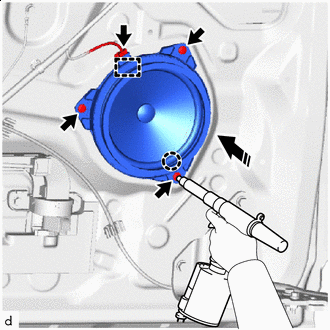
Install in this Direction Engage the guide and claw to temporarily install the rear speaker assembly.
-
Using an air riveter or hand riveter, install the rear speaker assembly with 3 new rivets.
Note
-
Do not touch the cone part of the rear speaker assembly.
-
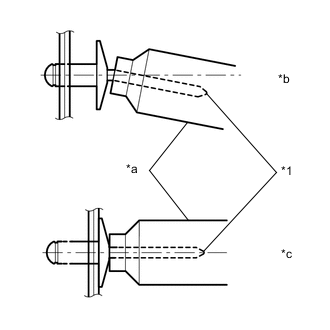
*1 Mandrel *a Riveter *b Incorrect *c Correct Do not pry on the rivets with the riveter, as this will cause damage to the riveter and mandrel.
-
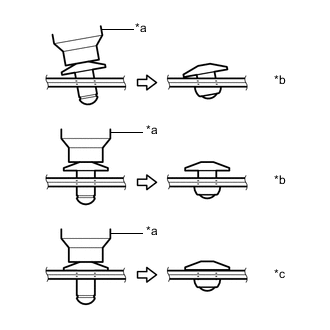
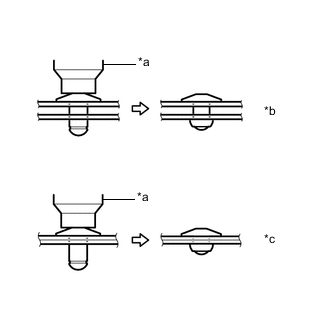
*a Riveter *b Incorrect *c Correct Confirm that the rivets are seated properly against the rear speaker assembly.
-
Do not tilt the riveter when installing the rivets to the rear speaker assembly.
-
Do not leave any clearance between the rivet heads and rear speaker assembly.
-
*a Riveter *b Incorrect *c Correct Do not leave any clearance between the rear speaker assembly and door. Firmly hold the 2 items together while installing the rivets.
-
-
Connect the connector.
-
-
INSTALL REAR DOOR TRIM BOARD SUB-ASSEMBLY LH
-
INSTALL NO. 3 SLIDE DOOR WEATHERSTRIP LH