FRONT DOOR SPEAKER REMOVAL
CAUTION / NOTICE / HINT
Tech Tips
-
Use the same procedure for both the RH and LH sides.
-
The procedure described below is for the LH side.
PROCEDURE
-
REMOVE POWER WINDOW REGULATOR MASTER SWITCH ASSEMBLY WITH FRONT DOOR ARMREST BASE PANEL (for Driver Side)
-
REMOVE POWER WINDOW REGULATOR SWITCH ASSEMBLY WITH FRONT DOOR ARMREST BASE PANEL (for Front Passenger Side)
-
REMOVE FRONT ARMREST ASSEMBLY LH
-
REMOVE LOWER DOOR FRAME GARNISH LH
-
REMOVE FRONT DOOR INSIDE HANDLE BEZEL PLUG LH
-
REMOVE COURTESY LIGHT ASSEMBLY (w/ Courtesy Light)
-
REMOVE REFLEX REFLECTOR (w/o Courtesy Light)
-
REMOVE FRONT DOOR TRIM BOARD SUB-ASSEMBLY LH
-
REMOVE FRONT NO. 1 SPEAKER ASSEMBLY
-
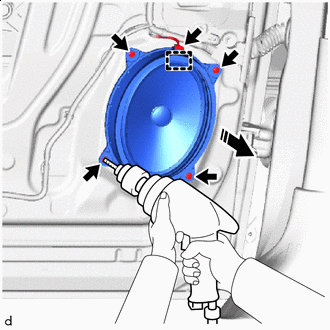

Remove in this Direction Disconnect the connector.
-
Using a drill bit with a diameter of less than 5 mm (0.197 in.), remove the 4 rivet heads as shown in the illustration.
Note
-
Do not touch the cone part of the front No. 1 speaker assembly.
-
Do not drill the rivet at an angle as this will cause damage to the drill and drill hole. Line up the drill and rivet, and carefully drill out the rivet head.
-
Be careful as the cut rivet will be very hot.
-
-
Continue drilling and push out the remaining rivet fragments.
-
Disengage the guide to remove the front No. 1 speaker assembly.
-
Using a vacuum cleaner, remove the rivet fragments and shavings from the inside of the door.
-