RADIO RECEIVER INSTALLATION
PROCEDURE
-
INSTALL RADIO AND DISPLAY ASSEMBLY
-
INSTALL NO. 1 RADIO RECEIVER BRACKET
-
Install the No. 1 radio receiver bracket with the 4 screws.
-
-
INSTALL NO. 2 RADIO RECEIVER BRACKET
-
Install the No. 2 radio receiver bracket with the 4 screws.
-
-
INSTALL NAVIGATION ECU WITH WIRE (w/ Navigation System)
-
INSTALL RADIO RECEIVER ASSEMBLY WITH BRACKET
-
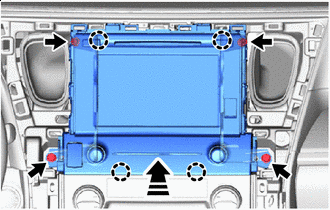

Install in this Direction Connect the connectors.
-
Engage the claws to temporarily install the radio receiver assembly with bracket as shown in the illustration.
-
Install the radio receiver assembly with bracket with the 4 bolts.
-
-
INSTALL NO. 3 INSTRUMENT PANEL REGISTER ASSEMBLY
-
INSTALL NO. 4 INSTRUMENT PANEL REGISTER ASSEMBLY
-
INSTALL UPPER INSTRUMENT PANEL FINISH PANEL
-
INSTALL CENTER NO. 1 INSTRUMENT CLUSTER FINISH PANEL (for Separate Console Box Type)
-
INSTALL CENTER NO. 2 INSTRUMENT CLUSTER FINISH PANEL (for Separate Console Box Type)
Tech Tips
Use the same procedure as for the center No. 1 instrument cluster finish panel. (for Separate Console Box Type)
-
INSTALL INSTRUMENT PANEL FINISH PANEL END LH (for Integrated Console Box Type)
-
INSTALL INSTRUMENT PANEL FINISH PANEL END RH (for Integrated Console Box Type)
Tech Tips
Use the same procedure as for the center instrument panel finish panel end LH. (for Integrated Console Box Type)
-
INSTALL NO. 2 BOX BOTTOM MAT (for Integrated Console Box Type)
-
CONNECT CABLE TO NEGATIVE BATTERY TERMINAL
Note
When disconnecting the cable, some systems need to be initialized after the cable is reconnected.