REAR TRAILING ARM INSTALLATION
CAUTION / NOTICE / HINT
Tech Tips
-
Use the same procedure for the RH side and LH side.
-
The following procedure is for the LH side.
PROCEDURE
-
INSTALL REAR TRAILING ARM ASSEMBLY
-
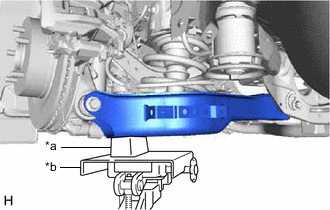
*a Wooden Block *b Transmission Jack Using a transmission jack and a wooden block, support the rear No. 2 suspension arm assembly.
Note
-
When jacking up the rear No. 2 suspension arm assembly, be sure to jack it up slowly.
-
Make sure to perform this operation with the vehicle kept as low as possible.
-
-
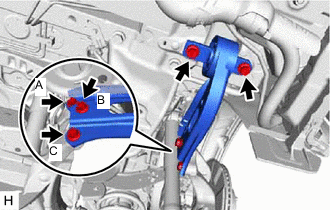
Install the rear trailing arm assembly to the rear axle carrier sub-assembly with the 3 bolts.
- Torque:
- 125 N*m { 1275 kgf*cm, 92 ft.*lbf }
Note
Tighten the 3 bolts in the order of (B), (A) and (C).
-
Install the rear trailing arm assembly to the body with the 2 bolts.
- Torque:
- 125 N*m { 1275 kgf*cm, 92 ft.*lbf }
-
Slowly lower the rear No. 2 suspension arm assembly.
-
-
INSTALL SKID CONTROL SENSOR WIRE
-
Install the skid control sensor wire to the rear trailing arm assembly with the bolt.
- Torque:
- 8.5 N*m { 87 kgf*cm, 75 in.*lbf }
-
-
INSTALL LOWER NO. 2 CONTROL ARM COVER
-
INSTALL REAR WHEEL
-
INSPECT AND ADJUST REAR WHEEL ALIGNMENT
-
PERFORM INITIALIZATION
-
Initialization of the headlight ECU sub-assembly LH.
-