REAR CRANKSHAFT OIL SEAL REMOVAL

PROCEDURE
-
REMOVE AUTOMATIC TRANSAXLE ASSEMBLY
-
REMOVE DRIVE PLATE AND RING GEAR SUB-ASSEMBLY
-
Using height adjustment attachments and plate lift attachments, place the engine assembly on a flat level surface.
Note
-
Using height adjustment attachments and plate lift attachments, keep the engine assembly level.
-
To prevent the No. 2 oil pan sub-assembly from deforming, do not place any attachments under the No. 2 oil pan sub-assembly of the engine assembly.
-
Using an engine sling device and engine lift, secure the engine assembly before servicing.
-
-
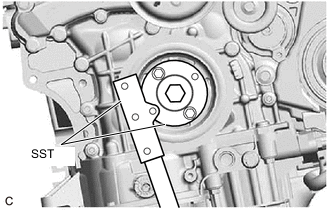
Using SST, hold the crankshaft pulley.
- SST
- 09213-70011 ( 09213-70020 )
- 09330-00021
-
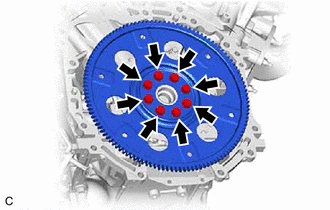
Remove the 8 bolts, the rear drive plate spacer, the drive plate and ring gear sub-assembly.
-
-
REMOVE NO. 1 CRANKSHAFT POSITION SENSOR PLATE
-
Remove the No. 1 crankshaft position sensor plate.
-
-
REMOVE REAR ENGINE OIL SEAL
-

*a Protective Tape *b Cut Position Using a knife, cut through the lip of the rear engine oil seal.
-
Using a screwdriver with its tip wrapped with protective tape, pry out the rear engine oil seal.
Note
Be careful not to damage the crankshaft.
-