COMBINATION METER INSTALLATION
CAUTION / NOTICE / HINT
Note
When replacing the combination meter assembly, make sure to replace it with a new one.
Tech Tips
-
Use the same procedure for RHD and LHD vehicles.
-
The procedure listed below is for LHD vehicles.
PROCEDURE
-
INSTALL COMBINATION METER ASSEMBLY
-
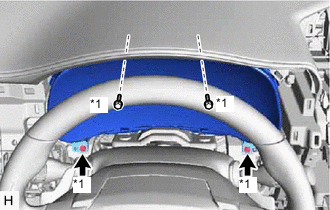
*1 Screw Connect the connectors and attach the clamp.
-
Install the combination meter assembly with the 4 screws.
-
-
INSTALL INSTRUMENT CLUSTER FINISH PANEL SUB-ASSEMBLY
-
INSTALL CENTER INSTRUMENT CLUSTER FINISH PANEL ASSEMBLY
-
INSTALL NO. 2 INSTRUMENT PANEL SAFETY PAD SUB-ASSEMBLY
-
INSTALL INSTRUMENT SIDE PANEL RH
-
INSTALL NO. 1 SWITCH HOLE BASE
-
INSTALL LOWER NO. 1 INSTRUMENT PANEL FINISH PANEL
-
INSTALL NO. 1 INSTRUMENT PANEL UNDER COVER SUB-ASSEMBLY
-
INSTALL NO. 1 INSTRUMENT PANEL SAFETY PAD SUB-ASSEMBLY
-
INSTALL INSTRUMENT SIDE PANEL LH
-
INSTALL UPPER NO. 2 CONSOLE PANEL GARNISH
-
INSTALL UPPER NO. 1 CONSOLE PANEL GARNISH
-
INSTALL UPPER REAR CONSOLE PANEL
-
INSTALL CONSOLE ARMREST ASSEMBLY
-
INSTALL COWL SIDE TRIM BOARD RH (for RHD)
-
INSTALL DOOR SCUFF PLATE ASSEMBLY RH (for RHD)
-
ENABLE AUTOAWAY/RETURN FUNCTION (for Power Tilt and Power Telescopic Steering Column)
-
Restore the autoaway/return function setting to the previous condition by changing the customize parameter.
-