BRAKE MASTER CYLINDER(for RHD) INSTALLATION

PROCEDURE
-
INSPECT AND ADJUST BRAKE BOOSTER PUSH ROD
-
INSTALL BRAKE MASTER CYLINDER SUB-ASSEMBLY
Note
-
The master cylinder and piston are designed so that the piston can easily fall out. Prevent this by making sure the tip of the master cylinder points downward when handling the master cylinder.
-
Make sure foreign matter does not adhere to the piston of the master cylinder. If foreign matter adheres, it off with a cloth. Then apply lithium soap base glycol grease to the entire outer circumference contact surface area of the piston.
-
Install a new O-ring to the brake master cylinder sub-assembly.
-
Install the brake master cylinder sub-assembly to the brake booster assembly with the 2 nuts.
- Torque:
- 12.5 N*m { 127 kgf*cm, 9 ft.*lbf }
-
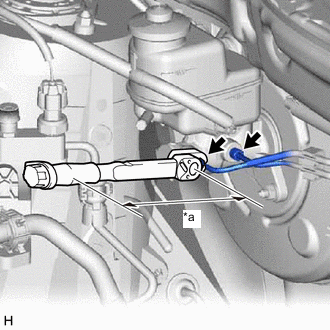
*a Torque Wrench Fulcrum Length Using a union nut wrench, connect the 2 brake lines to the brake master cylinder sub-assembly.
- Torque:
- Specified tightening torque
- 15.2 N*m { 155 kgf*cm, 11 ft.*lbf }
Tech Tips
-
Calculate the torque wrench reading when changing the fulcrum length of the torque wrench.
-
When using a union nut wrench (fulcrum length of 22 mm (0.8661 in.)) + torque wrench (fulcrum length of 162 mm (6.3779 in.)): 13.4 N*m (137 kgf*cm, 10 ft.*lbf)
-
Connect the brake fluid level warning switch connector to the brake master cylinder sub-assembly.
-
-
BLEED BRAKE SYSTEM
-
INSTALL CENTER NO. 1 COWL TOP VENTILATOR LOUVER
-
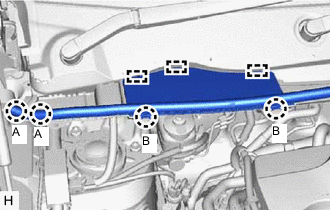
Attach the 2 claws (B) and 3 guides to install the center No. 1 cowl top ventilator louver.
-
Slide the hood to cowl top seal to attach the 2 claws (A).
-