REAR DISC BRAKE PAD REPLACEMENT

CAUTION / NOTICE / HINT
Tech Tips
-
Use the same procedure for the RH and LH sides.
-
The following procedure is for the LH side.
Note
After replacing the disc brake pads, the clearance between the disc brake pads and rear discs becomes larger and the brake pedal feel becomes softer. Therefore, after replacing the disc brake pads, depress the brake pedal several times and check the clearance and brake pedal feel.
PROCEDURE
-
REMOVE REAR WHEEL
-
REAR BRAKE PAD REPLACEMENT MODE
-
DRAIN BRAKE FLUID
Note
Wash off brake fluid immediately if it comes in contact with any painted surface.
-
REMOVE REAR DISC BRAKE PAD
-
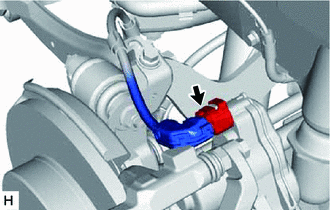
Disconnect the connector from the parking brake actuator assembly LH.
Note
-
Remove any dirt or water from around the connector.
-
Do not allow dirt or water inside the connector.
-
-
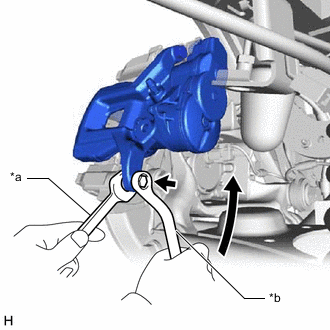
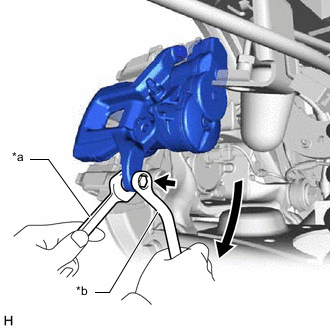
*a Hold *b Turn Hold the rear disc brake cylinder slide pin and remove the bolt.
-
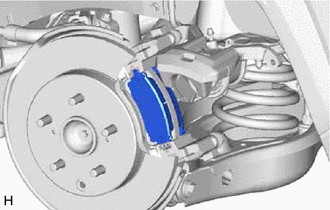
Lift up the rear disc brake cylinder assembly LH as shown in the illustration and remove the rear disc brake pads from the disc brake cylinder mounting LH.
CAUTION:
When removing the rear disc brake pad, make sure that your hands, etc., do not get caught in the rear disc brake cylinder assembly LH.
-
Using a screwdriver, remove the 2 pad wear indicator plates from the rear disc brake pads.
-
-
REMOVE REAR ANTI-SQUEAL SHIM
-
for Type A:
-
Remove the 2 rear No. 1 disc brake anti-squeal shims and 2 rear No. 2 disc brake anti-squeal shims from the rear disc brake pad.
-
-
for Type B:
-
Remove the rear No. 1 disc brake anti-squeal shim, rear No. 2 disc brake anti-squeal shim and rear disc brake anti-squeal shim from the rear disc brake pad.
-
-
-
INSTALL REAR ANTI-SQUEAL SHIM
-
for Type A:
-

Disc brake grease Apply disc brake grease to both sides of the 2 rear No. 1 disc brake anti-squeal shims as shown in the illustration.
Note
Make sure that disc brake grease is applied onto the lining surface.
-
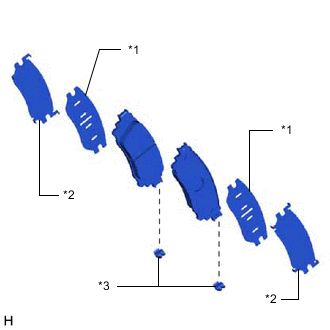
*1 Rear No. 1 Disc Brake Anti-squeal Shim *2 Rear No. 2 Disc Brake Anti-squeal Shim *3 Pad Wear Indicator Plate Install the 2 rear No. 1 disc brake anti-squeal shims and 2 rear No. 2 disc brake anti-squeal shims to the rear disc brake pads.
Note
-
When replacing a worn pad, the shims must be replaced together with the pads.
-
Install the shims in the correct positions and direction as shown in the illustration.
-
-
-
for Type B:
-
*a Inner Side *b Outer Side Disc brake grease Apply disc brake grease to both surfaces of the inner rear No. 1 disc brake anti-squeal shim and only to the inner surface of the outer rear disc brake anti-squeal shim.
Note
Make sure that disc brake grease is applied onto the lining surface.
-
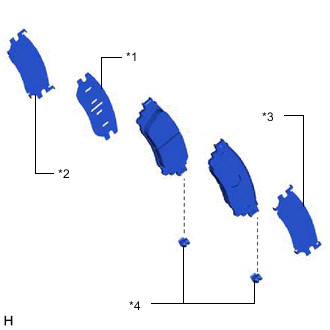
*1 Rear No. 1 Disc Brake Anti-squeal Shim *2 Rear No. 2 Disc Brake Anti-squeal Shim *3 Rear Disc Brake Anti-squeal Shim *4 Pad Wear Indicator Plate Install the rear No. 1 disc brake anti-squeal shim and rear No. 2 disc brake anti-squeal shim to the inner rear disc brake pad.
Note
-
When replacing a worn pad, the shims must be replaced together with the pads.
-
Install the shims in the correct positions and direction as shown in the illustration.
-
-
Install the rear disc brake anti-squeal shim to the outer rear disc brake pad.
Note
When replacing a worn pad, the shims must be replaced together with the pads.
-
-
-
INSTALL REAR DISC BRAKE PAD
-
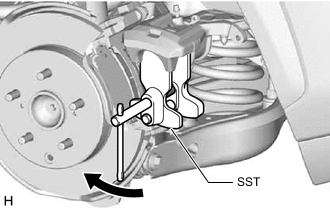
Using SST, push back the rear disc brake piston.
Note
Do not forcibly install the piston into the rear disc brake cylinder assembly LH.
- SST
- 09719-77010
-
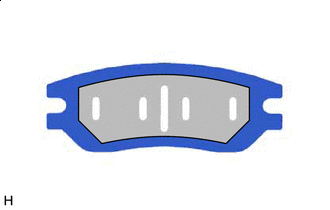
Install the 2 new pad wear indicator plates to the rear disc brake pads.
Note
Install the pad wear indicator plates in the correct positions and directions.
-
Lift up the rear disc brake cylinder assembly LH and install the rear disc brake pads to the disc brake cylinder mounting LH.
CAUTION:
When installing the rear disc brake pad, make sure that your hands, etc., do not get caught in the rear disc brake cylinder assembly LH.
Note
Make sure there is no oil or grease on the friction surface of the pads and disc.
Tech Tips
If the rear disc brake pad has an identification mark, be sure to confirm the installation location.
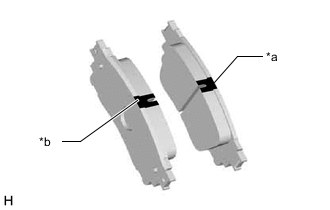
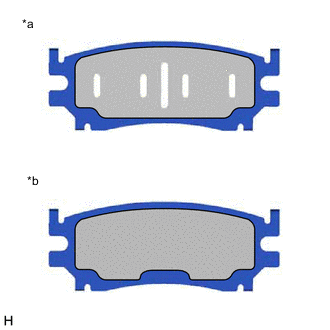
*a Inner Side (Purple) *b Outer Side (White) -
*a Hold *b Turn Hold the rear disc brake cylinder slide pin and install the rear disc brake cylinder assembly LH to the disc brake cylinder mounting LH with the new bolt.
- Torque:
- 34.3 N*m { 350 kgf*cm, 25 ft.*lbf }
-
Connect the connector to the parking brake actuator assembly.
-
Depress the brake pedal several times.
-
-
ADD BRAKE FLUID
-
INSTALL REAR WHEEL
-
RECOVERY TO NORMAL