FRONT BUMPER(except Sport Package) INSTALLATION
CAUTION / NOTICE / HINT
PROCEDURE
-
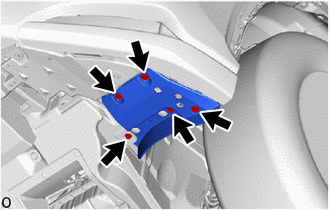
INSTALL FRONT BUMPER SIDE RETAINER LH
-

Attach the 2 claws to install the front bumper side retainer LH.
-
Attach the clip.
-
Install the 2 screws.
-
-
INSTALL FRONT BUMPER SIDE RETAINER RH
Tech Tips
Use the same procedure described for the LH side.
-
INSTALL FRONT BUMPER REINFORCEMENT SUB-ASSEMBLY
-

Install the front bumper reinforcement sub-assembly with the 6 bolts.
- Torque:
- 34 N*m { 347 kgf*cm, 25 ft.*lbf }
-

Attach the 4 clamps to install the engine room main wire.
-
-
INSTALL LOWER RADIATOR AIR GUIDE PLATE
-

Attach the 2 clips to install the lower radiator air guide plate.
-
-
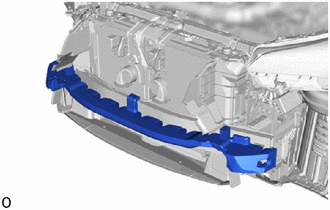
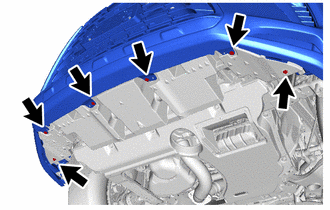
INSTALL FRONT BUMPER LOWER ABSORBER
-
Install the front bumper lower absorber with the 8 screws.
-
-
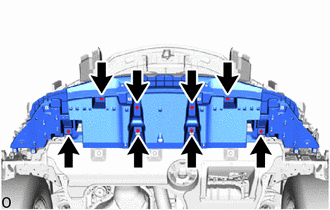
INSTALL FRONT BUMPER ENERGY ABSORBER
-
Install the front bumper energy absorber.
-
-
INSTALL FRONT BUMPER ASSEMBLY
-
w/ LEXUS Parking Assist-sensor System:
Connect the 2 No. 3 engine room wire connectors.
-
w/o LEXUS Parking Assist-sensor System:
Connect the No. 3 engine room wire connector.
-
w/ Fog Light:
Connect the 2 fog light connectors.
-
Connect the 2 clearance light connectors.
-
w/ Headlight Cleaner System:
-
Connect the headlight washer hose.
Tech Tips
Confirm that the headlight washer hose is not twisted.
-
-
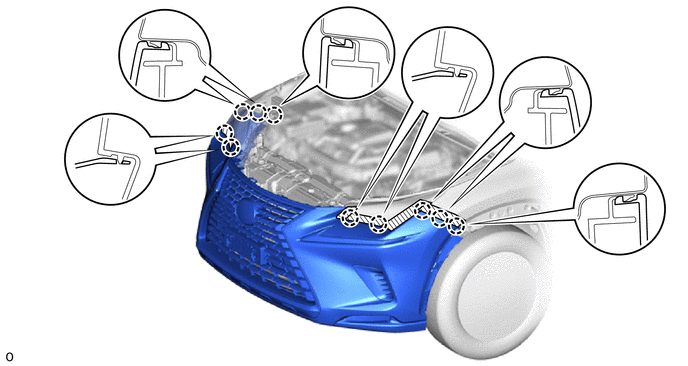
Attach the 10 claws to install the front bumper assembly.
-
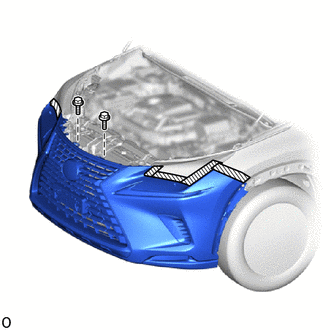
Install the 2 bolts.
-


Protective Tape Install the 2 clips.
-
Remove the protective tape.
-
Install the 6 screws.
-
-
INSTALL FRONT FENDER FRONT SPLASH SHIELD LH
-
Install the front fender front splash shield LH with the 5 screws.
-
-
INSTALL FRONT FENDER FRONT SPLASH SHIELD RH
Tech Tips
Use the same procedure described for the LH side.
-
INSTALL NO. 1 MOULDING TAPE (for Front Fender)
-
INSTALL NO. 2 MOULDING TAPE (for Front Fender)
-
INSTALL FRONT FENDER MOULDING SUB-ASSEMBLY LH (for Front Fender)
-
INSTALL FRONT FENDER MOULDING SUB-ASSEMBLY RH (for Front Fender)
Tech Tips
Use the same procedure described for the LH side.
-
INSTALL RADIATOR GRILLE PROTECTOR
-
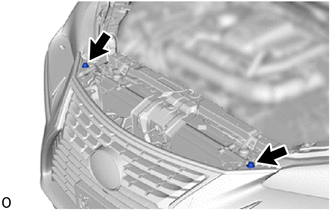
Install the 2 radiator grille protectors.
-
-
INSTALL RADIATOR SUPPORT OPENING COVER
-
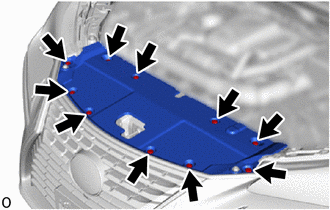
Install the radiator support opening cover with the 10 clips.
-
-
ADD WINDSHIELD WASHER FLUID (w/ Headlight Cleaner System)
-
ADJUST FOG LIGHT AIMING (w/ Fog Light)
-
ADJUST FRONT TELEVISION CAMERA ASSEMBLY (w/ Panoramic View Monitor System)
Tech Tips
When only the front bumper assembly is removed and reinstalled, it is not necessary to adjust the front television camera assembly.(Such as when removing or installing the front bumper in order to remove or install the headlight assembly.)
-
PERFORM CALIBRATION (w/ Intelligent Clearance Sonar System)
-
PERFORM CALIBRATION (w/o Intelligent Clearance Sonar System)