REAR LIGHT ASSEMBLY REMOVAL
CAUTION / NOTICE / HINT
Tech Tips
-
Use the same procedure for the RH and LH sides.
-
The procedure described below is for the LH side.
PROCEDURE
-
REMOVE CENTER BACK DOOR GARNISH
-
REMOVE BACK DOOR SIDE GARNISH LH
-
REMOVE BACK DOOR SIDE GARNISH RH
-
REMOVE BACK DOOR FINISH COVER LH (w/o Power Back Door)
-
REMOVE BACK DOOR FINISH COVER RH (w/o Power Back Door)
-
REMOVE BACK DOOR TRIM BASE (w/ Power Back Door)
-
REMOVE PULL HANDLE (w/ Power Back Door)
-
REMOVE BACK DOOR LOCK COVER (w/o Power Back Door)
-
REMOVE BACK DOOR LOCK COVER (w/ Power Back Door)
-
REMOVE BACK DOOR TRIM BOARD ASSEMBLY
-
REMOVE BACK DOOR OUTSIDE GARNISH SUB-ASSEMBLY
-
REMOVE REAR LIGHT ASSEMBLY LH
Note
If the rear light assembly LH has been removed, replace the rear light gasket with a new one.
-

Protective Tape Apply protective tape around the rear light assembly LH.
-
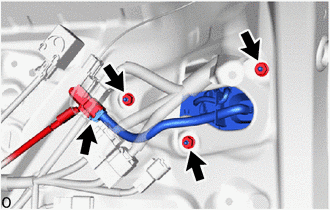
Disconnect the connector.
-
Remove the 3 nuts.
-
Remove the bolt.
-
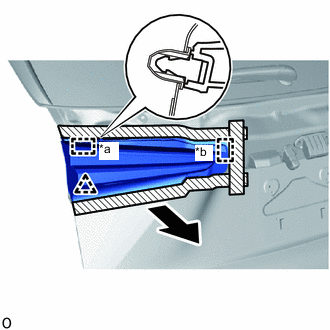
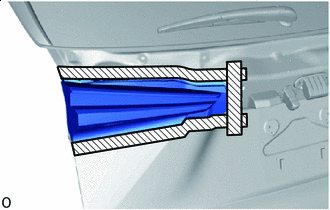
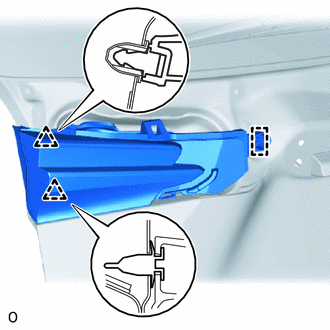
*a Pin *b Guide Detach the guide, pin and clip to remove the rear light assembly LH.
-