REAR SUSPENSION MEMBER REMOVAL

CAUTION / NOTICE / HINT
Tech Tips
-
Use the same procedure for the RH and LH sides.
-
The procedure listed below is for the LH side.
PROCEDURE
-
REMOVE REAR WHEEL
-
REMOVE REAR SUSPENSION ARM COVER LH
-
REMOVE REAR SUSPENSION ARM COVER RH
Tech Tips
Use the same procedure described for the LH side.
-
REMOVE REAR AXLE SHAFT NUT LH (for AWD)
-
REMOVE REAR AXLE SHAFT NUT RH (for AWD)
Tech Tips
Use the same procedure described for the LH side.
-
DISCONNECT REAR SKID CONTROL SENSOR WIRE LH (for 2WD)
-
w/o AVS:
-
w/ AVS:
-
-
DISCONNECT REAR SKID CONTROL SENSOR WIRE RH (for 2WD)
Tech Tips
Use the same procedure described for the LH side.
-
DISCONNECT REAR SPEED SENSOR LH (for AWD)
-
w/o AVS:
-
w/ AVS:
-
-
DISCONNECT REAR SPEED SENSOR RH (for AWD)
Tech Tips
Use the same procedure described for the LH side.
-
DISCONNECT REAR DISC BRAKE CALIPER ASSEMBLY LH
-
DISCONNECT REAR DISC BRAKE CALIPER ASSEMBLY RH
Tech Tips
Use the same procedure described for the LH side.
-
REMOVE REAR DISC
-
REMOVE REAR AXLE HUB AND BEARING ASSEMBLY LH (for 2WD)
-
REMOVE REAR AXLE HUB AND BEARING ASSEMBLY RH (for 2WD)
Tech Tips
Use the same procedure described for the LH side.
-
REMOVE REAR AXLE HUB AND BEARING ASSEMBLY LH (for AWD)
-
REMOVE REAR AXLE HUB AND BEARING ASSEMBLY RH (for AWD)
Tech Tips
Use the same procedure described for the LH side.
-
REMOVE REAR STABILIZER LINK ASSEMBLY LH
-
REMOVE REAR STABILIZER LINK ASSEMBLY RH
Tech Tips
Use the same procedure described for the LH side.
-
REMOVE REAR SUSPENSION BRACE SUB-ASSEMBLY
-
DISCONNECT PARKING BRAKE WIRE ASSEMBLY NO.1
-
REMOVE REAR DISC BRAKE DUST COVER SUB-ASSEMBLY LH
-
REMOVE REAR DISC BRAKE DUST COVER SUB-ASSEMBLY RH
Tech Tips
Use the same procedure described for the LH side.
-
REMOVE REAR HEIGHT CONTROL SENSOR SUB-ASSEMBLY LH
-
DISCONNECT REAR NO. 1 SHOCK ABSORBER BRACKET LH
-
DISCONNECT REAR NO. 1 SHOCK ABSORBER BRACKET RH
Tech Tips
Use the same procedure described for the LH side.
-
DISCONNECT REAR NO. 1 SUSPENSION ARM ASSEMBLY LH
-
DISCONNECT REAR NO. 1 SUSPENSION ARM ASSEMBLY RH
Tech Tips
Use the same procedure described for the LH side.
-
DISCONNECT REAR TRAILING ARM ASSEMBLY LH
-
DISCONNECT REAR TRAILING ARM ASSEMBLY RH
Tech Tips
Use the same procedure described for the LH side.
-
DISCONNECT REAR NO. 2 SUSPENSION ARM ASSEMBLY LH
-
DISCONNECT REAR NO. 2 SUSPENSION ARM ASSEMBLY RH
Tech Tips
Use the same procedure described for the LH side.
-
REMOVE REAR AXLE CARRIER SUB-ASSEMBLY LH
-
REMOVE REAR AXLE CARRIER SUB-ASSEMBLY RH
Tech Tips
Use the same procedure described for the LH side.
-
REMOVE REAR SHOCK ABSORBER ASSEMBLY LH
-
REMOVE REAR SHOCK ABSORBER ASSEMBLY RH
Tech Tips
Use the same procedure described for the LH side.
-
REMOVE REAR UPPER CONTROL ARM ASSEMBLY LH
-
REMOVE REAR UPPER CONTROL ARM ASSEMBLY RH
Tech Tips
Use the same procedure described for the LH side.
-
REMOVE REAR NO. 1 SUSPENSION ARM ASSEMBLY LH
-
REMOVE REAR NO. 1 SUSPENSION ARM ASSEMBLY RH
Tech Tips
Use the same procedure described for the LH side.
-
REMOVE REAR NO. 2 SUSPENSION ARM ASSEMBLY LH
-
REMOVE REAR NO. 2 SUSPENSION ARM ASSEMBLY RH
Tech Tips
Use the same procedure described for the LH side.
-
REMOVE PROPELLER WITH CENTER BEARING SHAFT ASSEMBLY (for AWD)
-
REMOVE REAR DIFFERENTIAL CARRIER ASSEMBLY (for AWD)
-
REMOVE REAR NO. 1 DIFFERENTIAL MOUNT CUSHION (for AWD)
-
REMOVE REAR NO. 1 STABILIZER BAR BRACKET (for LH Side)
-
REMOVE REAR NO. 1 STABILIZER BAR BRACKET (for RH Side)
Tech Tips
Use the same procedure described for the LH side.
-
REMOVE REAR STABILIZER BAR
-
DISCONNECT WIRE HARNESS
-
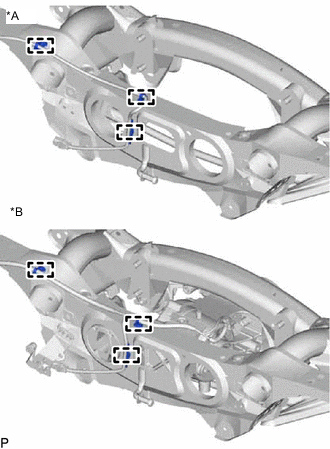
*A for 2WD *B for AWD Detach the 3 clamps and disconnect the wire harness.
-
-
REMOVE REAR SUSPENSION MEMBER SUB-ASSEMBLY
-
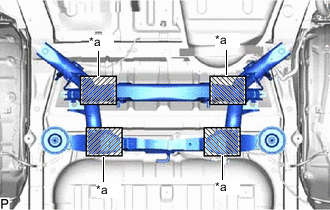
*a Attachment Placement Positions Place wooden blocks or plate lift attachments in the positions shown in the illustration and set an engine lifter underneath the suspension member.
Note
-
Place the wooden blocks or plate lift attachments so that the rear suspension member sub-assembly is level.
-
As the rear suspension member sub-assembly is very heavy, be sure to support it securely.
-
-
Remove the 2 bolts, 2 nuts, 2 rear upper rear suspension member cushion and rear suspension member sub-assembly.
-