REAR STABILIZER BAR INSPECTION
CAUTION / NOTICE / HINT
Tech Tips
-
Use the same procedure for the RH and LH sides.
-
The procedure listed below is for the LH side.
PROCEDURE
-
INSPECT REAR STABILIZER LINK ASSEMBLY LH
Note
Since the rear stabilizer link, rear stabilizer cushions and lock nut are not reusable, new parts must be installed.
-
Inspect the turning torque of the ball joint.
-
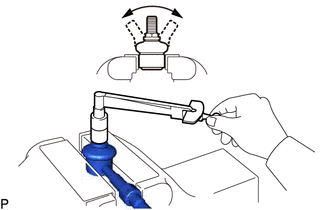
Secure the rear stabilizer link assembly in a vise using aluminum plates.
-
Install the nut to the rear stabilizer link assembly stud.
-
Move the stud back and forth several times. Using a torque wrench, turn the nut continuously at a rate of 3 to 5 seconds per turn and take the torque reading on the 5th turn.
Standard turning torque 0.05 to 1.96 N*m (0.5 to 20 kgf*cm, 0.4 to 17 in.*lbf) If the turning torque is not within the specified range, replace the rear stabilizer link assembly with a new one.
-
-
Inspect the dust cover.
-
Check that the dust cover is not cracked and that there is no grease on it.
-
-