ECM INSTALLATION
PROCEDURE
-
INSTALL NO. 2 ECM BRACKET
-
Install the No. 2 ECM bracket to the ECM with the 2 screws.
- Torque:
- 3.0 N*m { 31 kgf*cm, 27 in.*lbf }
-
-
INSTALL NO. 1 ECM BRACKET
-
Install the No. 1 ECM bracket to the ECM with the 2 screws.
- Torque:
- 3.0 N*m { 31 kgf*cm, 27 in.*lbf }
-
-
INSTALL ECM
-
Install the ECM with the 3 bolts.
- Torque:
- 6.5 N*m { 66 kgf*cm, 58 in.*lbf }
Note
Replace with a new part if it is dropped or if it receives a strong impact.
-
Connect the 2 ECM connectors and lock with the 2 levers.
Note
-
When connecting a connector, make sure that dirt, water and other foreign matter is not stuck between the connector and ECM.
-
Make sure that the 2 levers are securely lowered.
-
-
-
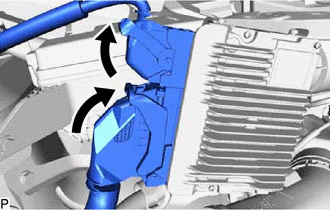
INSTALL AIR CLEANER CASE SUB-ASSEMBLY
-
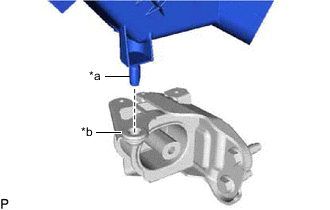
*a Pin *b Grommet Insert the pin of the air cleaner case sub-assembly to the grommet of the engine mounting insulator LH.
-
Install the air cleaner case sub-assembly with the 2 bolts.
- Torque:
- 5.0 N*m { 51 kgf*cm, 44 in.*lbf }
-
Attach the 3 wire harness clamps to connect the wire harness to the air cleaner case assembly.
-
-
INSTALL AIR CLEANER FILTER ELEMENT SUB-ASSEMBLY
-
Install the air cleaner filter element sub-assembly.
-
-
INSTALL AIR CLEANER CAP SUB-ASSEMBLY
-
Attach the 2 clips to install the air cleaner cap sub-assembly.
-
Tighten the hose clamp to secure the air cleaner cap sub-assembly.
-
Attach the wire harness clamp to connect the wire harness to the air cleaner cap sub-assembly.
-
Connect the intake mass air flow meter sub-assembly connector.
-
-
INSTALL BATTERY
-
INSTALL BATTERY INSULATOR
-
INSTALL BATTERY CLAMP SUB-ASSEMBLY
-
CONNECT CABLE TO POSITIVE BATTERY TERMINAL
-
CONNECT CABLE TO NEGATIVE BATTERY TERMINAL
Note
When disconnecting the cable, some systems need to be initialized after the cable is reconnected.
-
PERFORM INITIALIZATION