ACTIVE REAR WING INSTALLATION
PROCEDURE
-
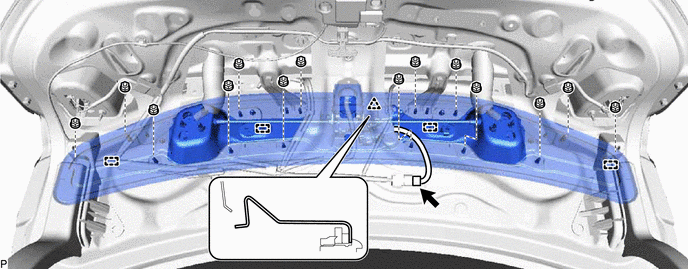
INSTALL ACTIVE REAR WING ASSEMBLY
-
Engage the clip and 4 guides.
-
Install the active rear wing assembly with the 14 nuts.
- Torque:
- 5.5 N*m { 56 kgf*cm, 49 in.*lbf }
-
Connect the connector.
-
-
INSPECT REAR SPOILER SUB-ASSEMBLY
-
Check the difference in level "a" between the luggage compartment door panel and the upper surface of the rear spoiler sub-assembly when the rear spoiler sub-assembly is fully closed.
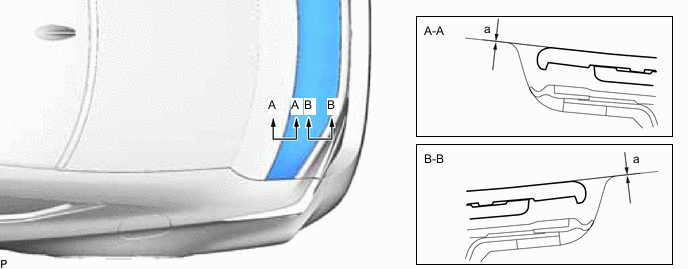
Standard Area Measurement Area Measurement A - A 0 + 1.5 mm (0 + 0.0591 in.)
0 - 1.5 mm (0 - 0.0591 in.)
B - B 0 + 1.5 mm (0 + 0.0591 in.)
0 - 1.5 mm (0 - 0.0591 in.)
Tech Tips
-
"+" represents the condition that the rear spoiler sub-assembly is above the panel level. "-" represents the condition that the rear spoiler sub-assembly is below the panel level.
-
Use the same procedure for the RH side and LH side.
-
-
-
ADJUST REAR SPOILER SUB-ASSEMBLY
Tech Tips
Use the same procedure for the RH side and LH side.
-
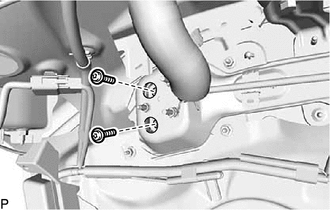
Using a T30 "TORX" socket wrench, remove the 2 bolts.
-
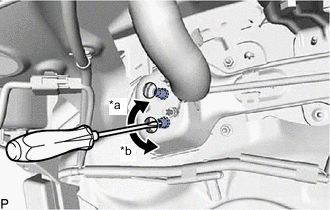
*a Up *b Down Using a screwdriver, adjust the 2 collars of the top cover lock control link sub-assembly LH so that the heights of the rear spoiler sub-assembly and luggage compartment door panel are aligned.
-
Using a T30 "TORX" socket wrench, install the 2 bolts.
- Torque:
- 5.1 N*m { 52 kgf*cm, 45 in.*lbf }
-
-
INSTALL REAR SPOILER CAP (for LH Side)
-
Clean the rear spoiler drain.
-
Remove any remaining double-sided tape from the rear spoiler drain.
-
Wipe off any tape adhesive residue with cleaner.
-
-
Remove the release paper from a new rear spoiler seal.
Tech Tips
After removing the release paper, keep the exposed adhesive free from foreign matter.
-
Install the rear spoiler seal to the rear spoiler drain.
-
Install the rear spoiler cap with the 3 nuts.
- Torque:
- 6.7 N*m { 68 kgf*cm, 59 in.*lbf }
-
-
INSTALL REAR SPOILER CAP (for RH Side)
Tech Tips
Use the same procedure as for the LH side.
-
CONNECT SLIDING ROOF DRAIN HOSE
Tech Tips
Use the same procedure for the RH side and LH side.
-
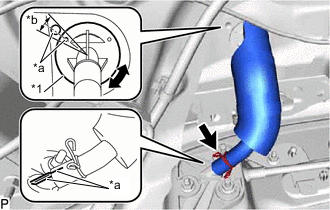
*1 Sliding Roof Drain Grommet *a Alignment Mark *b 20° or less Turn the sliding roof drain grommet as shown in the illustration and align the alignment marks.
-
Expand the clip to connect the rear sliding roof drain hose as shown in the illustration.
Tech Tips
Slide the hose to the base of the drain pipe.
-
Release the clip to secure the rear sliding roof drain hose.
-
-
INSTALL LUGGAGE COMPARTMENT DOOR HINGE COVER LH
-
INSTALL LUGGAGE COMPARTMENT DOOR HINGE COVER RH
-
INSTALL LUGGAGE COMPARTMENT DOOR COVER
-
INITIALIZE ACTIVE REAR WING SYSTEM
-
CHECK ACTIVE REAR WING SYSTEM